After my husband and I made a set of pivoting clamps for my copper pipe tapestry looms, see this post: LINK
I thought…. oh, would it ever be great if we could make a stand for the looms.
I’ve been using a music stand as an easel, which works great for my little 8 inch Mirrix loom, but it was just not good for the larger copper pipe looms.
Luckily, last fall, I bought a length of 3/4 inch copper tubing at a garage sale- what a deal!
I paid $2(!) for 14 ft of copper tubing! (The people used to run a ‘You Pick’ farm but were selling up all their irrigation equipment, including this unused chunk of copper tubing! wowsa).
I was convinced that we could uncoil it and use it to make a stand.
Jim was not at all convinced!
He insisted that we buy steel conduit, because it was stronger. And straighter. And it hadn’t been coiled up by an over eager giant.
I hated it.
I stuck to my guns, and kept saying that yes, yes, the wonky curves in the tubing will be fiiiiiiiiine!!!!!
Jim was still not convinced.
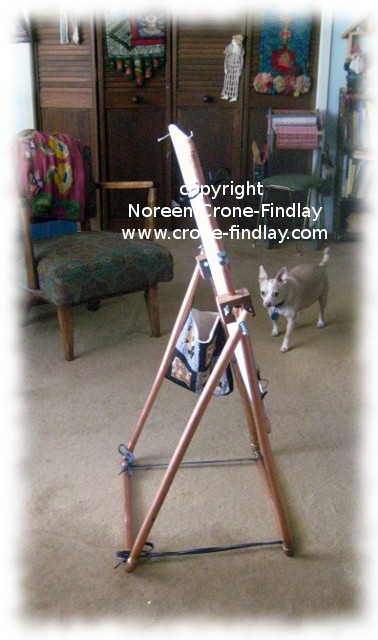
But, together, we bodgered together a slightly wonky, somewhat Dr Seuss-y stand for my copper pipe looms and
I LOVE LOVE LOVE it!
We made 2 ‘U’ shapes…. basing the measurement for the inside tube on the width of my looms (we made 3 copper pipe looms that are the same width- at some point I’ll explain why) plus the height I wanted the stand to be.
Then, we made the larger ‘U’ shape to fit around the first ‘U’, so it can fold flat.

copyright Noreen Crone-Findlay http://www.crone-findlay.com
I wanted long pivot bolts so I can hang scissors and bobbin baskets and bags off the sides of the loom.
And, yep, the ‘stops’ are boot laces. Humble, but functional!

copyright Noreen Crone-Findlay http://www.crone-findlay.com
Yes, it’s a little wonky, but I LOVE it! It’s so much more ergonomically friendly to weave at it now than on the music stand.
And, now I don’t have to set up the saw horses to warp the copper pipe looms.
The loom can be easily rotated in the stand. Bliss.
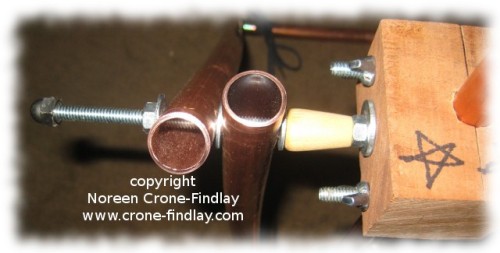
This photo shows how we put a longer bolt into the pivot clamp so that it can easily pass through the 2 copper pipes of the stand.
I wanted a long bolt because I hang bags for bobbins and yarn, as well as scissors, from it for convenience.
I put a wooden bead between the stand and the pivot clamp (as well as washers) to space it out from the wing nuts of the clamps.
By tightening the bolt on the outside of the pivot, against the stand, it puts enough pressure on the loom to keep it from spinning while you are weaving.
I sit with the lower edge of the loom in my lap, which keeps it from spinning, but, eventually, when I have woven to the top, I can see that I will have to change that position.
Will post about that when I get there!
And, it is very easy to release one loom and transfer another loom onto the stand. 🙂
I am such a happy camper.
Okay, back to my weaving. 🙂


Fabulously creative! This is so clever and so functional (at least to the extent I can understand what you’ve gone…). Good on you!
LikeLike
Thank you, thank you! I am just delighted with it! It works so well! Having a sturdy, multi-functioning stand for a loom is just the ~best~ 🙂
LikeLike
Pingback: Pivoting clamp for pipe style tapestry loom | Tottie Talks Crafts Blog
Thanks much. Now I can make one for myself and 2 for my weave loving Grandkids. Yay!
LikeLike
That’s great, Elizabeth! That’s why I posted this- so that other people can make them for themselves 🙂 Happy weaving!!! 🙂
LikeLike
How long are the “legs”? I’m thinking around 28″ based on the legs of my little folding table?
LikeLike
The inner leg (the ‘U’ that fits inside the outer ‘U’) is cut to 26 inches. The pivot point is one inch down from the top of that. The elbows add height. The outer ‘U’ has to fit over the inner ‘U’, so don’t cut your pipe until you have completely soldered the inner ‘U’ together. Then take your measurements off that.
LikeLike
Sounds good, thanks! First step will be to replace the blade of the pipe cutter… don’t ask, LOL!
LikeLike
LOL… we broke one of our pipe cutters! So, yes, a sharp blade in the cutter is essential! Happy building!
LikeLike
So far so good.. all we have left to do is find a spacer bead or something and drill the holes for the legs.. everything else is ready! Should have it all set up and ready by today or tomorrow! 🙂
Then I’ll probably make a set of clamps for my other loom with thicker pipes.. the clamps we made would work with a Mirrix loom because the pipes are 5/8″.. (aka as 1/2 inch pipe, that’s the outer diameter)…
Thanks so much for posting this! I may someday try PVC pipe, but I already had most of what I needed to make it with copper pipe…
LikeLike
I am so glad that it went so well, Jessica! I have built another version of the loom stand and will be posting info next week when I have met the stiff deadline that I am working to.
To make the spacer bead, you can simply cut a small piece of dowel or squared off wood cut to the right thickness, and drill a 1/4 inch hole in it. Voila! Instant spacer bead! 🙂
LikeLike
And, I agree that making a stand for the Mirrix loom is a great idea! I don’t use my 16 inch loom much, because I don’t like the ergonomics of weaving with it on the table- it’s too wide to comfortably weave with it on a music stand like I do with my 8 inch Mirrix. Making one of these stands is definitely the answer!!! 🙂
LikeLike
Can’t wait to see your new version!
I’m almost done with mine, just a bit of fine tuning left to do…
Thanks for the idea of a tree branch, I’ll look outside!
I also need a way to adhere the Mirrix spring tray to copper since gorilla glue did NOT work… Gary is suggesting machine screws for it, I’ll pick some up later… THEN I can warp the loom for real.
Also, since the Mirrix shedding device makes the loom top heavy, I need some kind of weight on the bottom, or/and a way to keep it from moving.. the spacer and wing nuts might help there, but I’m thinking a weight on the bottom won’t hurt.
I don’t know if an actual Mirrix loom would be top heavy like this or not?
For a weight, since we have a lot of sand that my youngest used to make Russian juggling balls, I’ll find something to fill with sand.. so it’ll be ALMoST like a warp-weighted loom, ha!
LikeLike
Hi Jessica, Have you tried E6000 glue? It’s very strong- so is epoxy. But, I think that the machine screws are going to be the best choice. And, yes, there is a fair amount of weight on the bottom of the Mirrix, which I hadn’t thought of as being ballast for the shedding mechanism, but it can see that it would work that way. Weighting the lower end is definitely going to be a good idea, as you want it balanced in the stand. Good luck and Happy Weaving!!!! 🙂
LikeLike
Pingback: Folding stand for my Mirrix tapestry loom | Tottie Talks Crafts Blog
Soooo, are you making these to sell?? Please please. My husband made a copper pipe loom for me (Archie Brenner ‘ s version). But your stand would make it “golden”.
LikeLike
I’m sorry, Linda, but I am not making them for sale. If your husband was able to make you the loom, then he’ll be able to make the stand, as it’s the same kind of techniques. Happy weaving!
LikeLike