We all need ‘joy bursts’ that cause us to suddenly laugh in a way that dissolves the bubble of misery that has been puffed up all over the place these days.
Laughter is good medicine! And sure enough, when I show people the Flying Joy Pig, their first response is usually a hoot of laughter followed by an ‘oooh so cute’.
These little piggies really are adorable and they do their job of making people laugh and smile very well! AND they are a lot of fun to make, so I highly recommend these little sweeties as Kindness Critters!
When I say that the Flying Joy Pig is small…. I mean it! They are only 1 1/2 inches (4 cm) from tip of nose to curly tail.
They are so satisfying to make. I hope you will enjoy them and make lots and lots of them to merrily fly out into the world and spread their sweet joyful kindness and delight wherever they flutter!
PS: If you want to wear the Flying Joy Pig as a pin, then stitch a pin back to it. They would also make delightful earrings. A jump ring with a tiny brass safety pin attached to one of the wings allows the Flying Joy Pig to be pinned to a lapel, bag or hat. A loop of yarn makes it easy to hang the Flying Joy Pig on a push pin or in a plant or from the rear view mirror.
Yikes- the stress of the insanity out in the world these days is causing me to have panic attacks in the night.
I have found that getting up and warping up my Kindness Loom really helps me to get myself regulated and able to sleep again.
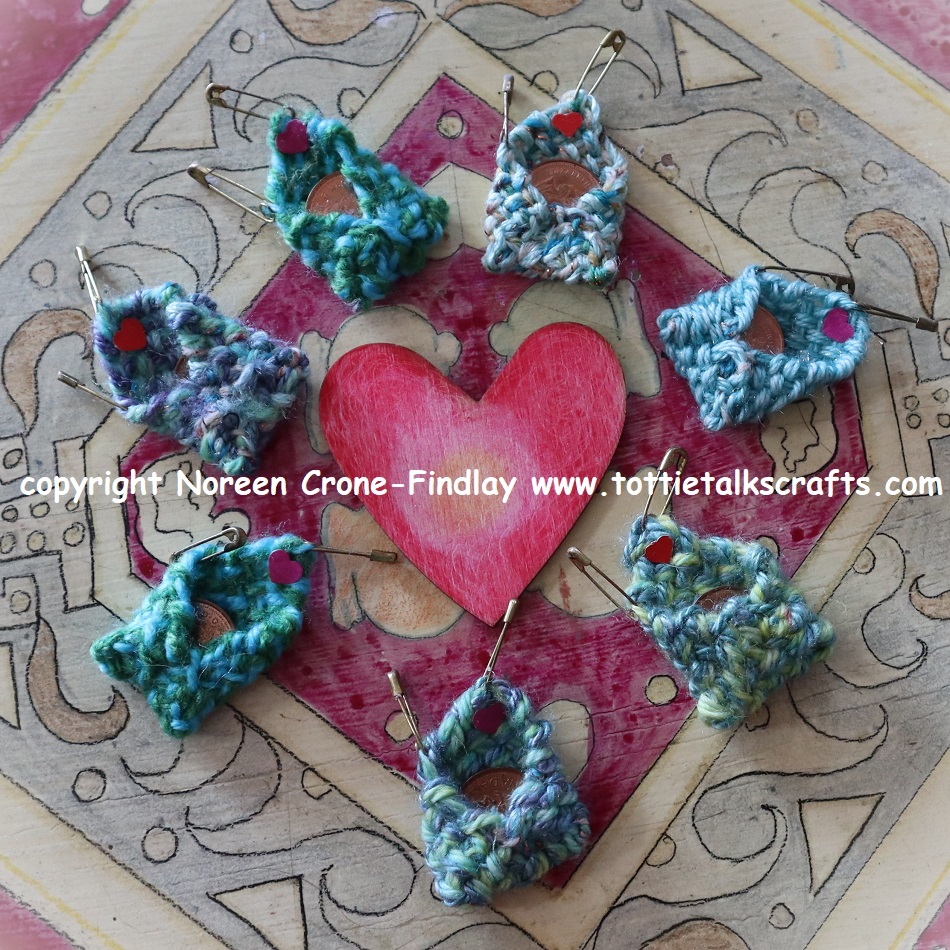
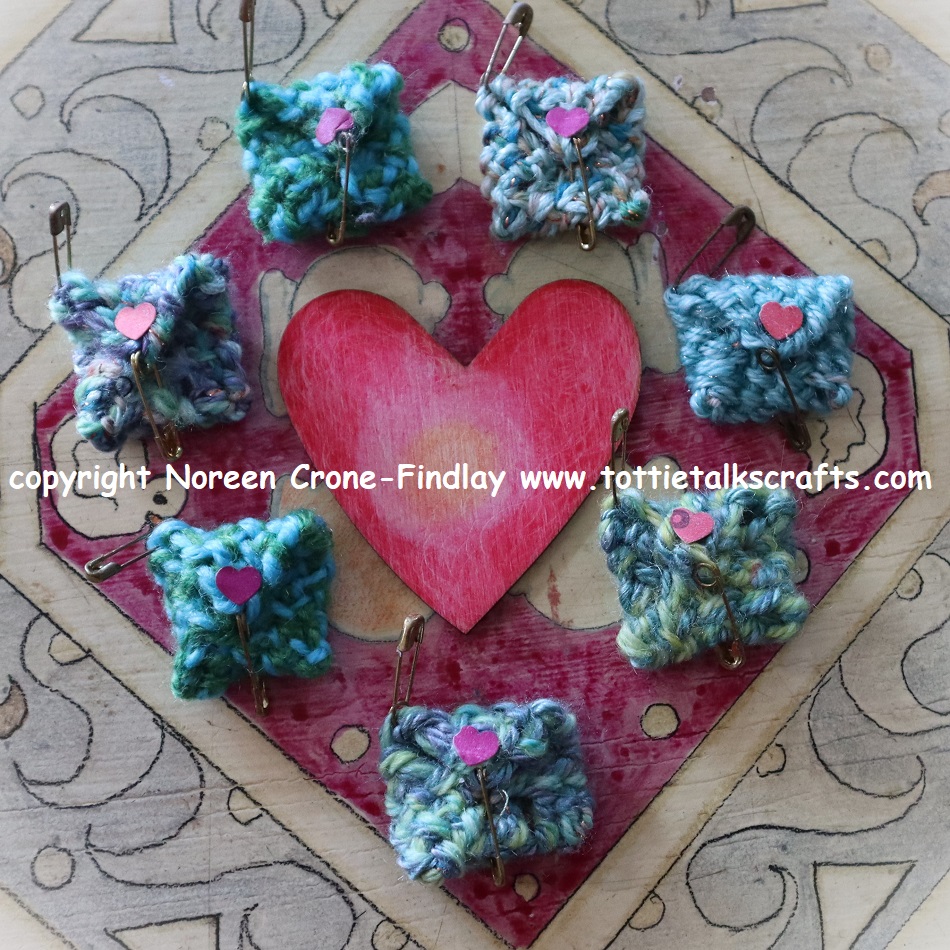
I have been working very hard on a new pattern for the Weaving Kindness project and hope to have it done soon so I can get it out into the world. But last night, I needed a break from ‘figuring it out’ so it was the Lucky Penny Pouches that called to me:
I find it so soothing to weave and stitch together the Lucky Penny Pouches…. these are going to be going to friends and family members that are dealing with challenges, and it made my heart happy to be weaving Kindness for them.
Sometimes, I get freaked out and think that my little bit of Kindness Weaving isn’t going to make any difference, but today I was re-assured by a post that Martha Beck wrote about using your art to calm down your amigdala as a way of healing your broken heart and thus healing the broken heart of the world.
That was so helpful! So, I will keep weaving threads of hope and healing, and hope that you will, too!
Big hugs ❤
I posted YouTube videos that show how to weave a square on the Kindness Loom and how to make a Lucky Penny Pouch. Those links are at: L I N K
Be well, be safe, be kind, take good care, get some sleep and WEAVE ON! ❤
When I was a little girl, I remember when my parents saw a penny on the ground, they would say:
“Find a Penny, Pick it Up, and on that day, you’ll have good luck!”
Then, they would offer it to someone, saying: “Here’s a Lucky Penny for you! Good Luck!”.
I love making little gifts to brighten the day of someone (friend, family. acquaintance or stranger) and
I decided to make a new little Kindness gift.
It seems to me that right now, everyone we know (and don’t know) all need to feel like some Good Luck will come their way,
so that’s why I have come up with the Lucky Penny Pouches.
I have made this step by step video tutorial to show how to weave and make a Lucky Penny Pouch (for good luck!) using the Kindness Loom that I designed for my ‘Weaving Kindness Project’.
The Lucky Penny Pouches turn ‘lost and found’ pennies into little Good Luck treasures that say to people: You matter! I wish you well! and Good Luck!
The Lucky Penny Pouches are quick and easy and fun to make and to give away. You’ll need the Kindness Loom and to weave one square on it. The video tutorial is available on my youtube channel.
When we offer a tiny handmade gift that shows another person that we care about them and that they matter, it is a small act but an essential one.
It’s so lovely to brighten another person’s day by delighting them with a tiny handmade comfort gift.
Amazingly enough, that makes your day so much better, too! What a good way to help to create connection, community and hope.
That is why I have designed a whole bunch of charming little woven ‘Kindness Gifts’ and a small simple, eco friendly pin loom, the Kindness loom, that people can make for themselves using just a few household tools and upcycled materials.
The Kindness looms are perfect for weaving all manner of petite, simple and sweet Kindness gifts that are easy to make. They are a lovely a way to say: “I wish you well”.
The Kindness Pin Loom is all about weaving small tokens of caring, kindness, comfort, wishes for good luck, sweet peace and blessings! From the tiniest flying pigs, Lucky Penny pouches, Comfort Bears, Vasilisa Dolls, Angels, Goddesses to ‘Portrait’ Dolls in homage to family and friends, the Kindness Pin Loom can weave them all, because I am designing them with love and best wishes!
Making things that embody joy and whimsy in small things can add up to great goodness, can’t it? Yup. ❤
As I make the pdf’s for the Kindness projects that I have designed to weave on the Kindness Loom and load them up to my etsy shop, where they will be for sale for a modest fee, I’ll post the links to an all links page LINK And, as I make youtube videos on how to weave on the Kindness Loom as well as some freebie projects, I’ll post those links on the same page, too.
PDF FOR STEP BY STEP INSTRUCTIONS SHOWING HOW TO MAKE A UNIQUE KINDNESS LOOM
This PDF of Step by Step Instructions shows how to make a Kindness Pin Loom. It’s the instructions for you to make the loom, not the finished loom. You’ll make your own unique one of a kind Kindness loom using these instructions purchased from my etsy shop.
3– Video tutorial: How to weave a square on the Kindness Loom by Noreen Crone-Findlay
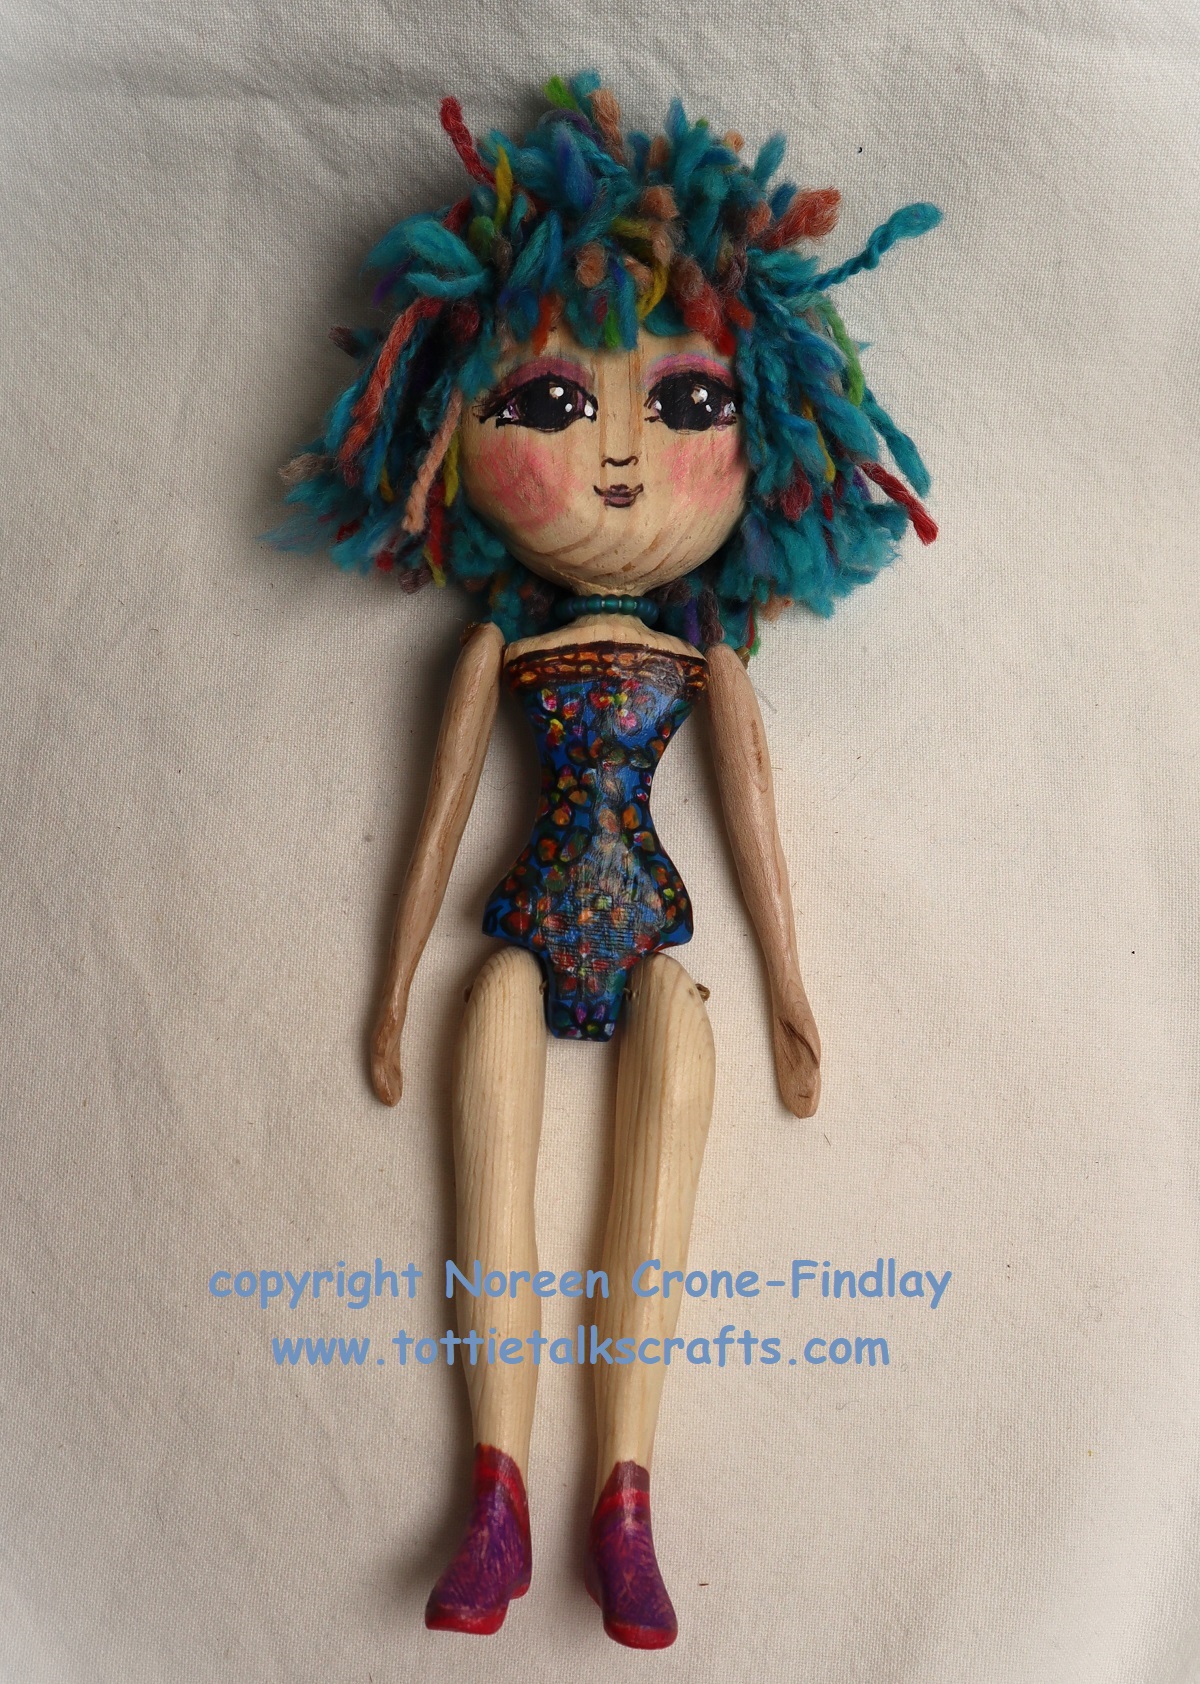
I have loved wooden dolls since I was a very little girl. There is something about a wooden doll that touches my heart deeply. Perhaps it is the energy of the tree still alive in the doll……
I have a very dear friend who is Japanese in origin and Canadian by choice.
Recently, she went back to Japan to visit her parents and help her Mum with a little downsizing.
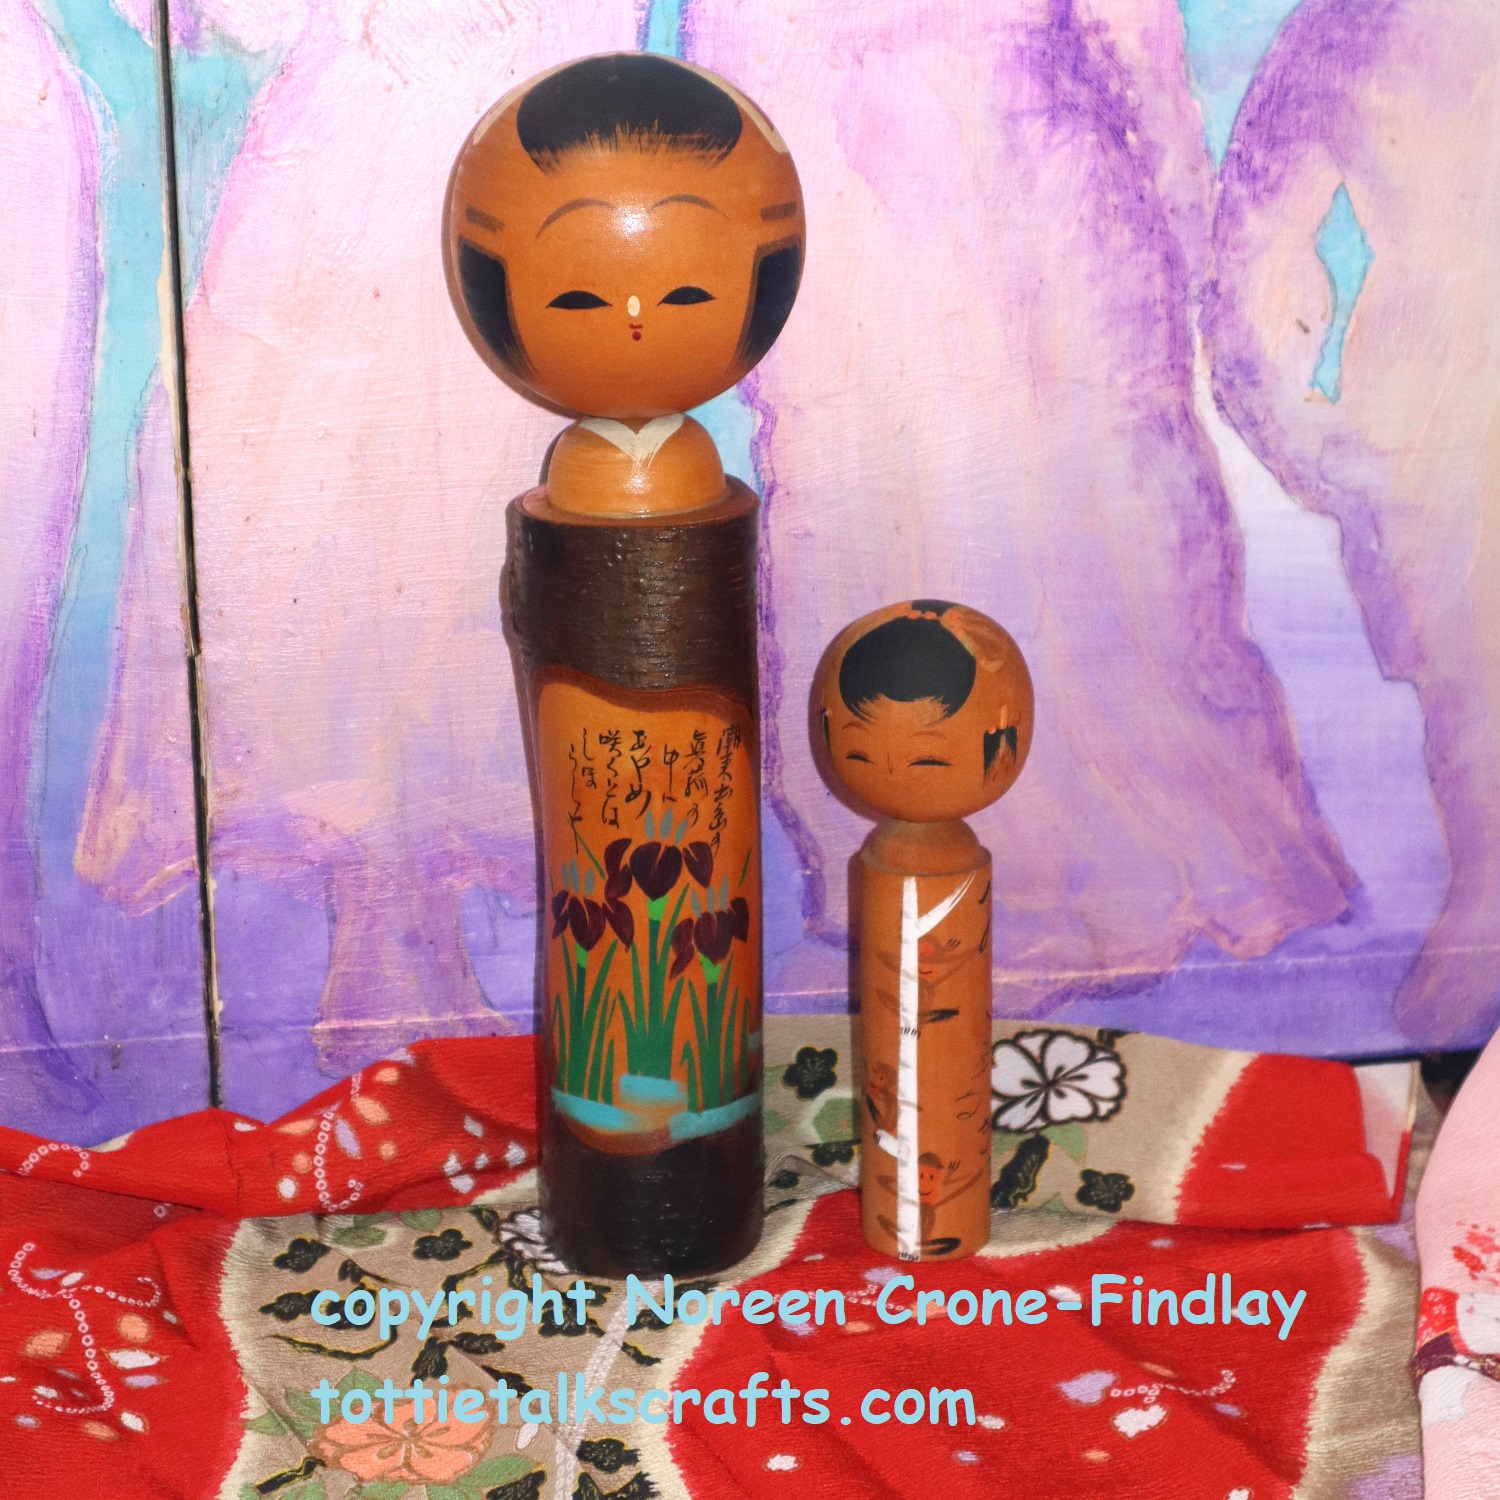
Her Mum decided that she no longer needed to keep these two Kokeshi dolls that had lived with her for probably more than 50 years.
My sweet friend wrapped them in Furoski wrapping cloths which I also LOVE. I have used the Furoshki method of carrying things since I discovered it about 20 years ago-
Here’s a link to a very useful quick Furoshki tutorial from the Japanese government:
The large Kokeshi doll is very heavy and tall- about 14 inches/36 cm. I love that she still has the bark of the tree on her. Her little sister is about 8 inches/20 cm tall and has the ‘See no evil, hear no evil, speak no evil’ monkeys hiding behind a bamboo tree. Delightful!
I treasure these elegant old dolls that came around the globe in my friend’s suitcase- what a special gift!
I am no longer carving wooden dolls, (health issues).
These One of a Kind Wooden Dolls are all for sale. They are $100 each + shipping.
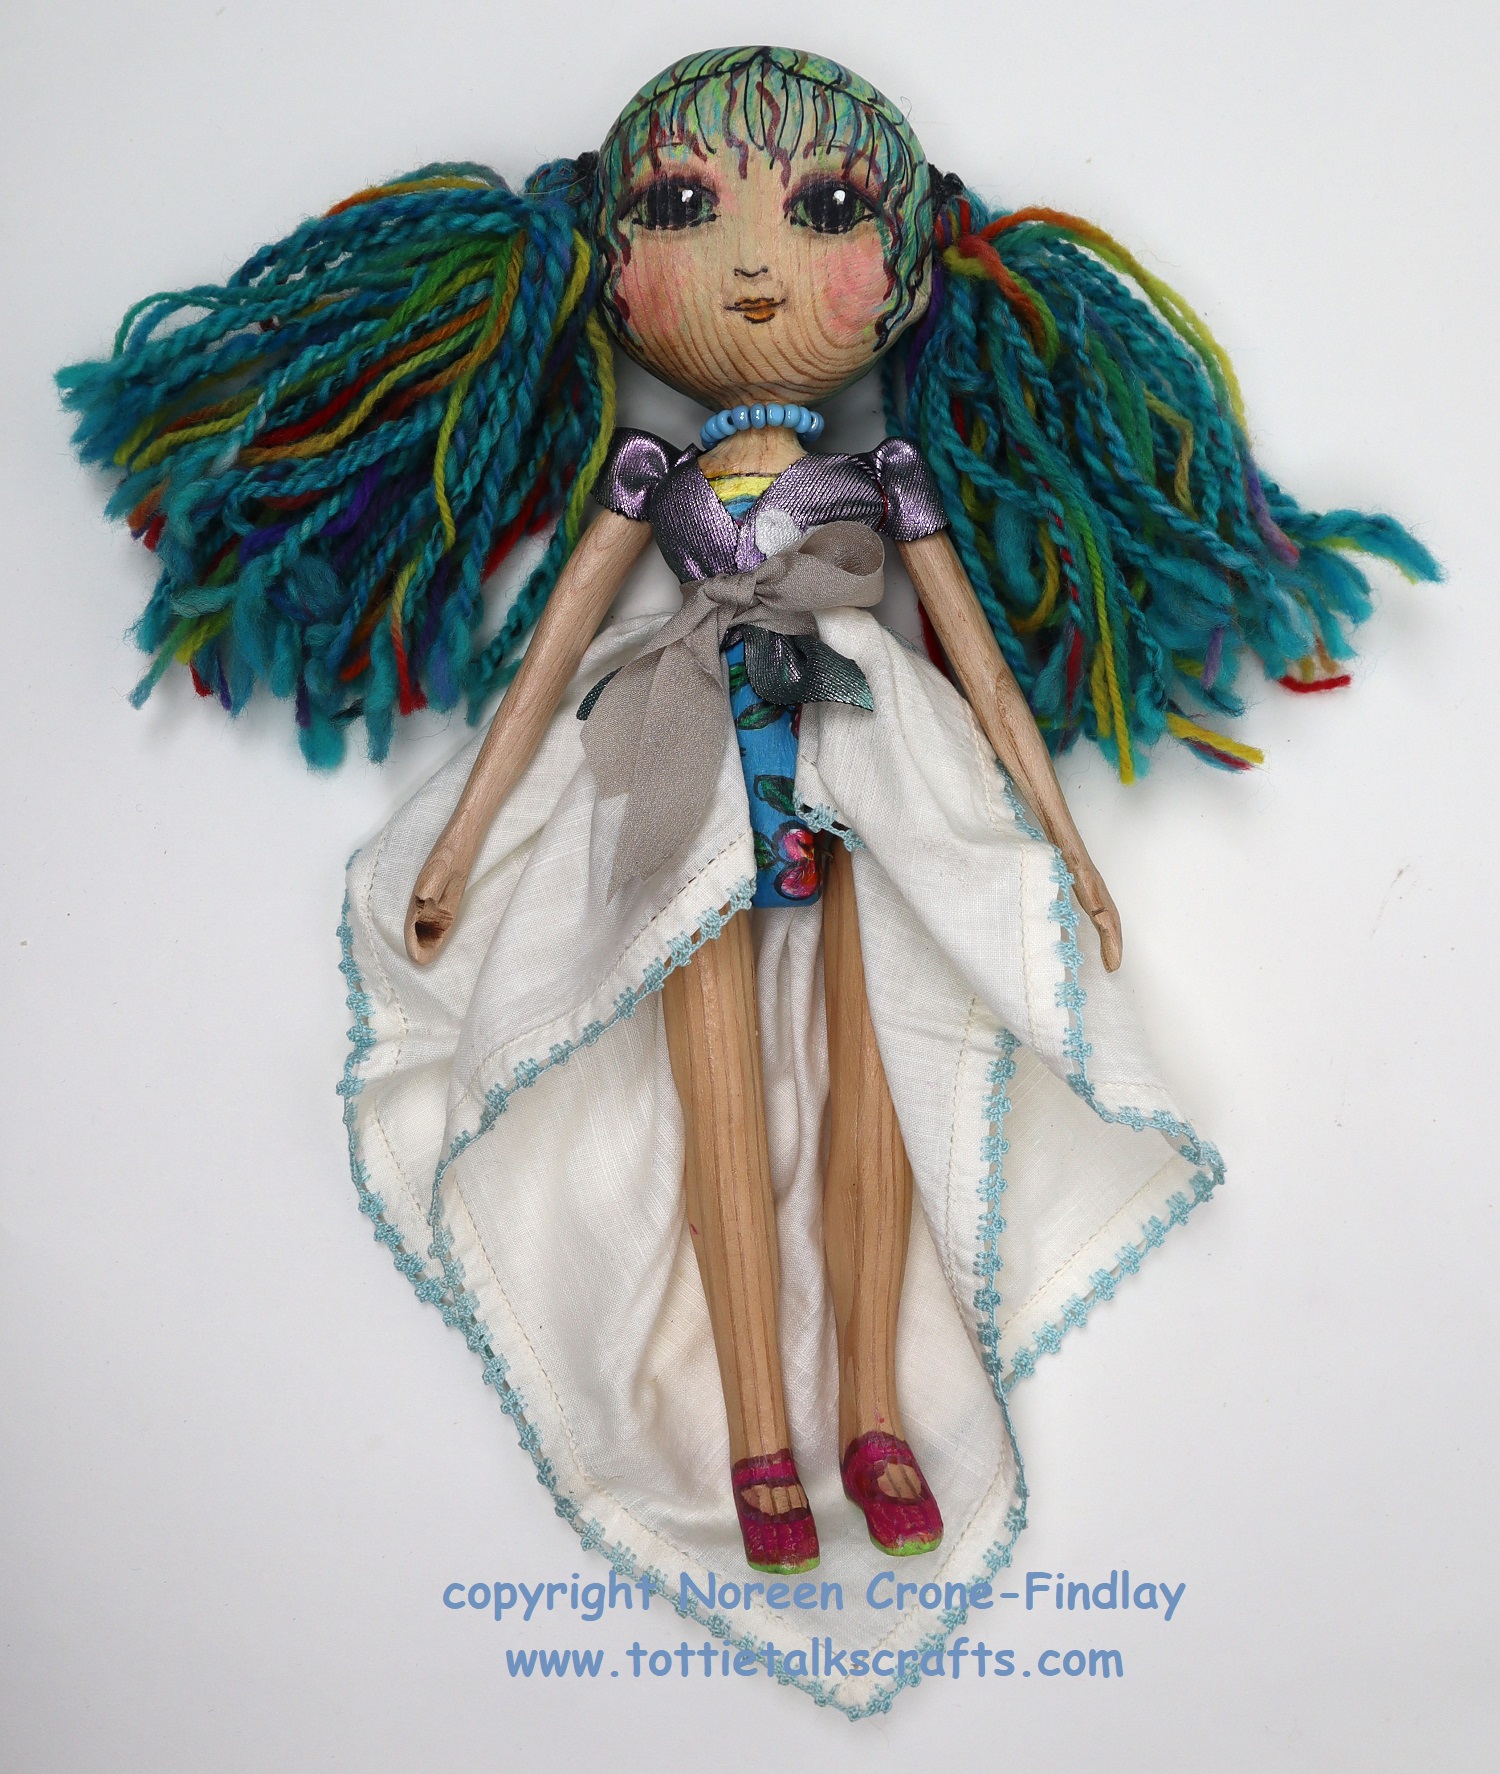
I spent hours making little fitted shimmery vests, and spent more hours messing around with lace for skirts. Sadly, the lace skirts just didn’t cut it.
So, when a dear friend gave me some vintage hankies, I had an ‘aha!’ moment…. and the skirt dilemma was resolved: Tie the hankies on with ribbons. This is a super simple non-sew skirt option that I came up with decades ago for dolls in my book: Soul Mate Dolls: Dollmaking as a Healing Art. It works so well! And, now, I am happy!
I bought the Coquelicot Skirt and Apron patterns last summer after seeing several youtube posts and blog posts about how much people were loving this skirt.
They are designed by a Canadian designer, Melanie Boivin (a genius). Her website is: LINK
To be honest, I found the pattern daunting at first, so decided to make a ‘trial’ skirt before I committed to more expensive fabric. BUT! The instructions are beautifully written, and walk you through the making of the skirt step by step, so my concerns vanished as I was sewing the first iteration. In fact, I can now ‘whip up’ a Coquelicot skirt in a snap. Love love love that!
For ‘trial skirt #1: I made it from a thrift shop find- a queen size 100% cotton knit sheet. I wasn’t sure if the knit would be okay or not, but oh my, I love it!
I wore it non stop all summer and decided that I wanted to make skirt #2 in a combination of fabrics that I had set aside for it in a good place. (LOL, of course I can’t find the ‘good place’ where the fabrics are waiting).
I made a couple of changes to the skirt: I like long skirts, so I lengthened it – but I should have copied the knee length pattern first for the apron before I lengthened it for the skirt. Oops.
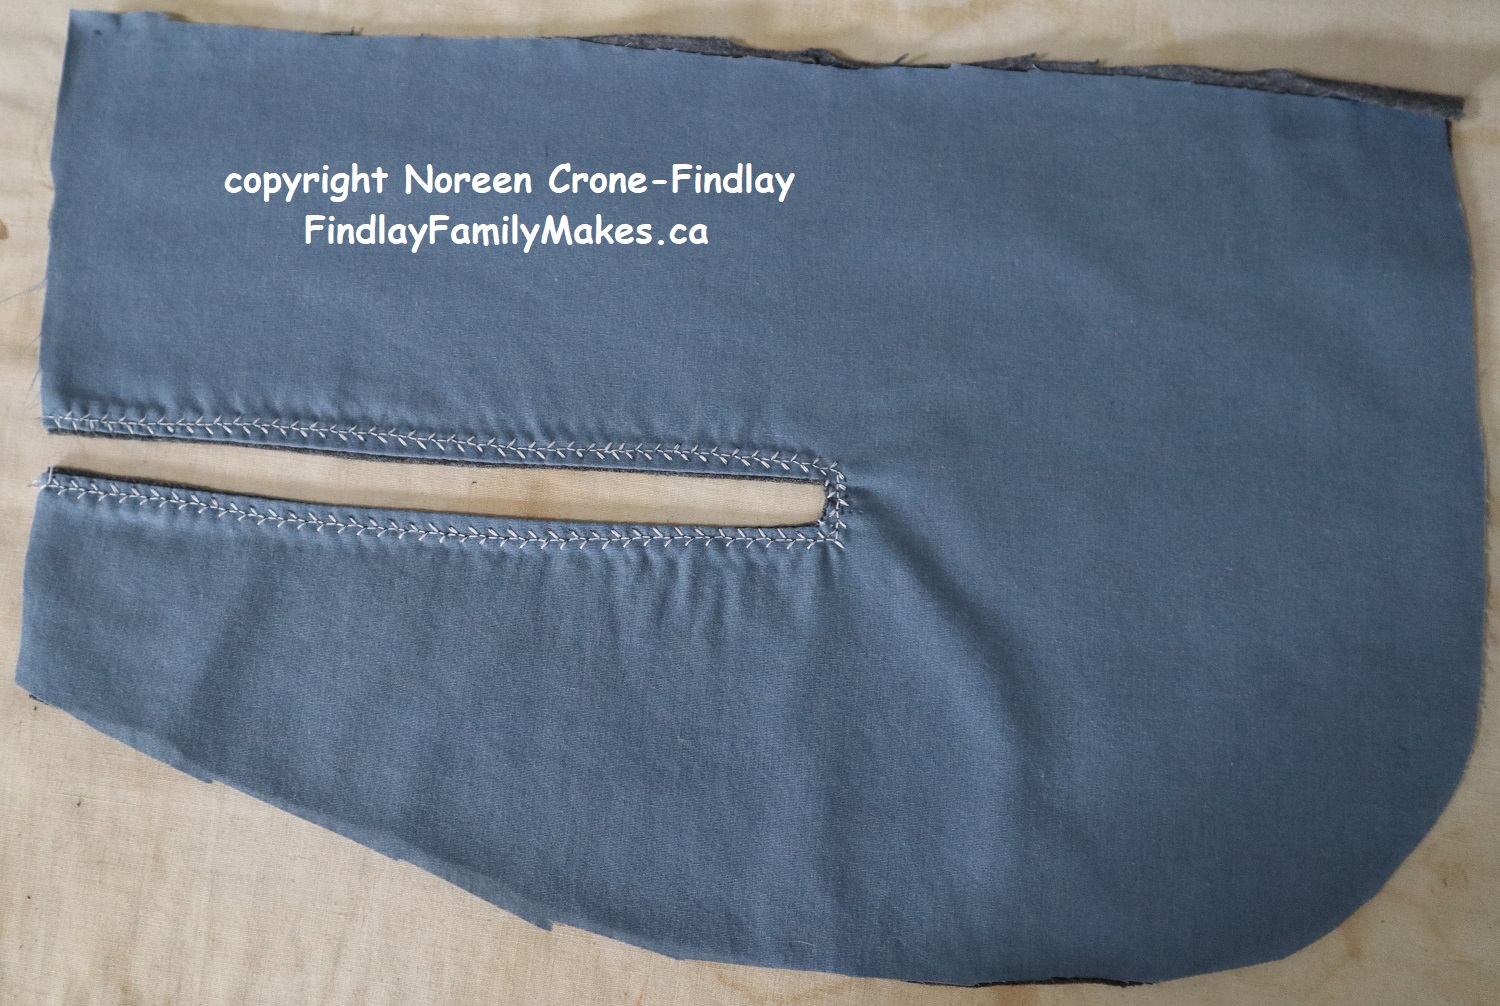
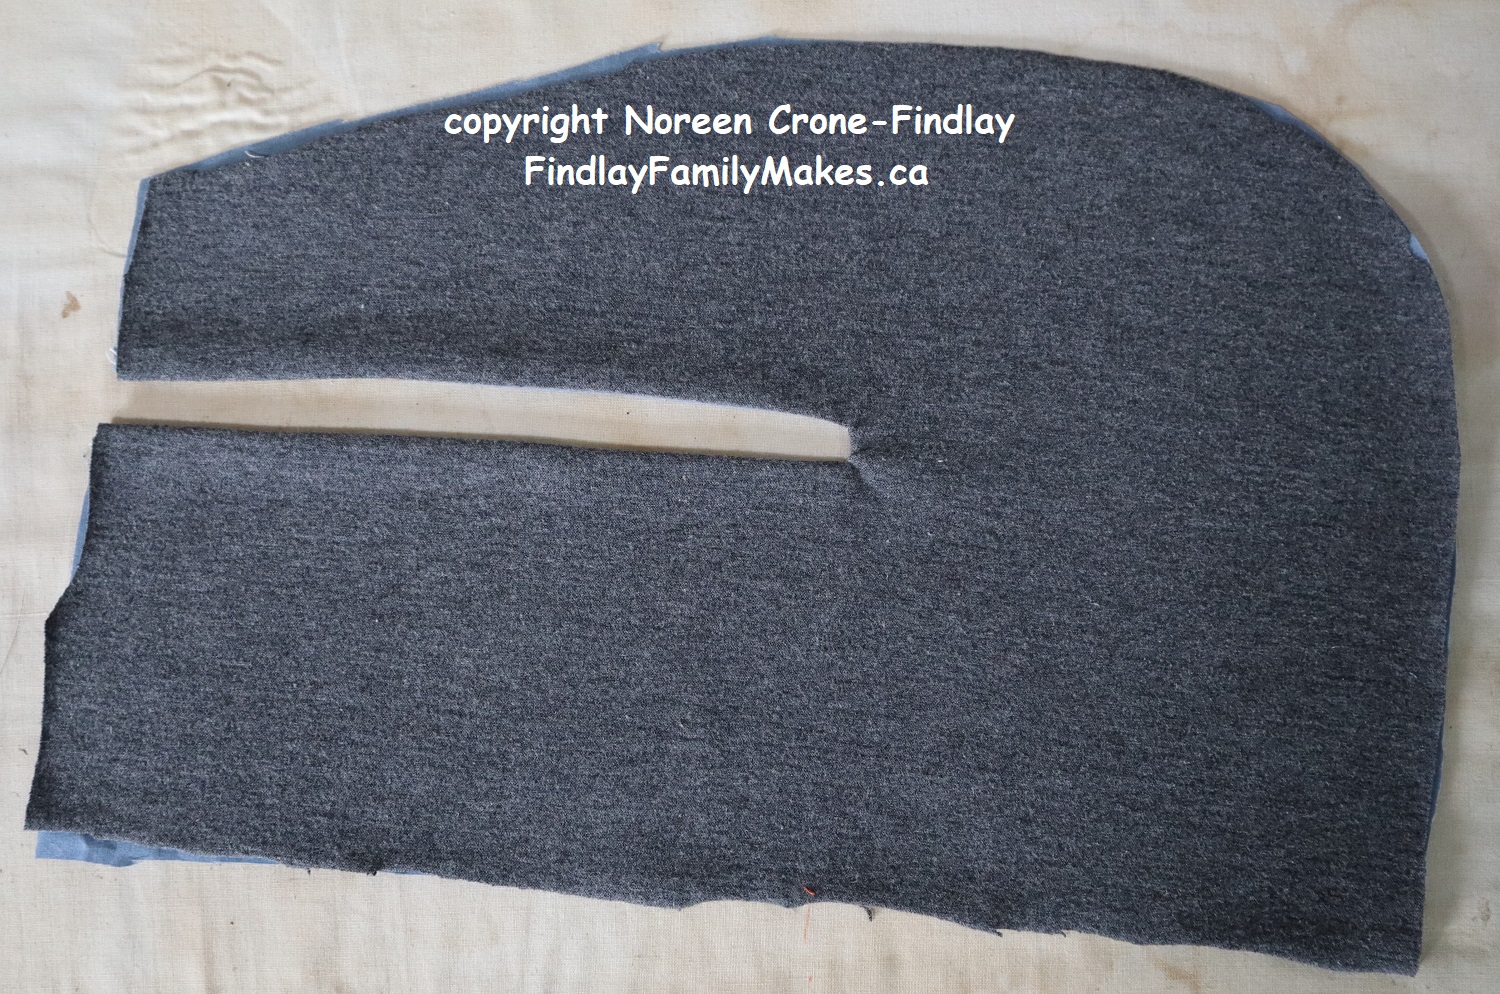
I am not a fan of using bias tape to bind pocket edges, so instead, I used fabric from a sheet that our little dog dug a hole in when she was being oddly enthusiastic about the joys of digging on our bed. Sigh.
I laid the upcycled lining fabric (cut from the doggied sheet) onto the pocket, stitched on the stitching lines,
turned it right sides out, pressed and topstitched the pocket opening
And made the pockets as shown in the pattern.
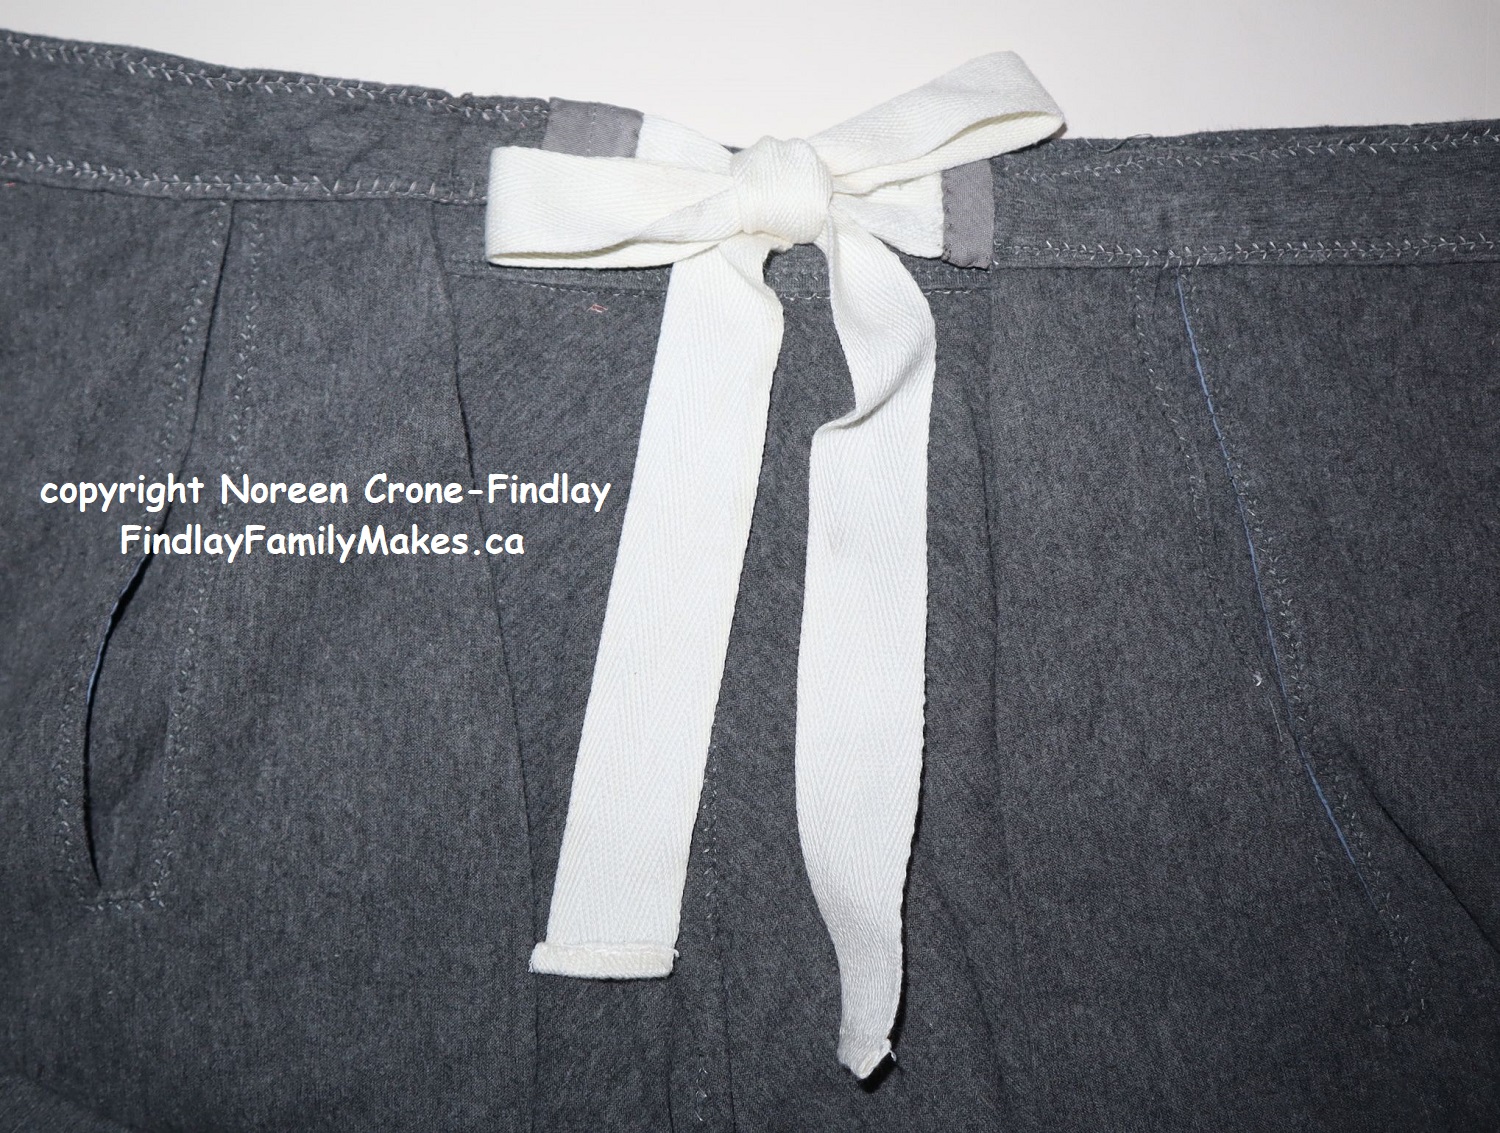
I found that the ‘D’ ring closure was uncomfortable, so I changed over to using gross grain ribbon for the ties for the back of the skirt (which are tied in front before the front is tied with self fabric ties)
Before the pandemic, I made a dress from all kinds of upcycled fabric scraps and and a blouse that I bought in a thrift shop because the fabric looked just like origami fabric.
I was no longer wearing the dress, so I wanted to upcycle it again, and decided that the apron would be a great way to do that. When I cut the dress up, I saved the pocket and sewed it onto the apron.
I found some awesome vintage closures that were supposed to be used on tablecloths, but I think of them as suspender clasps. Anyhow, I love how they make the straps super adjustable for adapting to however many layers I am wearing under the apron.
I LOVE the apron! I will make it again, but with fabric that is less ‘precious’ so that I don’t feel guilty about wiping my hands on it!
Knowing that I know that I absolutely love the Coquelicot skirt and find it incredibly comfortable gave me the confidence to go ahead and use some gorgeous wool fabric that I had been given to make another skirt. I practically live in this skirt now. So comfortable, and the hidden, well supported extra generous pockets are THE BEST!
Then I made another one to wear to the wedding of dear friends- also in gorgeous wool suiting that I had been given and have been holding onto until the perfect project came along. This is the perfect project!
I LOVE this skirt sooooooo much! For summer skirts, I am planning on using floral cotton and also linen from curtains that we no longer have on our windows, And, oh yes…. when that elusive black and white fabric re-appears- well! I will grab it and get sewing before it can get away from me again!
Do I recommend this pattern? You betcha! I am enjoying the skirts that I have made from the skirt pattern so much! And once I make the apron in a more ‘get down and dirty and don’t worry about it’ fabric, I will wear it all the time, too. I love aprons and this one is beautifully designed.