My mother passed away recently, and one of the ways that I have been processing my grief is to take it to my looms and weave about it.
Because I am deeply focused on weaving tapestries and woven pieces for my solo show, ‘Woven Women’, it was natural that this weaving would take the form of a Woven Woman.
My mother suffered from a form of dementia, I have been feeling is how sweet it is for her to be released from that dreadful fog of confusion……..
And, so, I have woven a piece on my Saori loom with supplemental embellishment with my stick weaving loom, that I call:
“Out of the Mist”. She’s approximately 30 inches tall by about 10 inches wide at the widest point:
‘Out of the Mist’ by Noreen Crone-Findlay (c)
One of my close friends gave me a seashell instead of a card, and it felt natural to have it become part of this piece.
I made a Kumihimo cord and tied a Celtic everlasting knot, which is stitched to her forehead, but barely visible under her cowl.
Weaving this tribute brought me great peace and comfort, and I think that my Mom would like it a lot.
I dreamt that I was invited to visit the workroom of a friend who passed on awhile ago.
She and I had written back and forth for several years before her death.
I still hold her dear in my heart, even though we never got to meet, face to face, in this world.
Anyhow, in the dream, I was invited into 2 gorgeous little rooms that were full, floor to ceiling, with antique drawers and shelves, full of exquisite handmade lace and yarn, and thread and weaving and embroidery.
It gave me a whole new view of heaven! 😀
I was particularly moved by the colors of one jacket and 2 bags that were woven with a range of reds and blues and then embroidered with yellow silk thread.
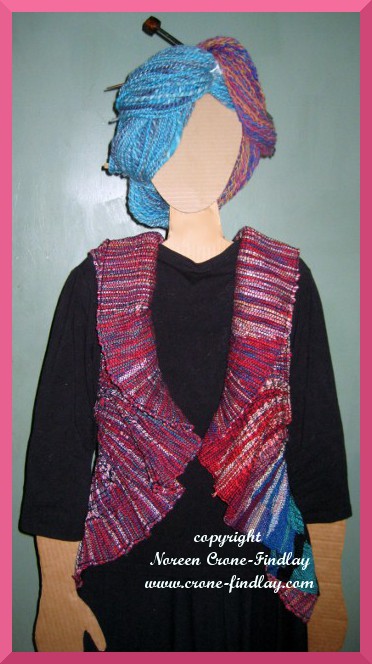
For the rest of this week, I have been glued to my loom, and then my sewing machine, weaving a vest that was inspired by the dream.
It has been such an interesting voyage of discovery, as it took me places that I didn’t expect to go, and it had it’s own rules and requirements.
Here it is:
copyright Noreen Crone-Findlay
I wove it on my Saori loom, blending the yarns on the bobbin, and adding and picking up strands of weft as I wove.
copyright Noreen Crone-Findlay
I knew that I was going to be shaping the vest by pulling on warp strands to add the curves that would build the vest, so I worked at making the shapes of the clasped weft be conducive to the warp pulling process.
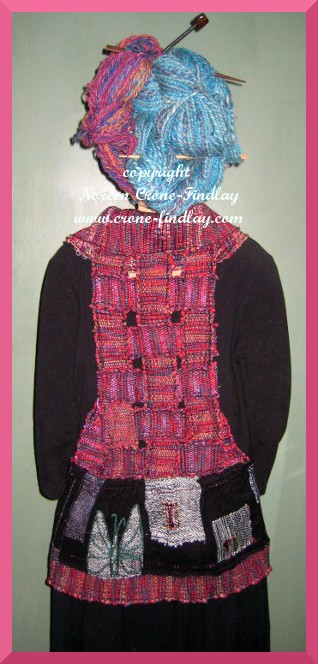
I had thought that I would use the narrow band to add another ruffle to the outside edge, but I decided instead, to use it to weave the back of the vest.
This is one of the things I love about Saori weaving- being able to do freeform work that takes off in a different direction than I had originally planned!
I like to shape the garment after I have woven it, so I do my warp pulling after the weaving is off the loom, and don’t do any shaping on the loom.
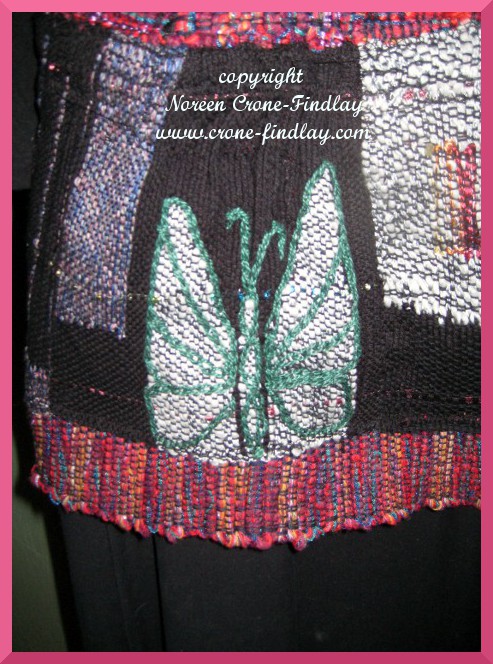
The butterfly was woven while it was still on the loom.
I had thought that I would embroider lots of dragonflies onto the vest.
I didn’t embroider the dragonflies while it was on the loom, as I wasn’t sure where I would be placing the pulled warp sections, and didn’t want the embroidery to be distorted or to interfere with the pulling process.
copyright Noreen Crone-Findlay
I had woven the butterfly a couple of weeks ago, and set it aside, as the piece that it had originally been part of felt like it was a ‘fail’.
How wrong I was! The butterfly and another section of the ‘fail’, fitted into the back of the vest just perfectly.
copyright Noreen Crone-Findlay
I thought that I would tat some dragonflies and stitch them on, but they just didn’t work.
It’s a wonderfully comfortable vest, and every time I wear it, I will think of a dear friend, and how she still inspires me!
So, my friends, here’s to life, to color, to love, and to the creative process!
May you weave sweet, colorful dreams! 😀
And, here is a video on how to shape fabric by pulling warp strands:
Even though the world outside my studio is deeply blanketed in snow:
copyright Noreen Crone-Findlay
There are flowers blooming in the studio:
copyright Noreen Crone-Findlay
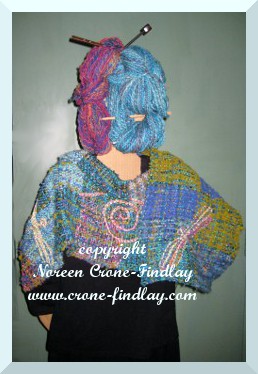
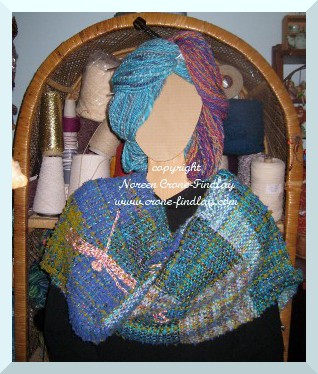
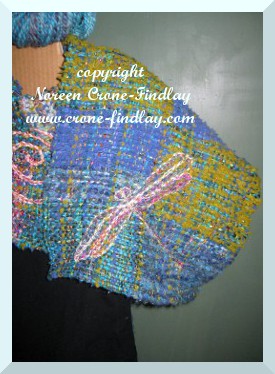
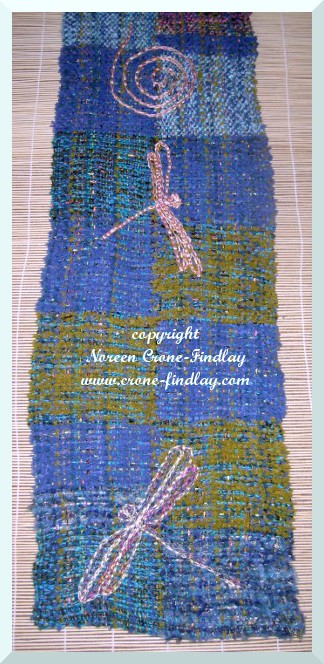
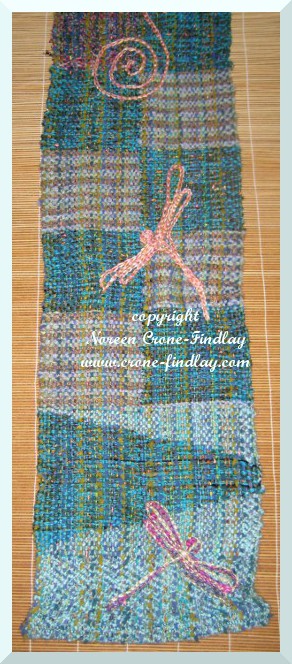
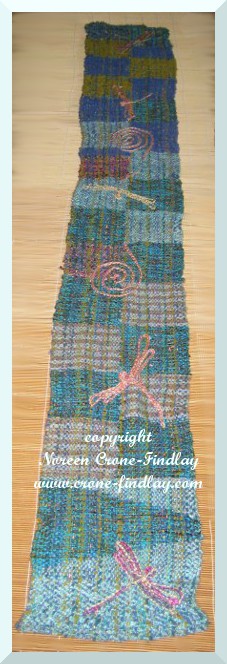
And, now, Dragonflies, with their lovely healing energy, are dancing in my studio!
I have just finished embroidering dragonflies and spirals on a prayer shawl that I wove on my 4 harness loom, inspired by Saori weaving:
copyright Noreen Crone-Findlay
It’s 13 inches wide and 101 inches long, so can be wrapped in all kinds of different ways:
copyright Noreen Crone-Findlay
Here are views of some of the dragonflies:
copyright Noreen Crone-Findlay
copyright Noreen Crone-Findlay
copyright Noreen Crone-Findlay
copyright Noreen Crone-Findlay
copyright Noreen Crone-Findlay
copyright Noreen Crone-Findlay
I used chenille, cotton, silk and rayon in the dragonfly wrap/prayer shawl.
Usually, I do the embroidery while the shawl is still on the loom, but this time, I chose to do the embroidery afterwards, as I needed to see the placement of the spirals and dragonflies on the piece as a whole.
Dragonflies always fill me with a sense of awe and wonder.
It makes perfect sense to me that people who are engaged in healing often feel that the dragonfly has special significance to them.
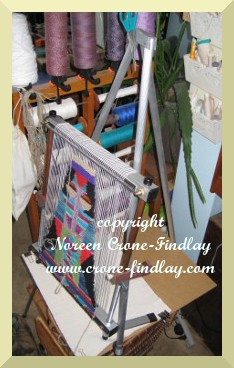
Yesterday, I took a tapestry off my 16 inch Mirrix loom- it’s nowhere near being finished as I am going to be doing embroidery on it.
I thought that I would give an update on the tapestries that I am weaving for my solo show next summer.
So, even though NONE of these pieces are anywhere close to being done, here’s a quick little glimpse at the works in progress:
copyright Noreen Crone-Findlay
And yes, I did plaster copyright notices all over them, as I have found that images have a way of getting away from you, so I want people to be able to follow them home!
The large tapestry is about a meter long – when you use extenders on the 16 inch loom, you can weave very long pieces.
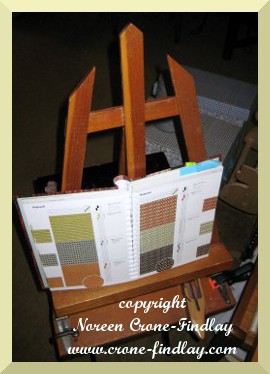
On the music stand are 2 tapestries that I am just getting started on.
The 12 inch tapestry has gobbled up all my ‘s’ hooks, so I need to go buy some more.
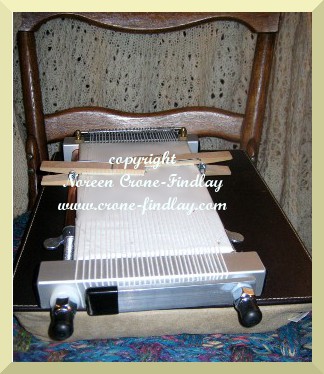
I warped up my 5 inch Mini in a totally outside the box way….. totally outside the Scrabble box, that is!
I bought a couple of extra Scrabble games from the thrift shop so I could use the letters for my titles of my video tutorials.
I plunked the tile holders into a drawer and occasionally, I wonder what I will do with them.
Well… the other day, when I was puzzling over how I could warp the Mini when all my ‘s’ hooks are in use elsewhere, I had a flash of inspiration-
copyright Noreen Crone-Findlay
I duct taped 2 of them together to make a cap to go over the Mini’s knobs at the top of the loom!
copyright Noreen Crone-Findlay
This is the back of the loom, showing how I warped it continuously, going over the ‘Scrabble Cap’.
It works brilliantly!
I don’t like showing a piece before I have made some progress on it.
In November, I’ll do another update, and hopefully, I’ll have lots more to show you! 🙂
I have just released a new pattern that has step by step photos showing how to weave these gorgeous baskets, using the easiest little loom ever made, the weaving stick loom:
copyright Noreen Crone-Findlay
This basket was woven with paper ribbon and embellished with buttons that I made from arbutus twigs and coconut shells.
copyright Noreen Crone-Findlay
The heart shaped basket has a plywood heart base (the template for the heart is included in the pattern).
Here, the heart basket is woven with art yarn:
copyright Noreen Crone-Findlay
Workshop participants who were learning how to weave the baskets asked me:
What can we use these baskets for?
Anything that fits in them that you want to keep organized! Beads, hair clips, packages of smallness, buttons, thread, bobbins, yarn….
copyright Noreen Crone-Findlay
The large oval basket in the photo above was woven with strips of torn fabric, so it’s a great eco option.
The yo yo flowers that embellish it’s side are made from scraps of upcycled fabric. (The instructions on how to make the yo yo circles are also included in the pattern).
This basket is great for holding fruit or heaps of little green tomatoes while they ripen, or anything else your heart desires.
Because it’s made of cloth, if it gets soiled, it can just be rinsed clean.
copyright Noreen Crone-Findlay
The green round basket is woven in the same way as the pink and blue one in the photo below, but I pulled up on the warp strands of the upper edges of the green one to curve it in.
copyright Noreen Crone-Findlay
So you can see that a small change makes a huge difference in the look of the basket.
I did the same thing to curve the top edge of the black oval shaped basket that is woven in exactly the same way as the paper ribbon basket.
copyright Noreen Crone-Findlay
The yarn that you use (combine several strands to get neat effects) and how you embellish the basket will guarantee that each basket that you make is totally unique.
And, recently, I have been experimenting with weaving lace.
Well… weaving leno lace and then embroidering it…..
copyright Noreen Crone-Findlay
This was my first attempt, and to be honest, it’s wonky and woobley and ‘real weavers’ would consider it to be a messy failure.
copyright Noreen Crone-Findlay
But, I really learned a lot while I was working on it- and am intrigued and intend to keep working with this technique.
By the way, this was woven on my 16 inch Mirrix loom, with loom extenders attached.
When I was warping up for my second embroidered Leno lace scarf, I made a video about the things I figured out while warping with loom extenders:
I got so overwhelmed with all the work for the Soumak Weave Along that I didn’t have time to do much more with the embroidered leno lace.
I needed my 16 inch loom for a tapestry, so I wove off the blue scarf to get it off the loom, and will be doing the embroidery with the scarf being off loom.
copyright Noreen Crone-Findlay
I am pleased with the progress I have made with the embroidery, and look forward to doing more of this technique.
I love scarves and wear them year round.
Leno lace scarves are light enough to be comfortable even in the summer, especially in the evening.
copyright Noreen Crone-Findlay
I haven’t had a chance to wash and block this one yet, so it’s not as nice as it will be.
I am planning on working a twisted cord with beads on it for the fringes.
Leno lace is so wonderful and has so much design potential that I intend to continue experimenting with it!
And, so, the Soumak Pouch Weave Along draws to a close with a very long video on finishing techniques.
copyright Noreen Crone-Findlay
Here are the chapters in the final installment:
1- Steam, Press and block the finished weaving
2- Overcast the straight edge of the inside front of the pouch
3- Making the point for the tip of the pouch
4- How to do the chain stitch embroidery
5- Cut out a lining
6- How to stitch the lining to the pouch invisibly
7- Stitch the side seams
8- Sew on the snaps
9- Stitching the edging cords to the pouch – in the video, I show how to add things like large beads at the ends and center of the cord, as well as the swivel clip hook. I also show how to stitch size 8 seed beads to the edging to embellish it. You don’t have to add these extra flourishes, but I thought that it made sense to show you how to do it so you ~could~ do it, if you want to.
It’s the embellishments that make the pouch the truly individual statement of your creativity!
Square cord spool knitted with 2 colors on 4 pegs,
Cord Spool knitted with 3 pegs
Kumihimo cords – the directions for how to braid the round cords come with the Kumihimo kit from Mirrix
Tubular Peyote stitch cord- instructions are available in beading books and when you google ‘tubular peyote stitch’.
And last, but certainly NOT least, and definitely the fastest, easiest cord of all to make is the Simple Twisted cord, using the method that I have developed, using a spool and a crochet hook.
You will need a cord that is about 15 inches (37.5 cm) long to go around the sides and upper edge of your pouch.
The instructions for how to attach them to your pouch will be in the final installment of the Weave Along: Finishing Techniques.
Here are some videos that I have made to help you make your decorative edging cords:
How to spool knit a cord with just 3 of the 4 pegs on the spool knitter:
How to spool knit a square cord with 2 colors on a 4 peg spool knitter:
How to make a twisted cord with a spool and crochet hook:


")
")
")
")
")
")
")
")
")
")

")
")
")
")
")
")
")
")