To see all the links for the ‘How To’ posts for the “Imagine” Banner Weave along, please go to L I N K S
To order the loom, book and extras kit for the Weave Along from Mirrix, please go K I T
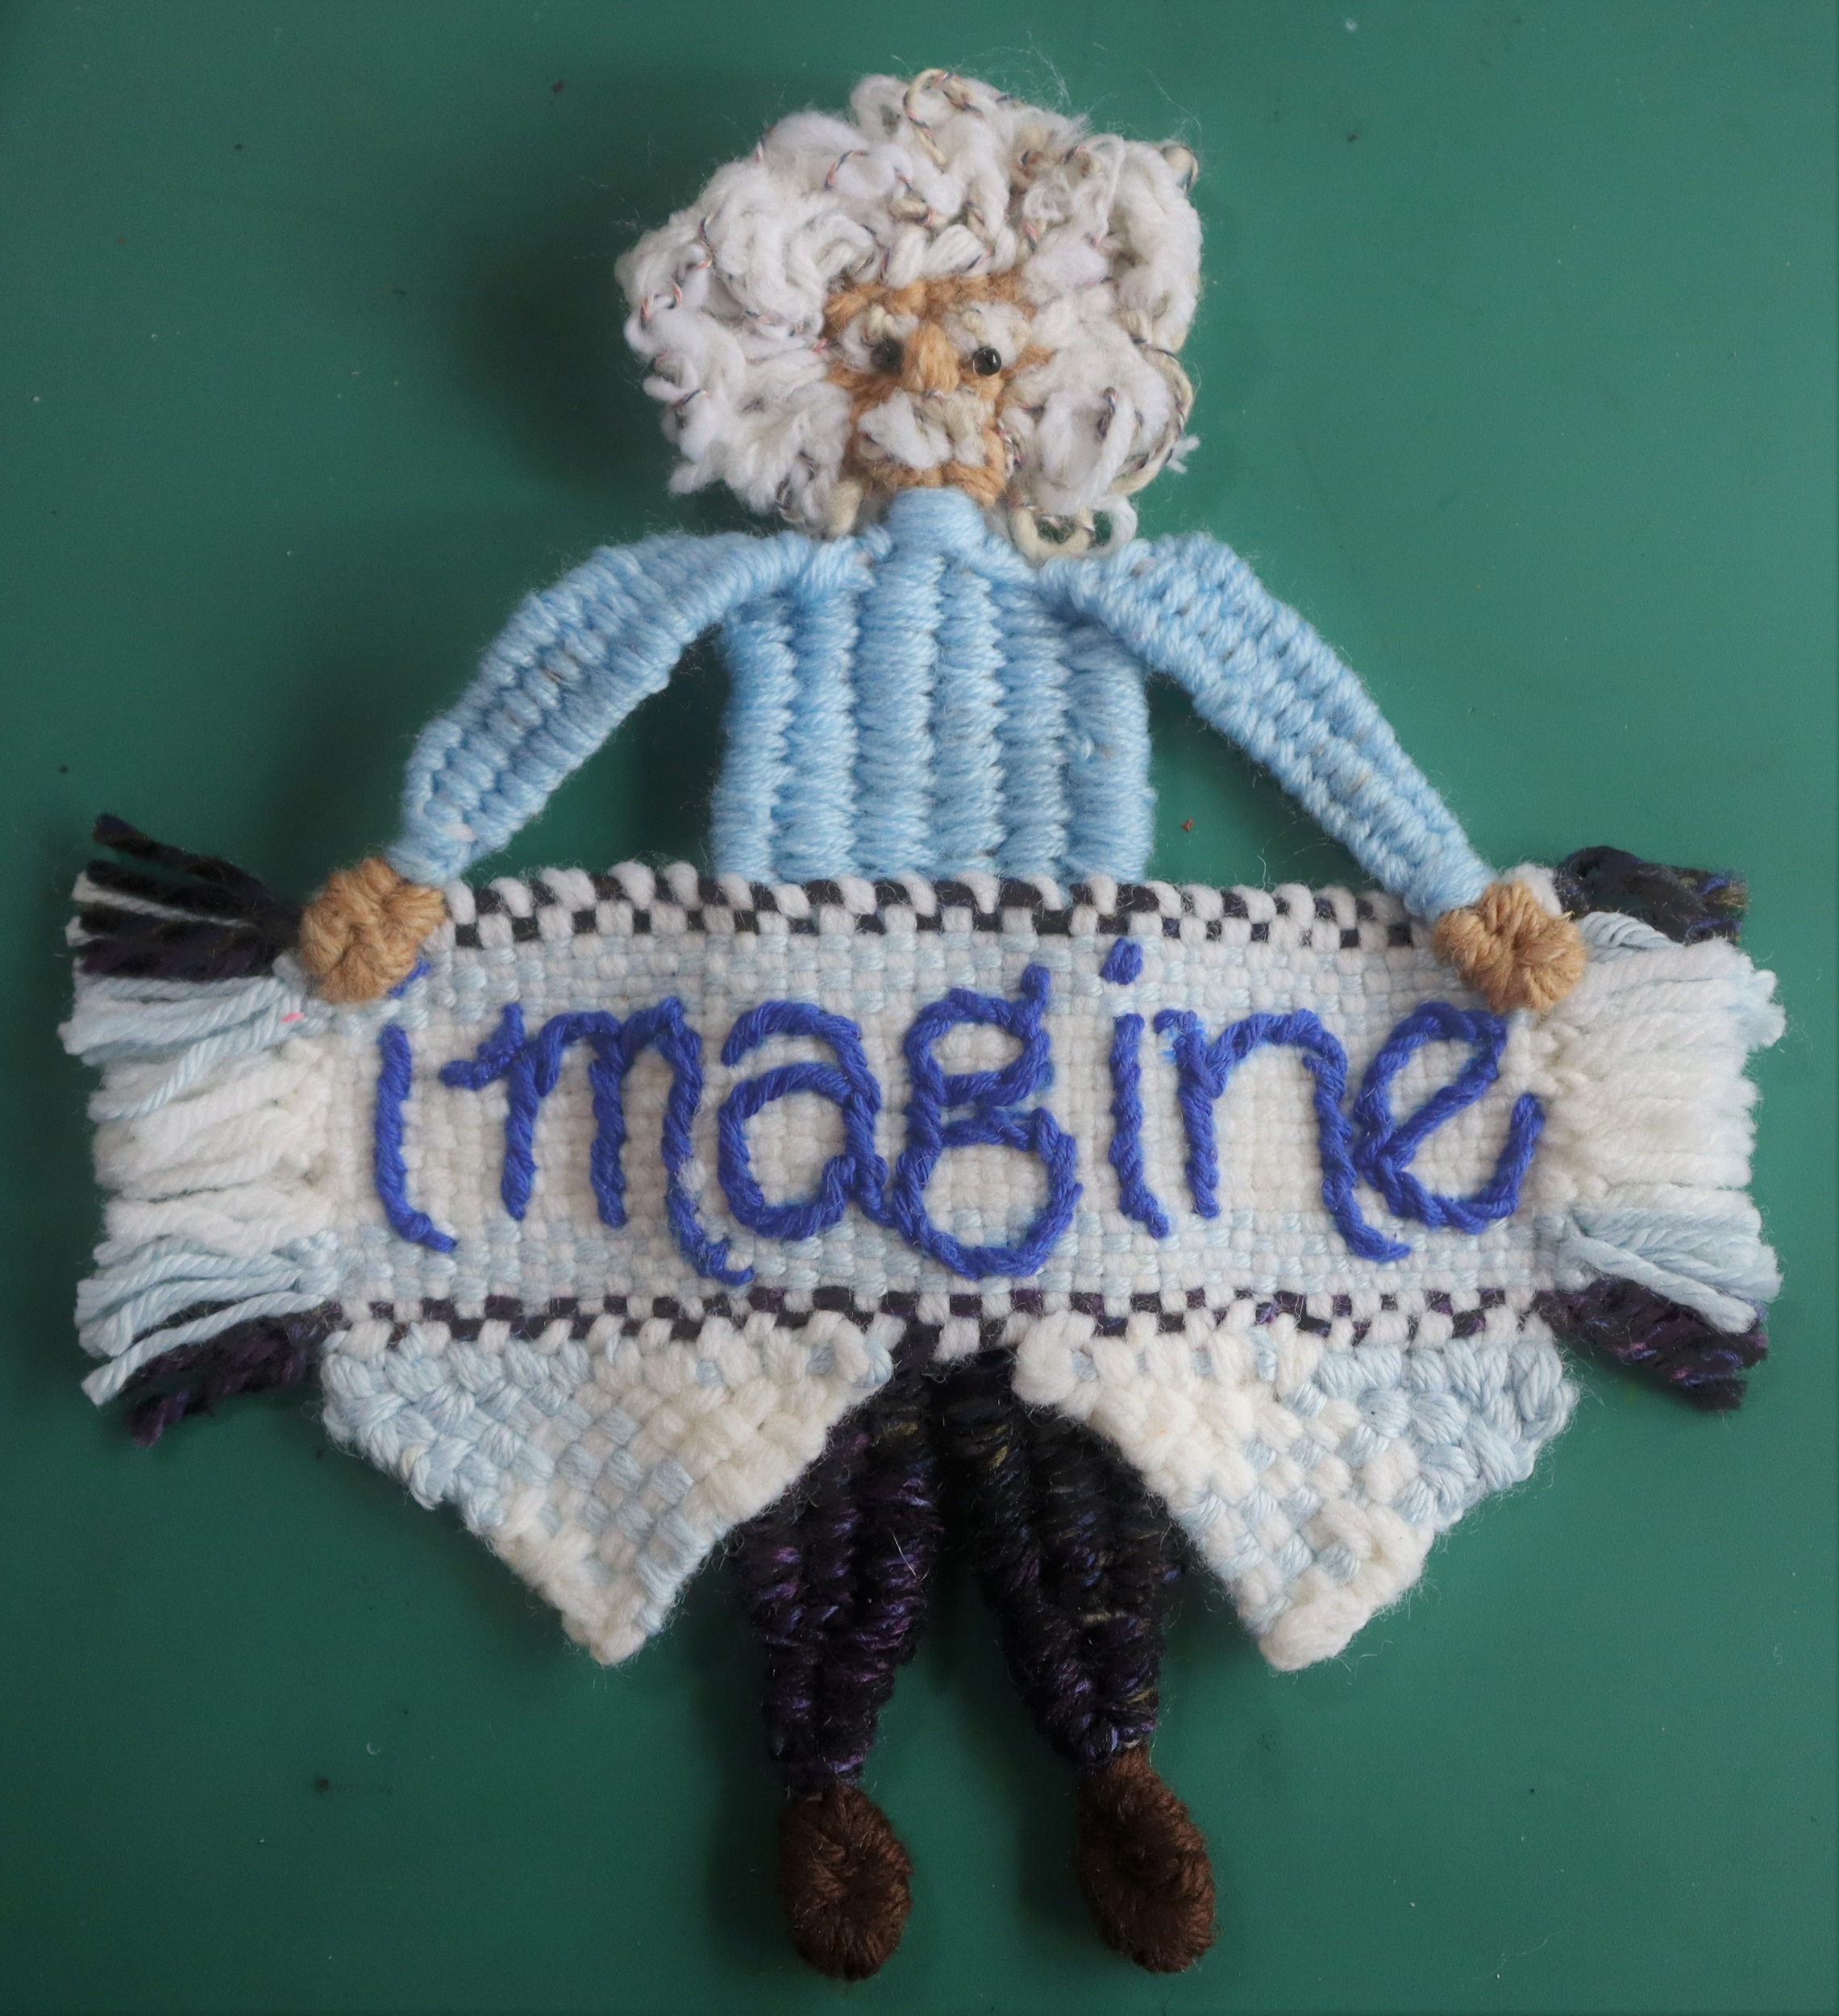
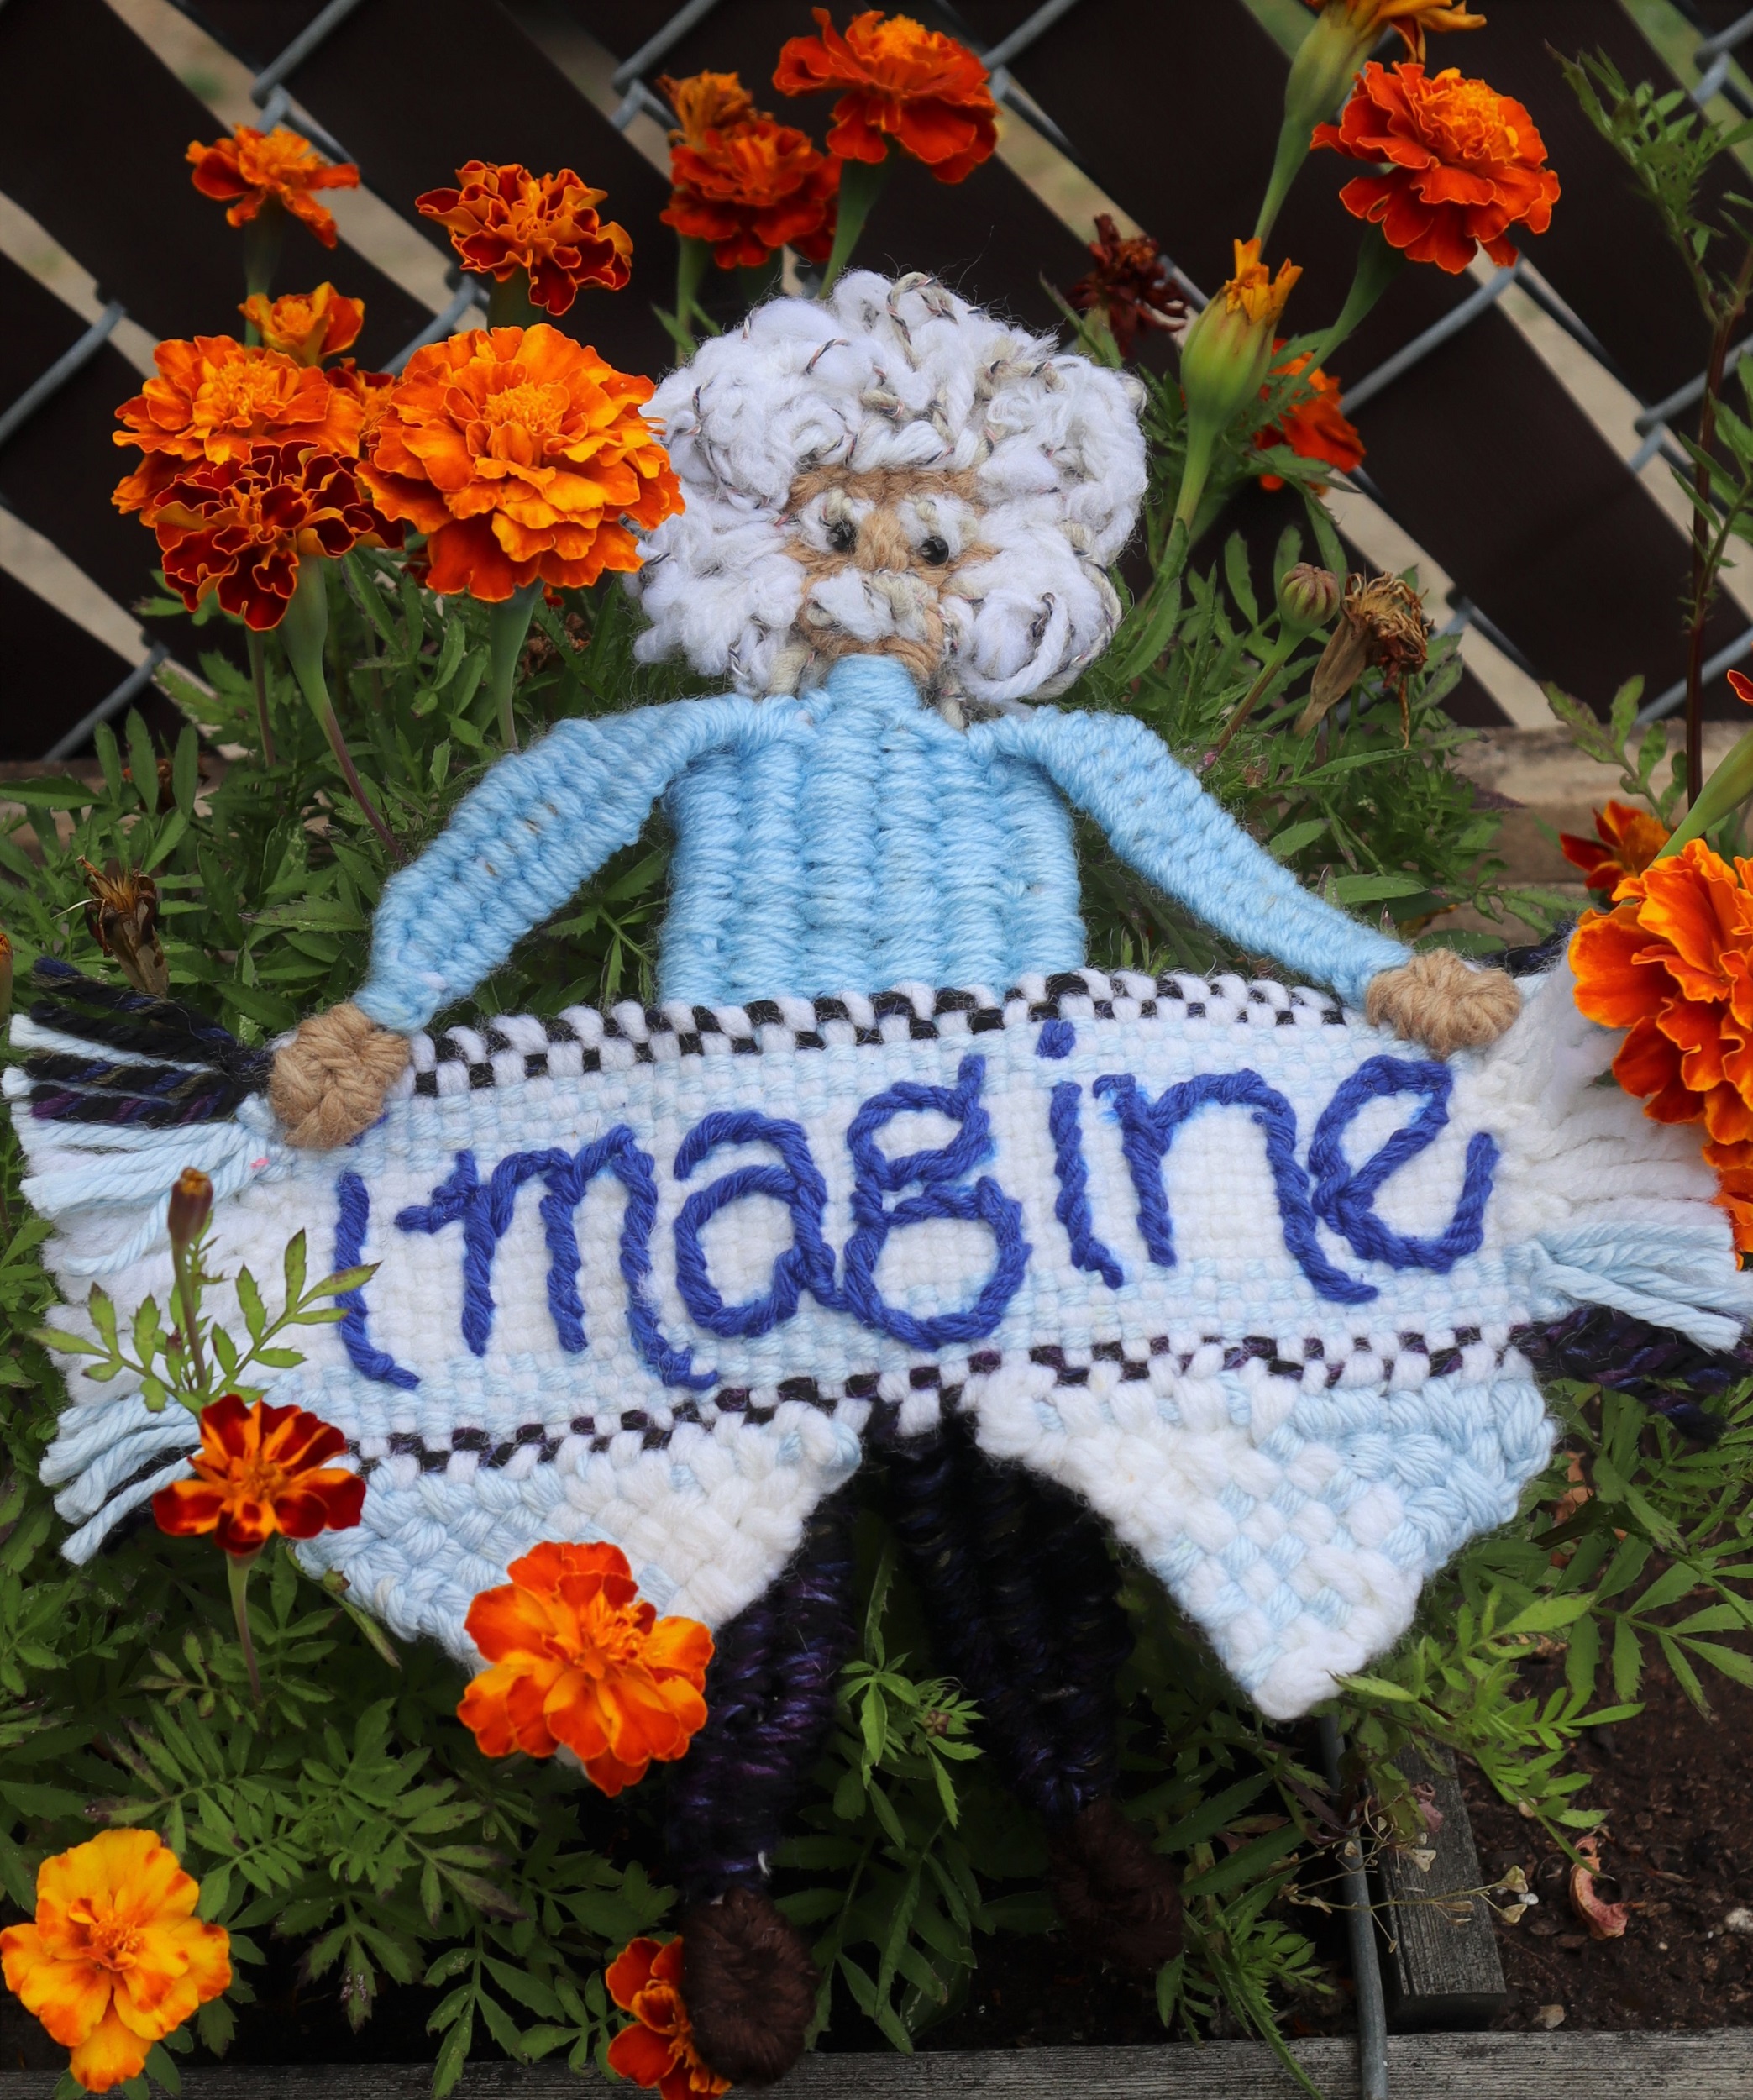
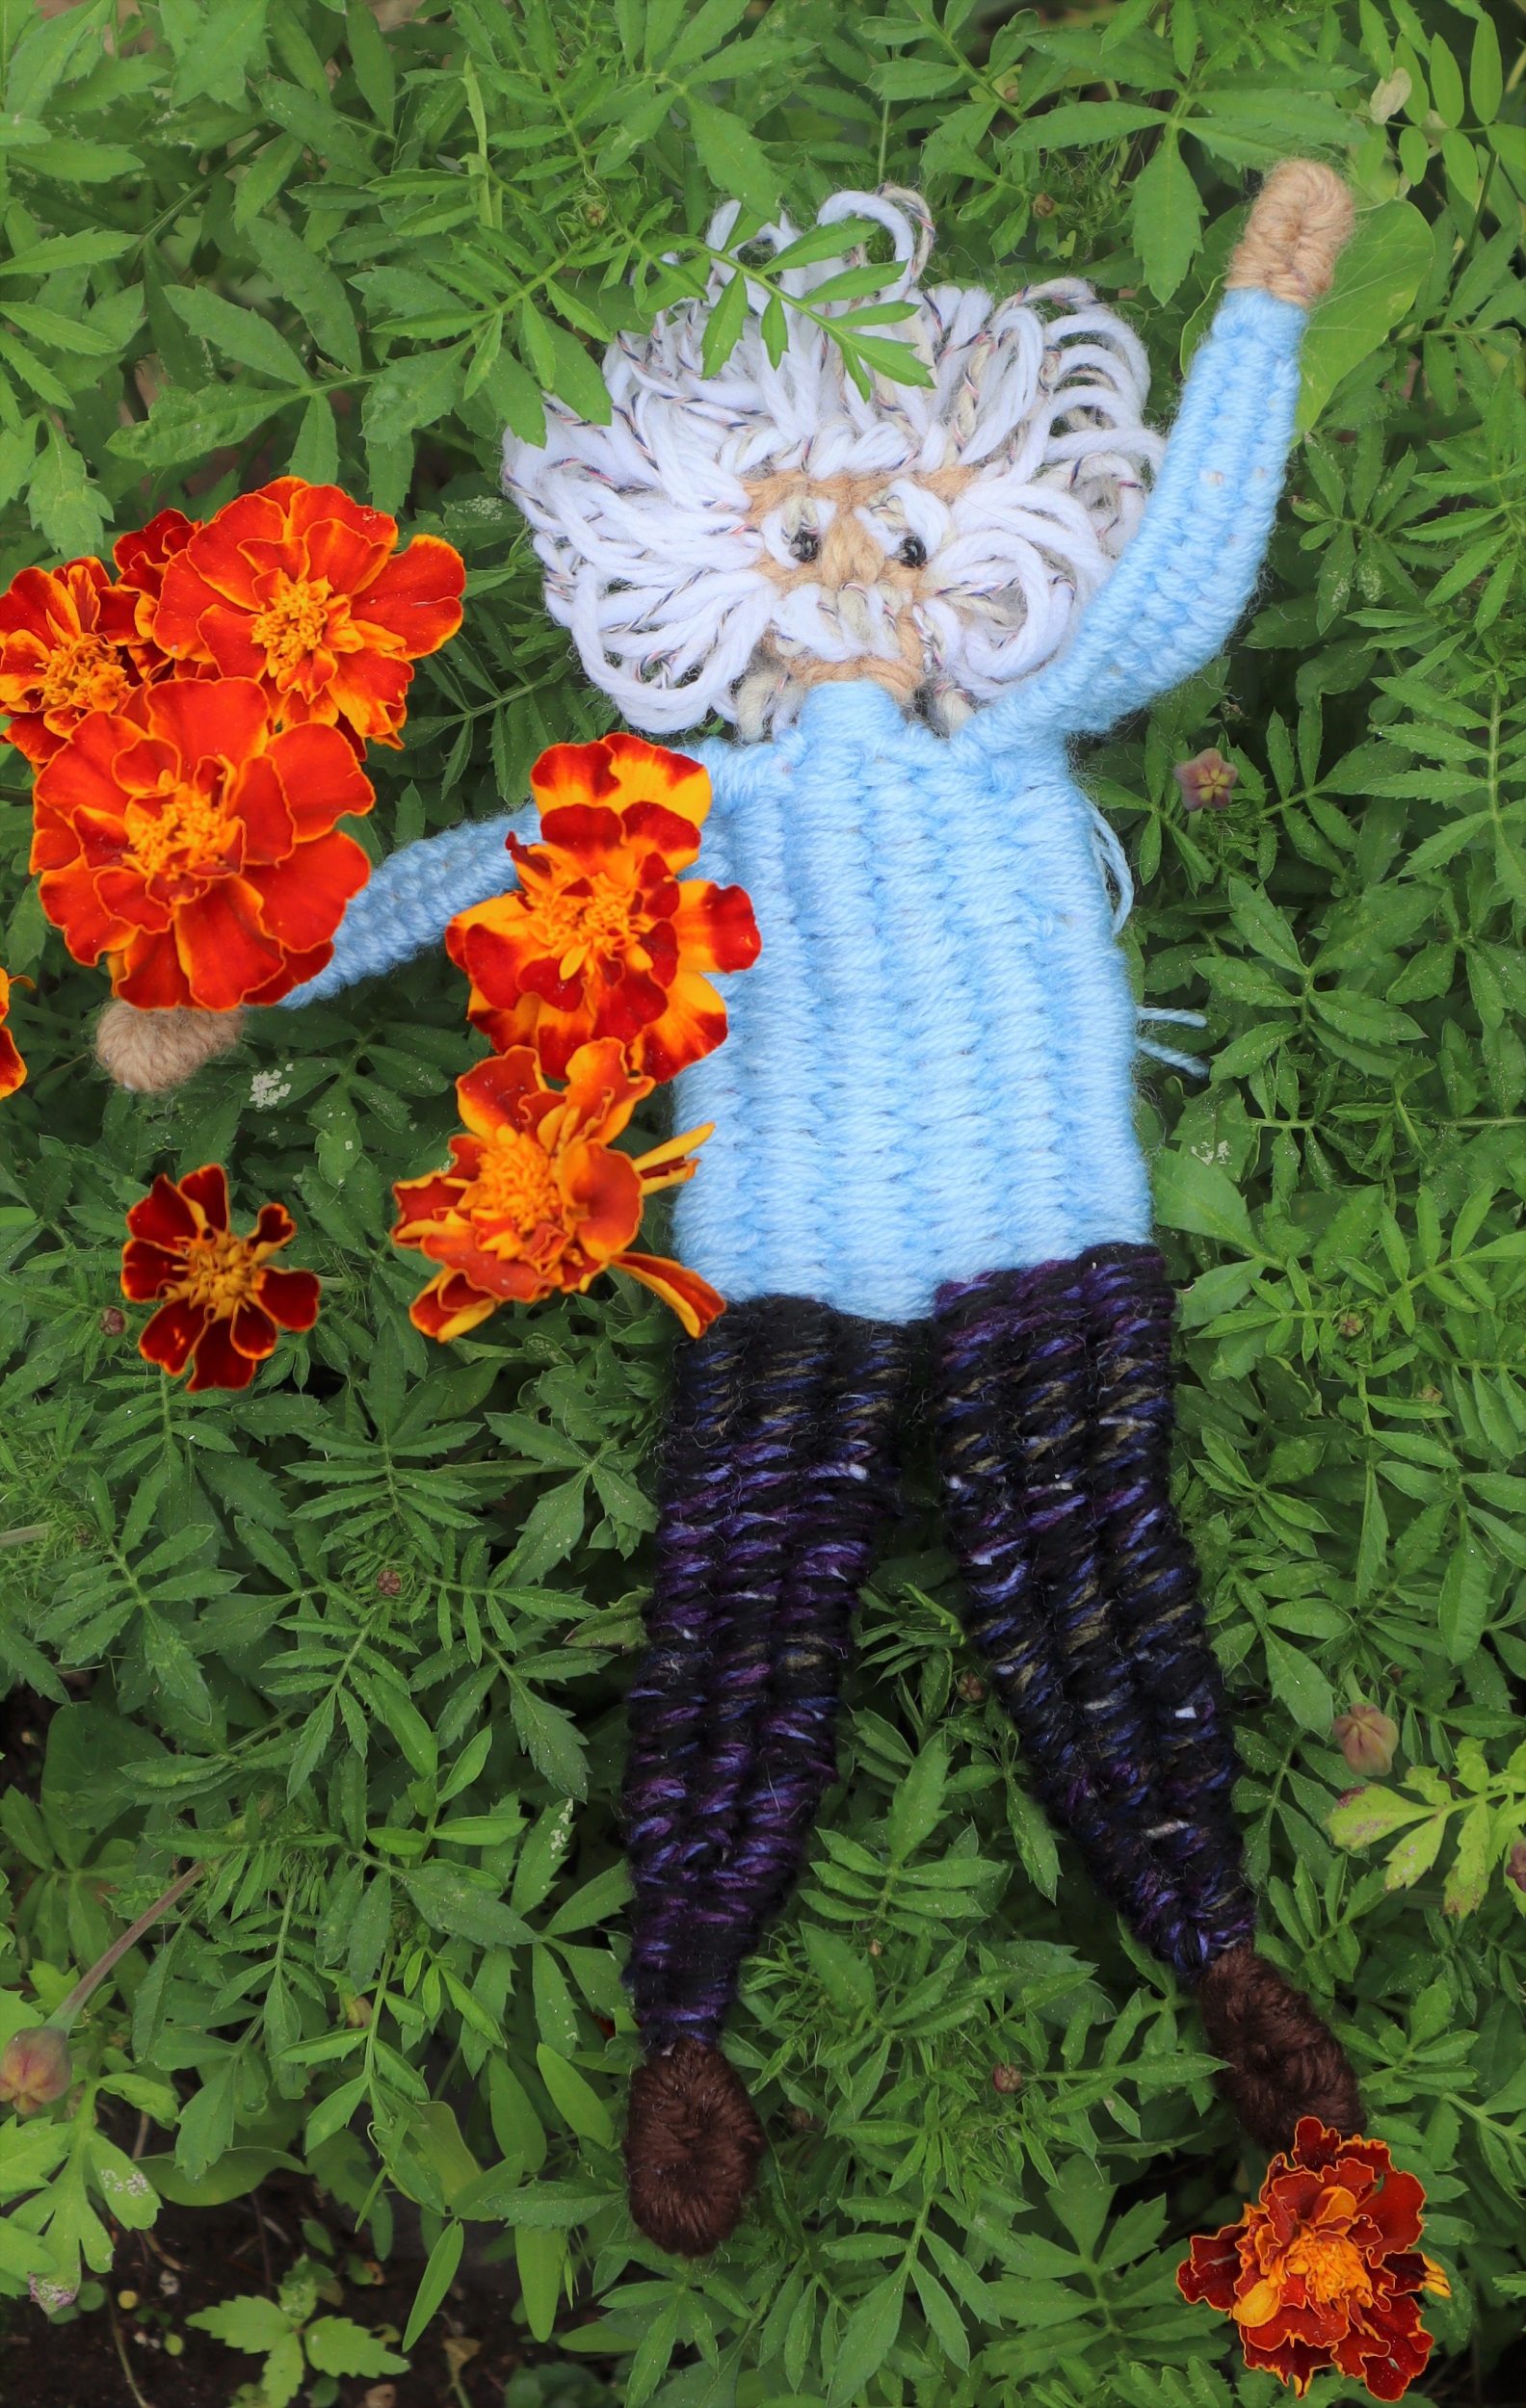
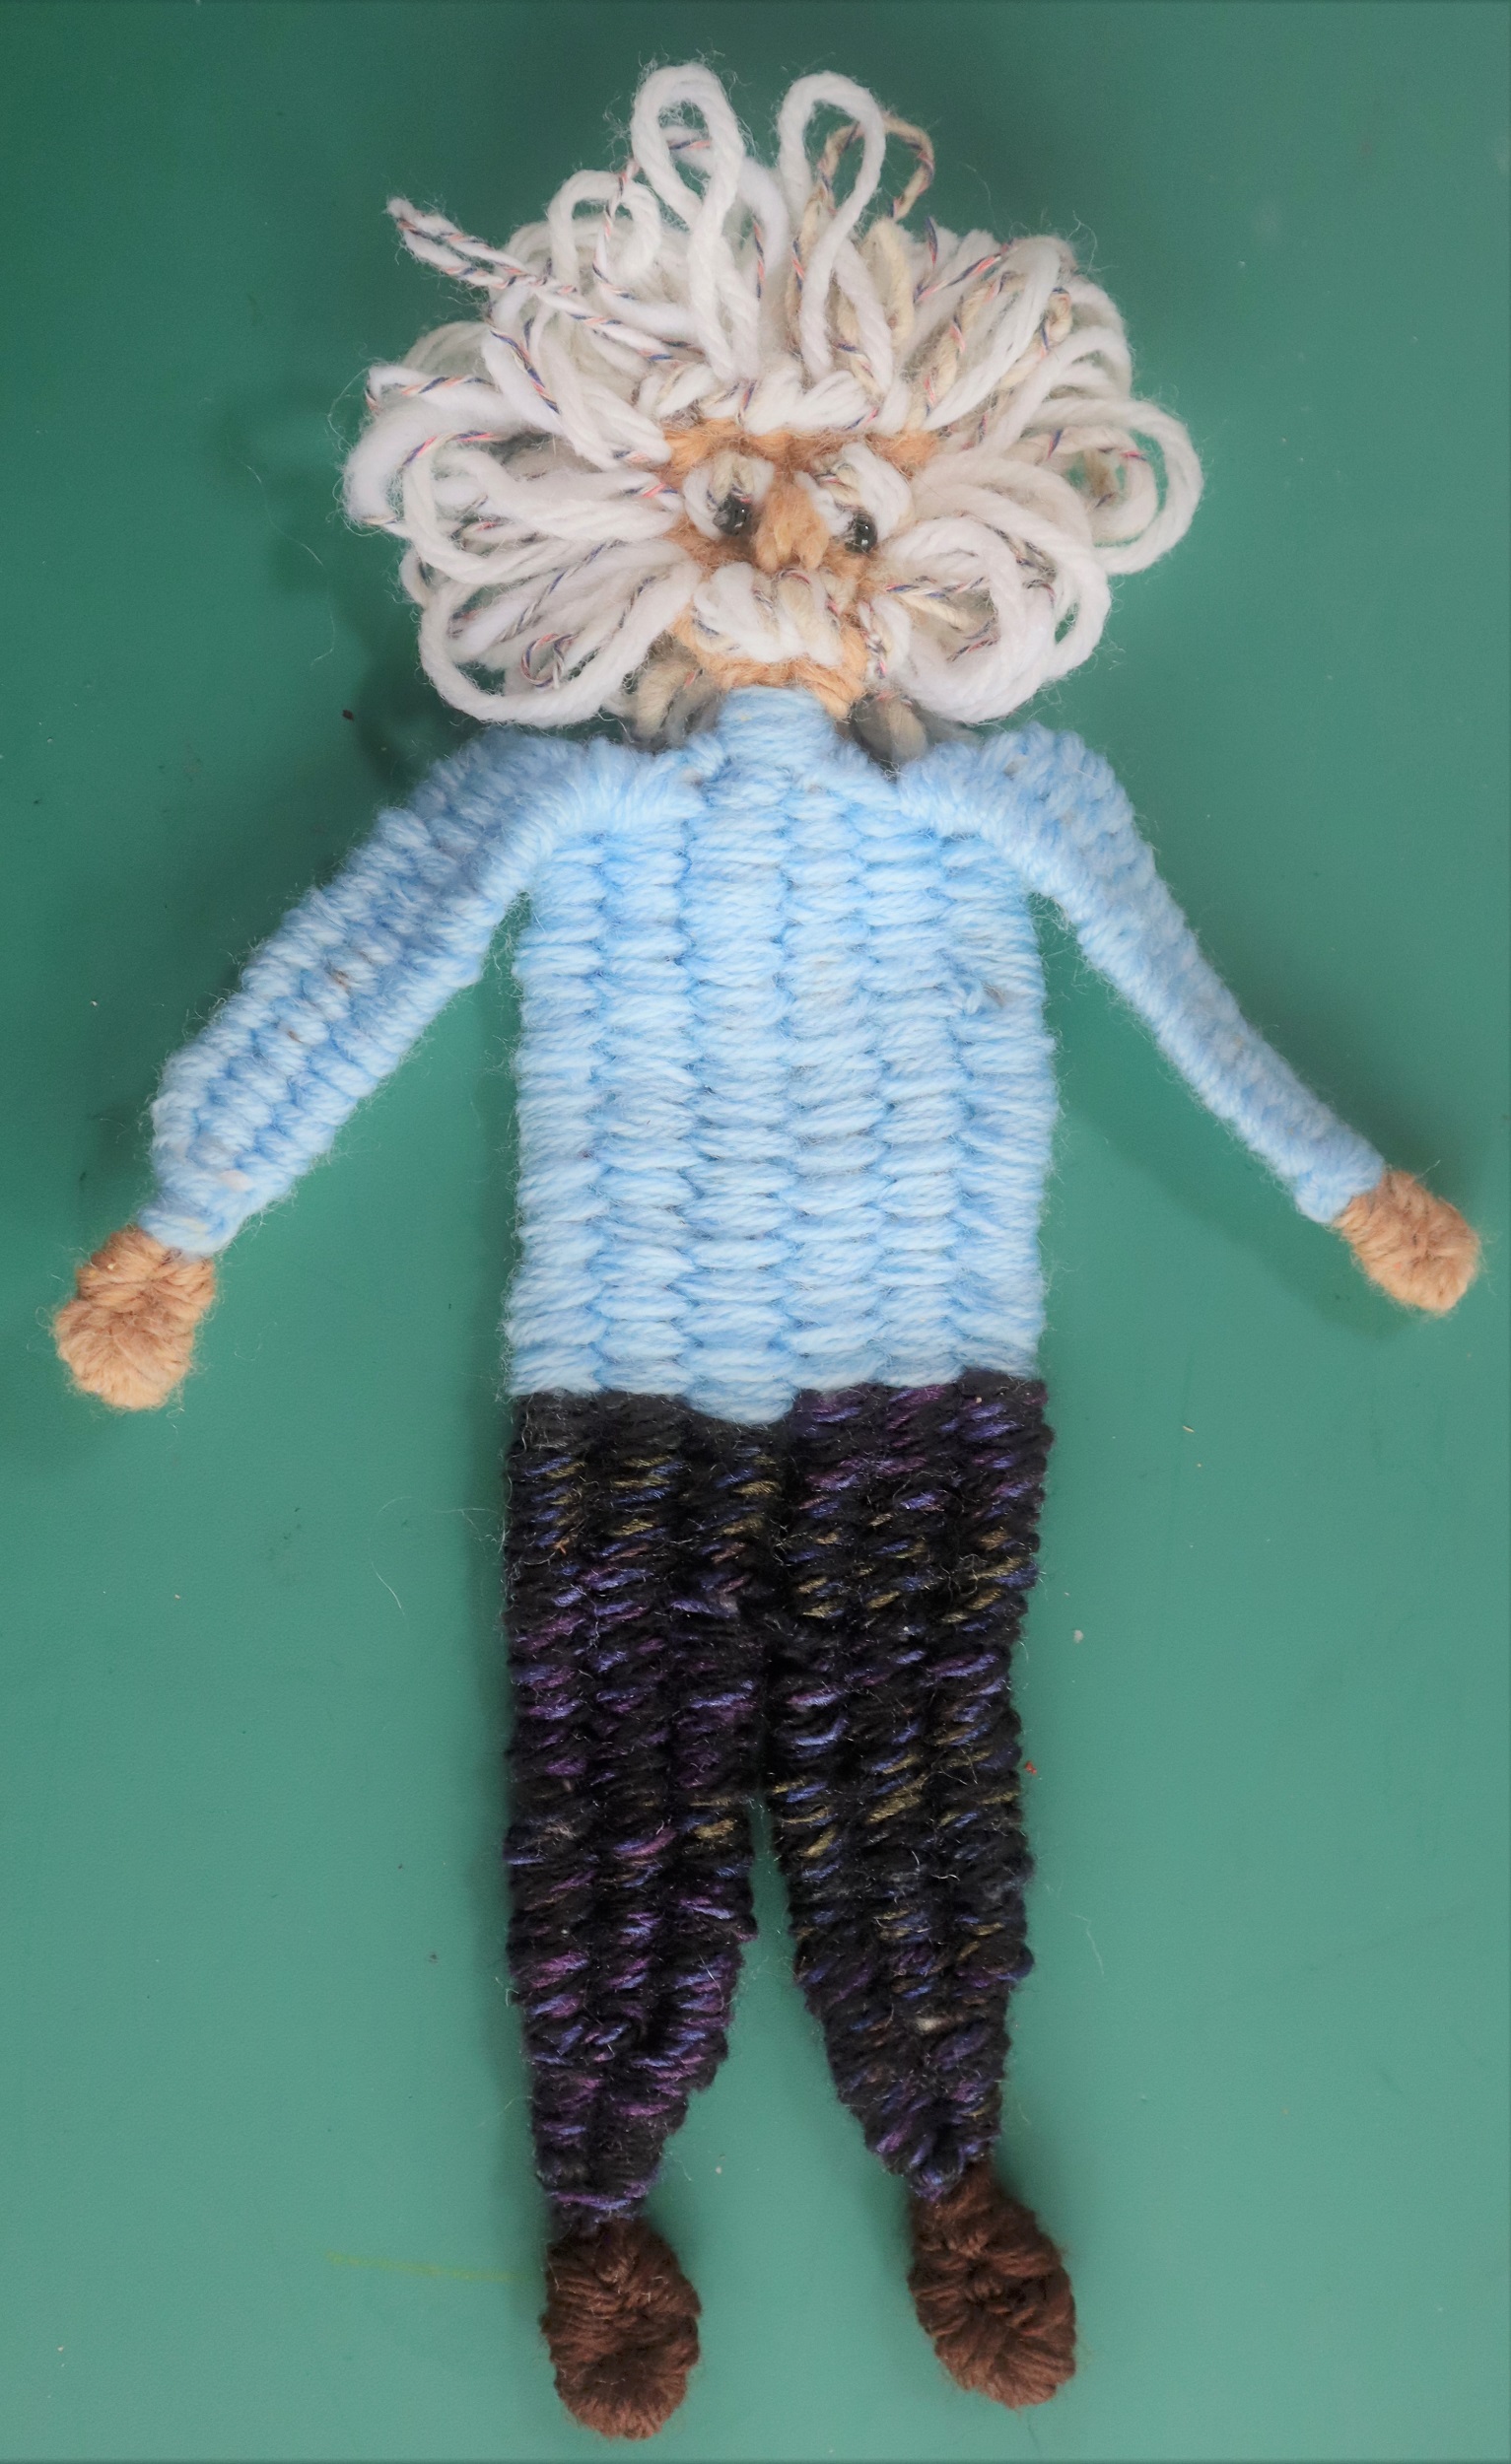
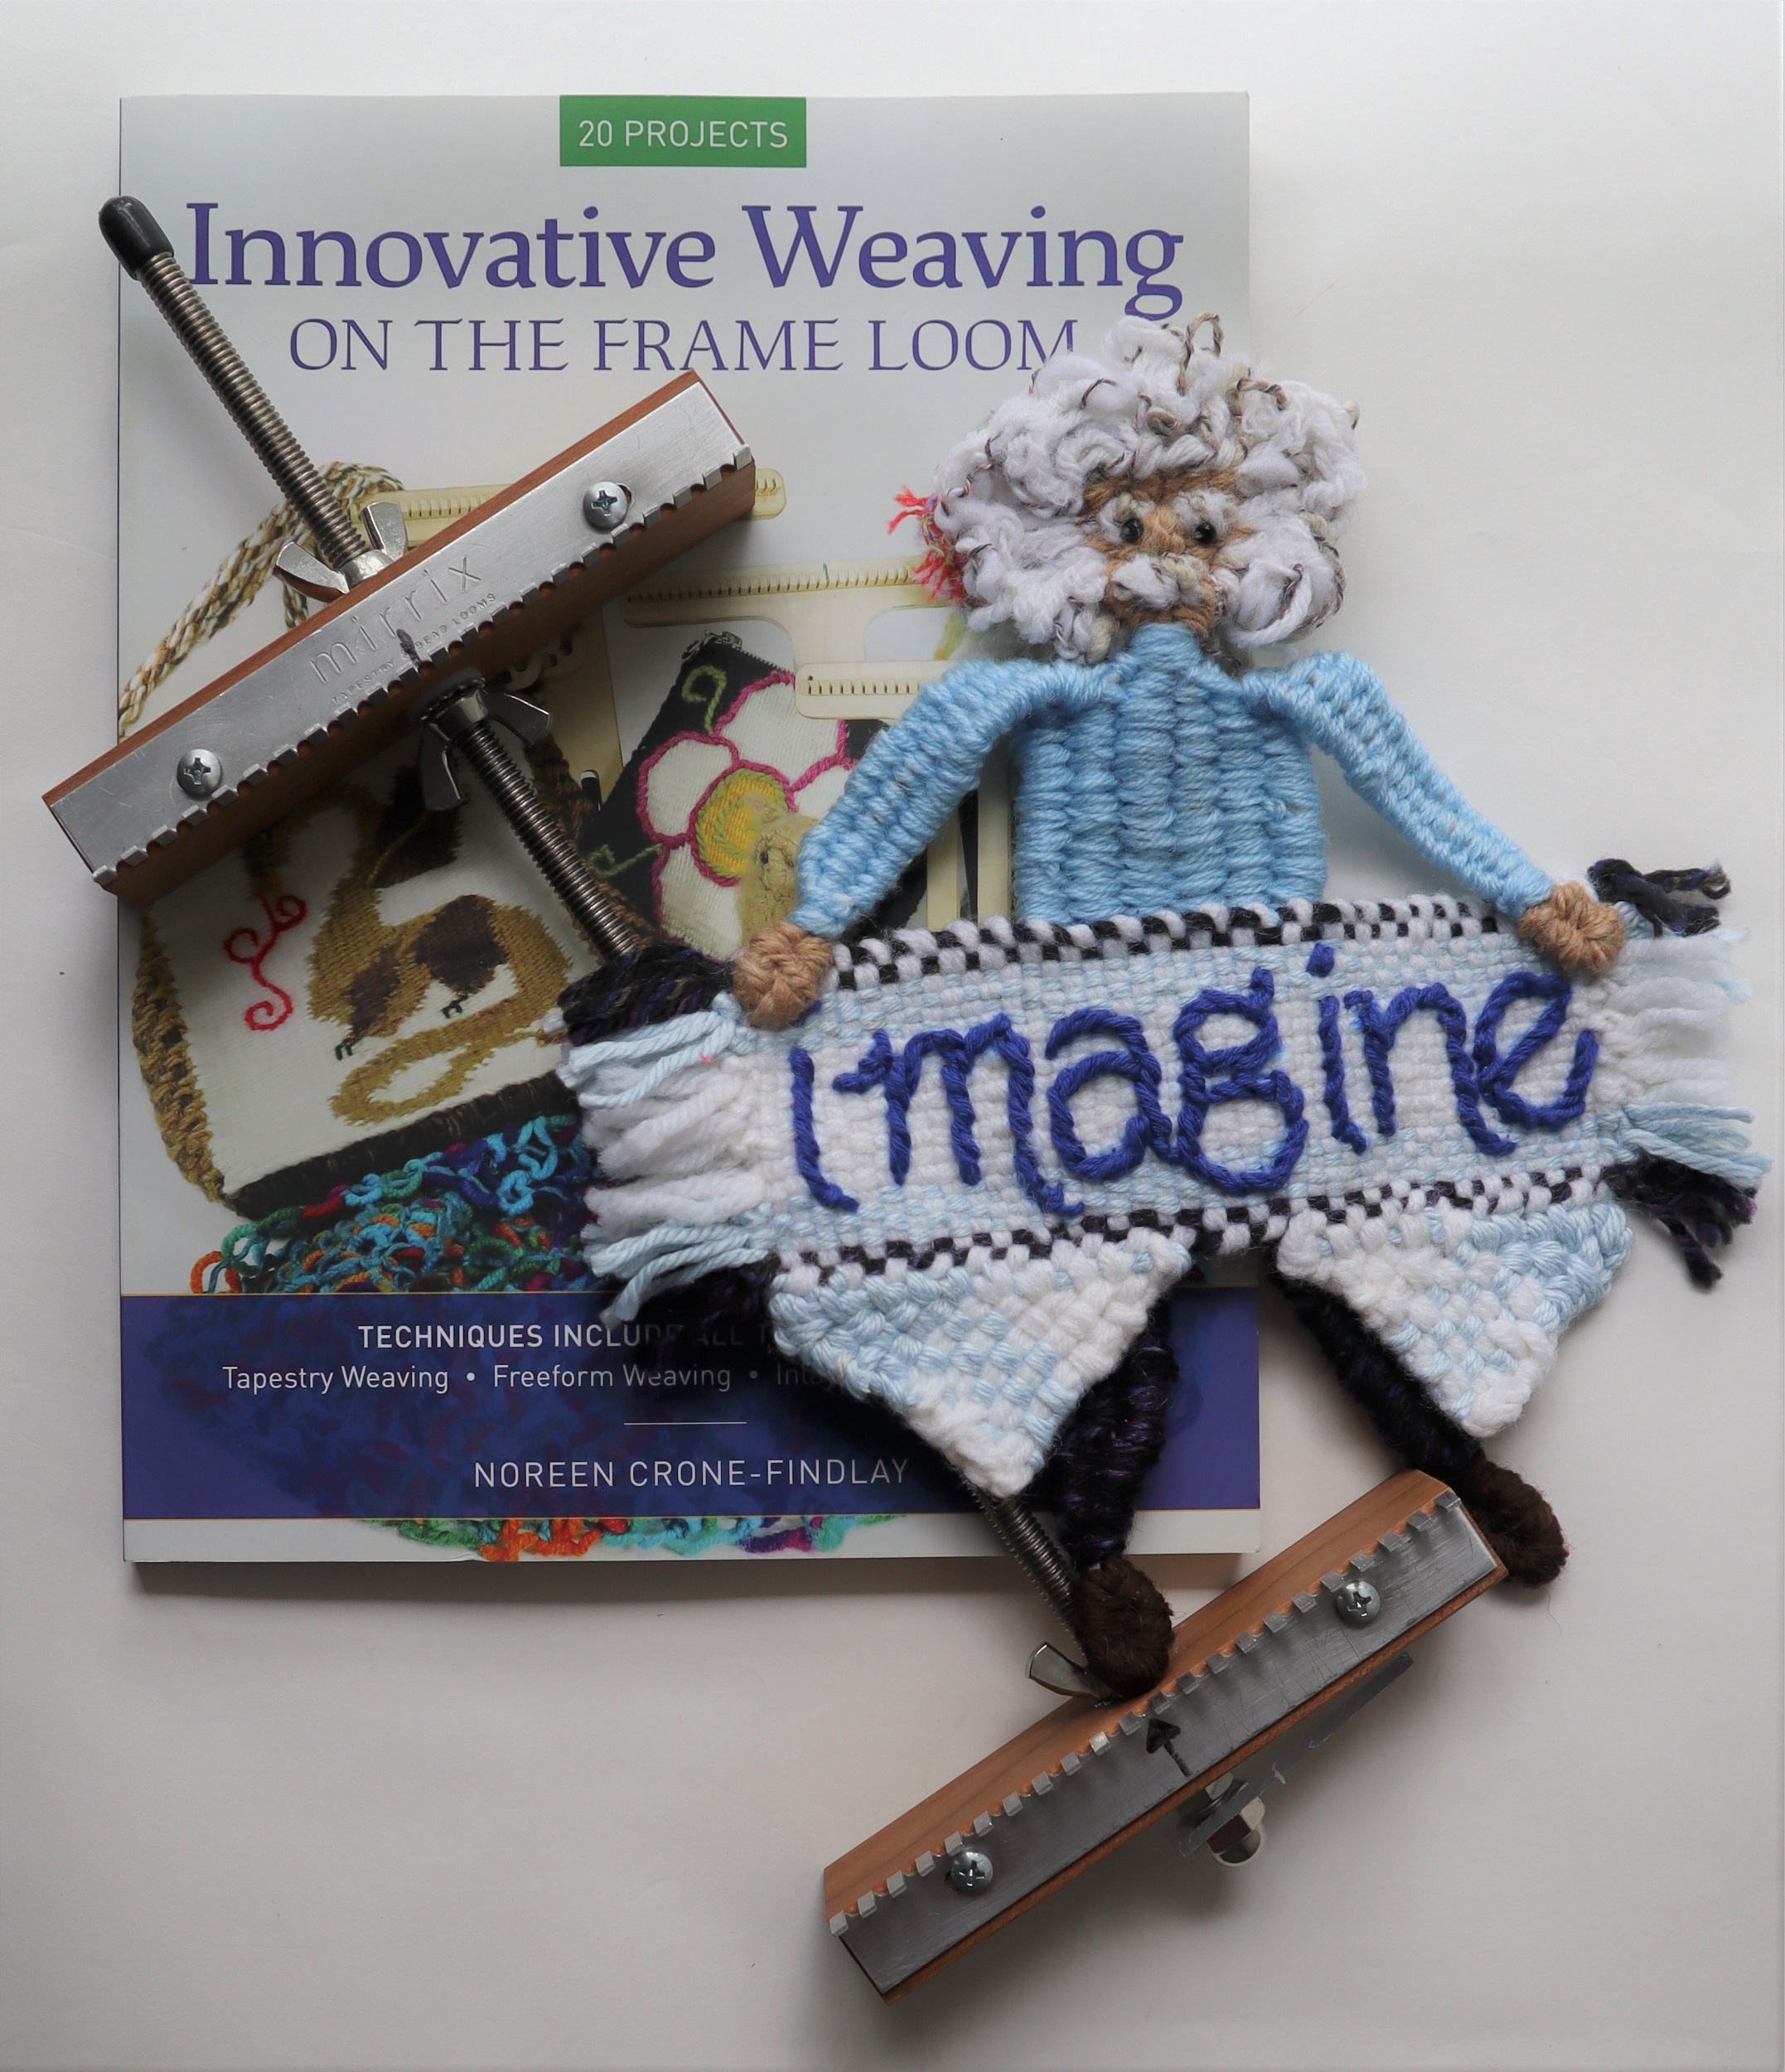
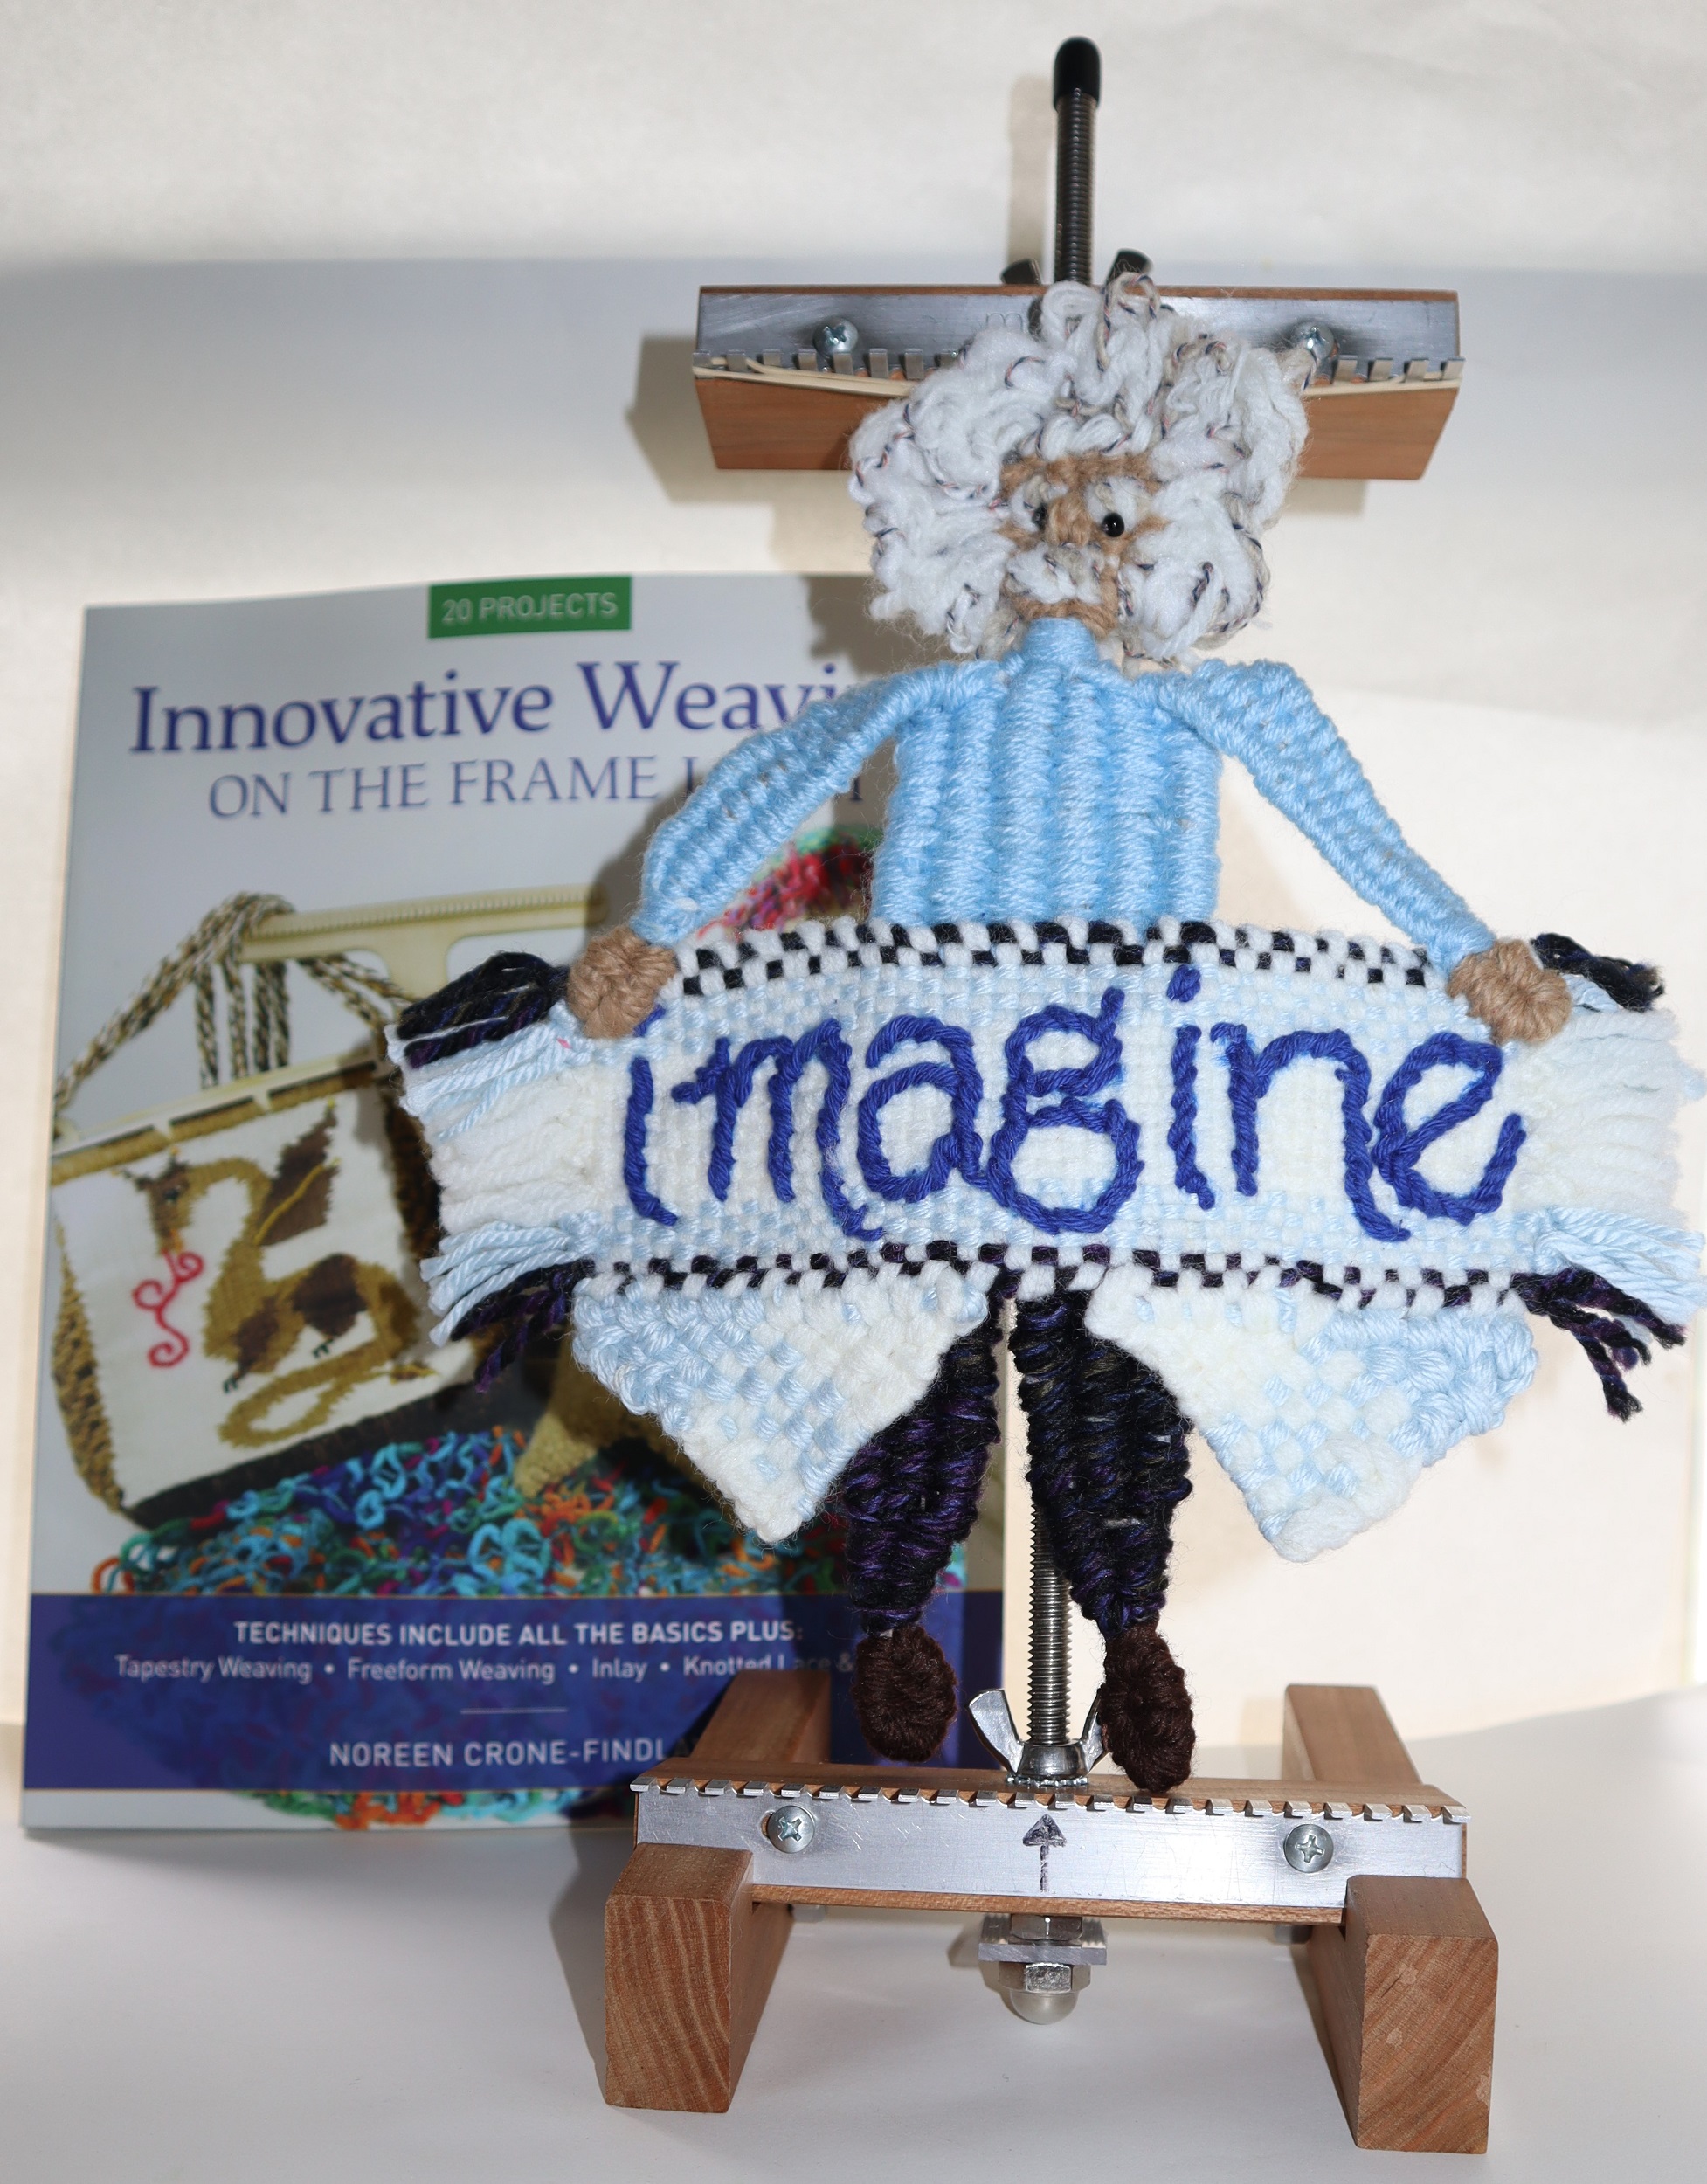
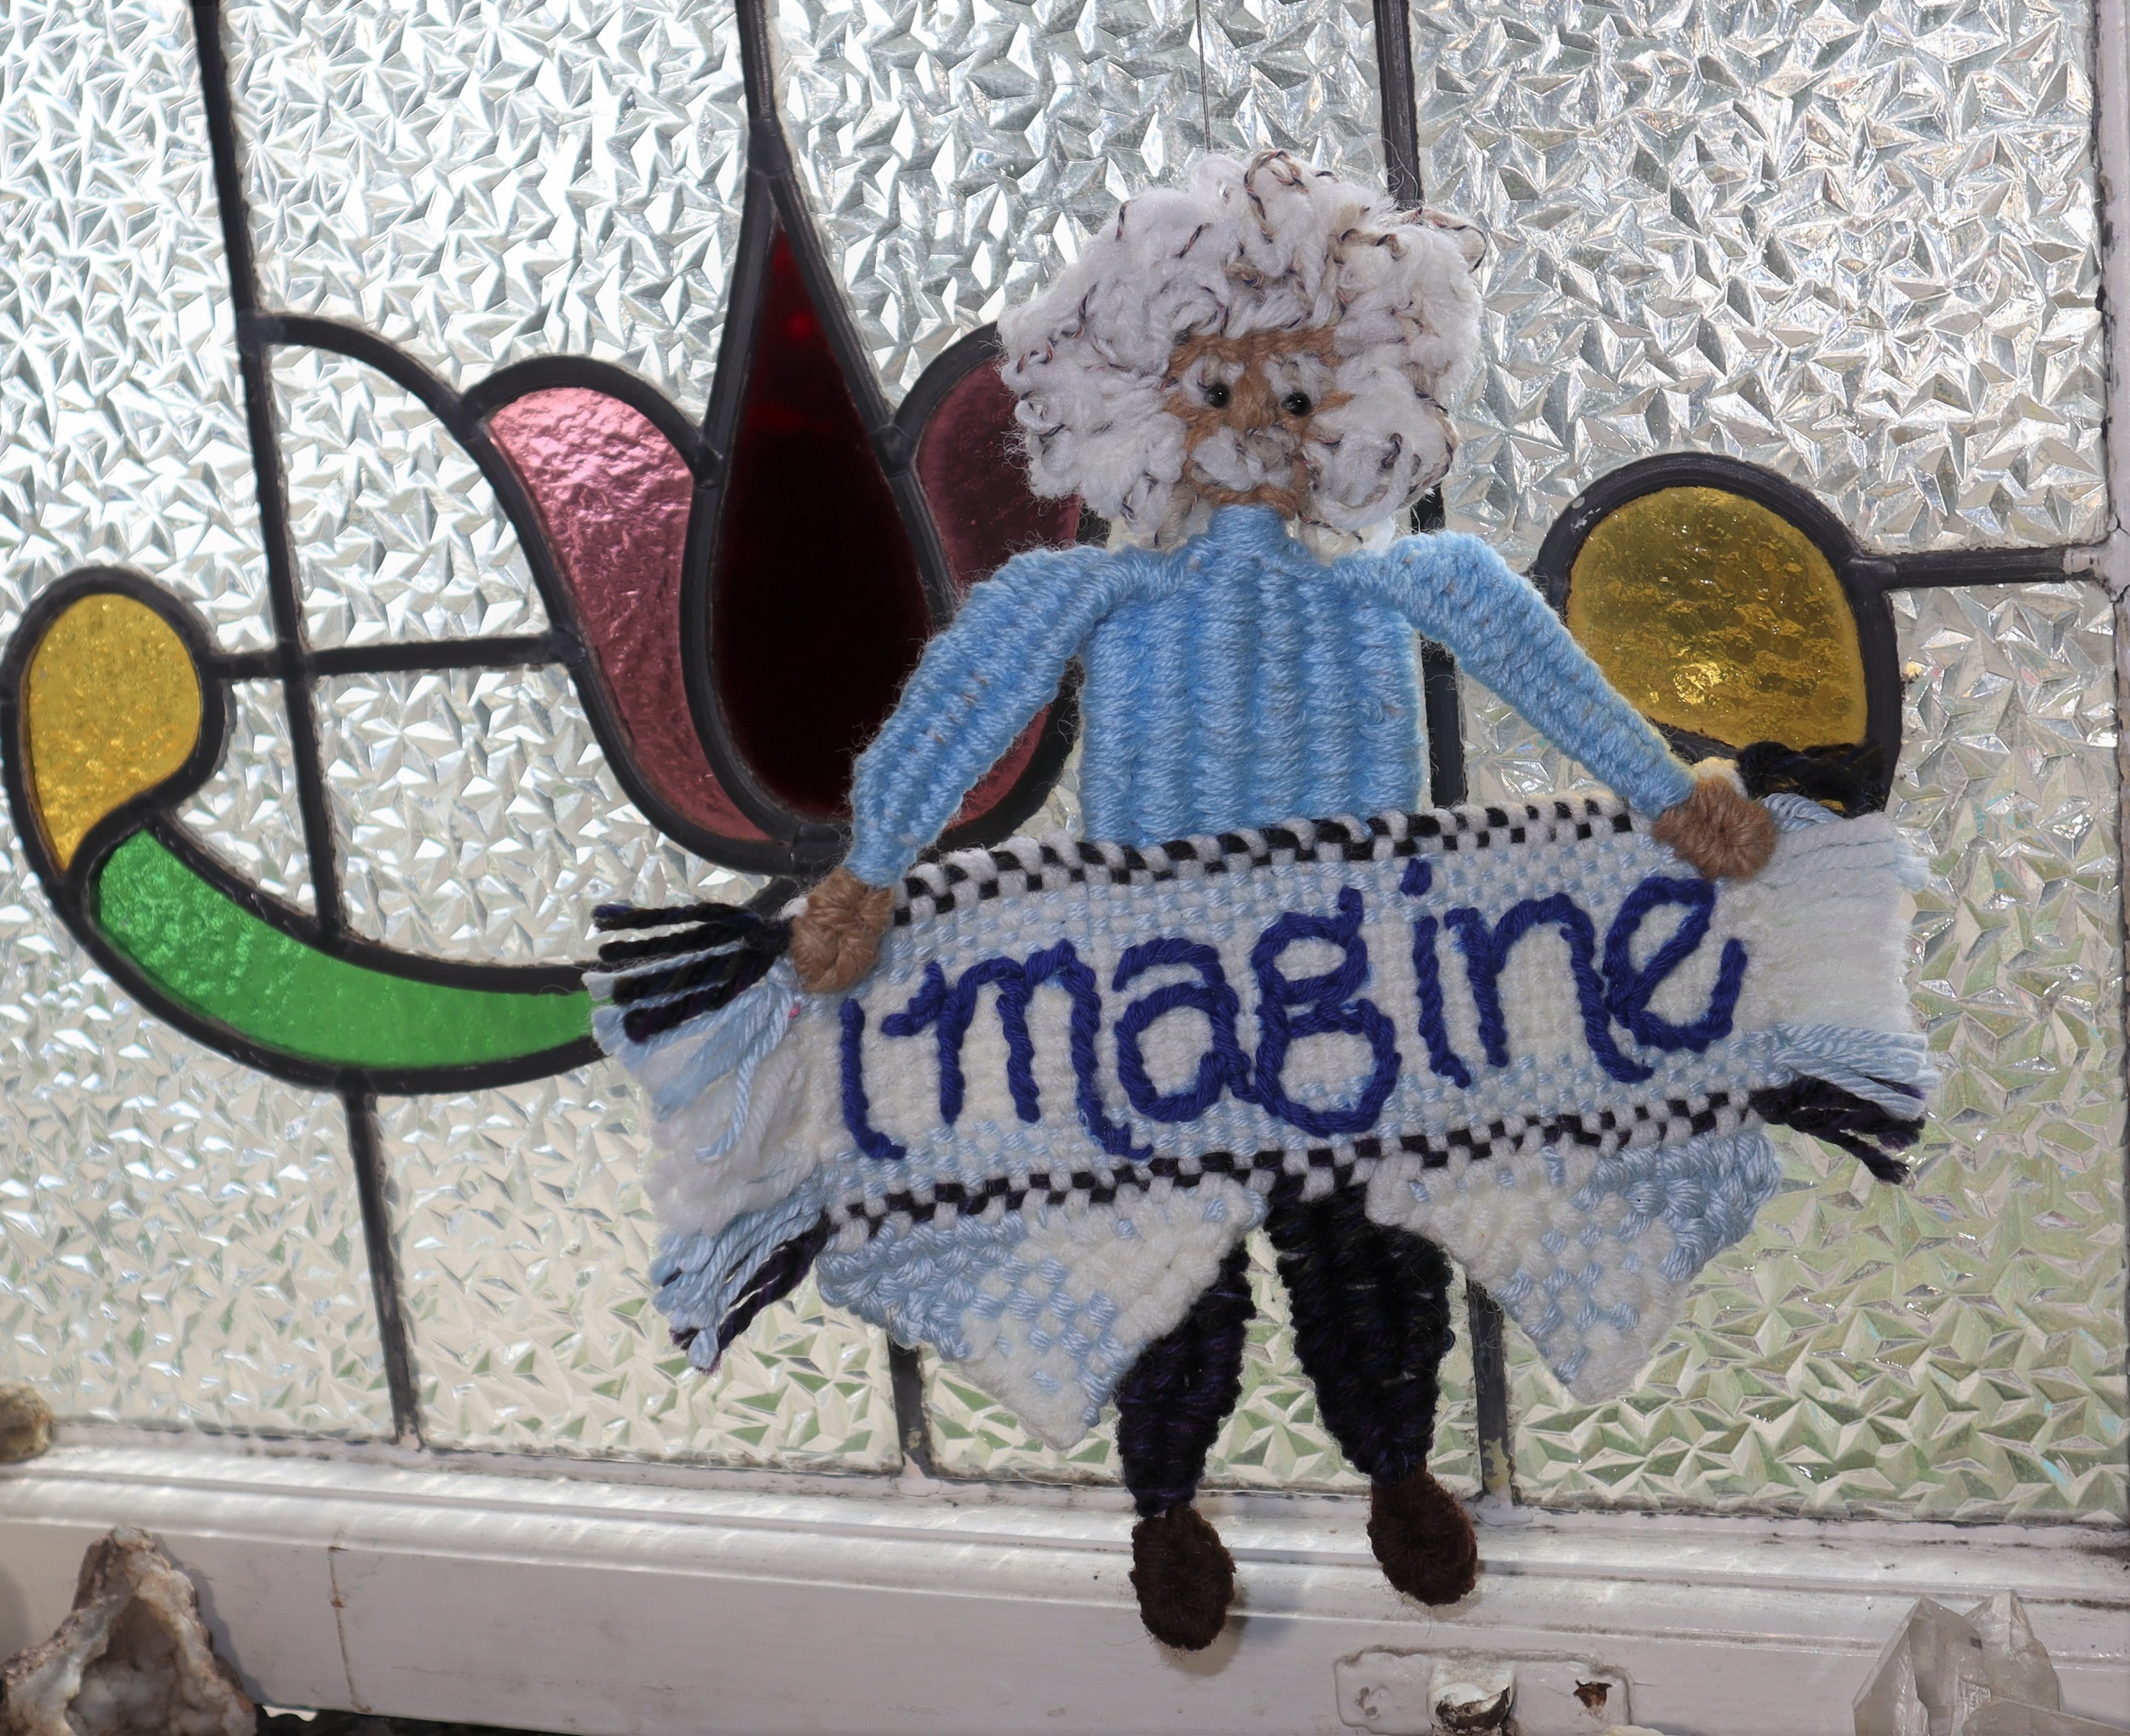
FREE FORM WEAVING: HOMAGE TO ALBERT EINSTEIN:
Albert Einstein is woven (with a few extrapolations and a slight adjustment to the waistline) following the instructions for the Woven Dancer on page 30 of “Innovative Weaving on the Frame Loom”.
In order to hold the pattern onto the loom, a backing board is needed. See: LINK
INSTRUCTIONS:
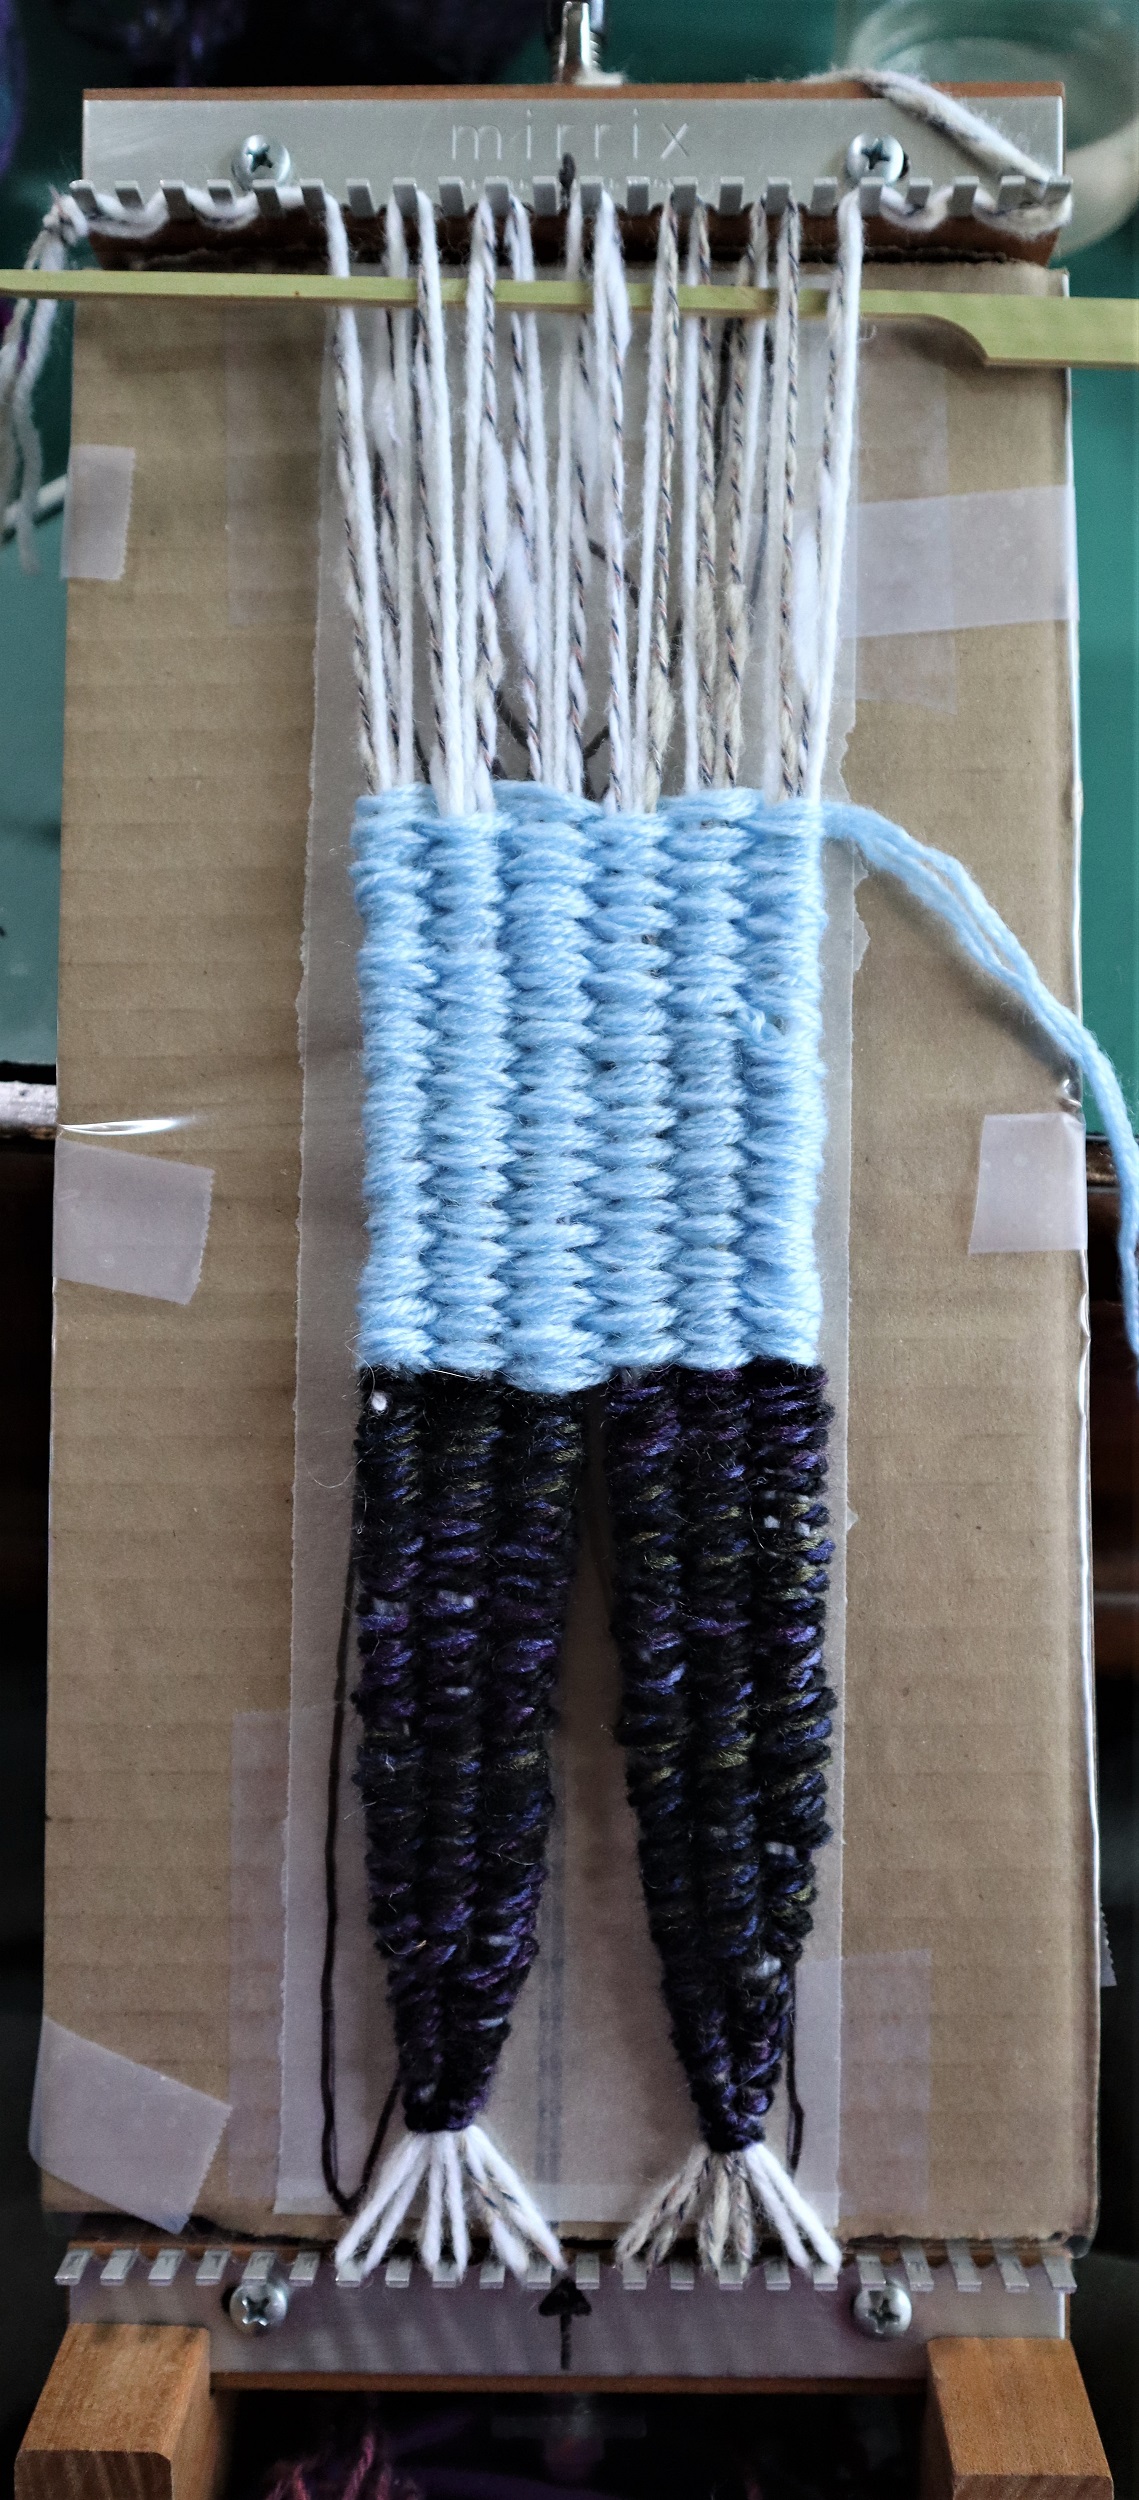
HOW TOWEAVE THE ALBERT EINSTEIN FIGURE:
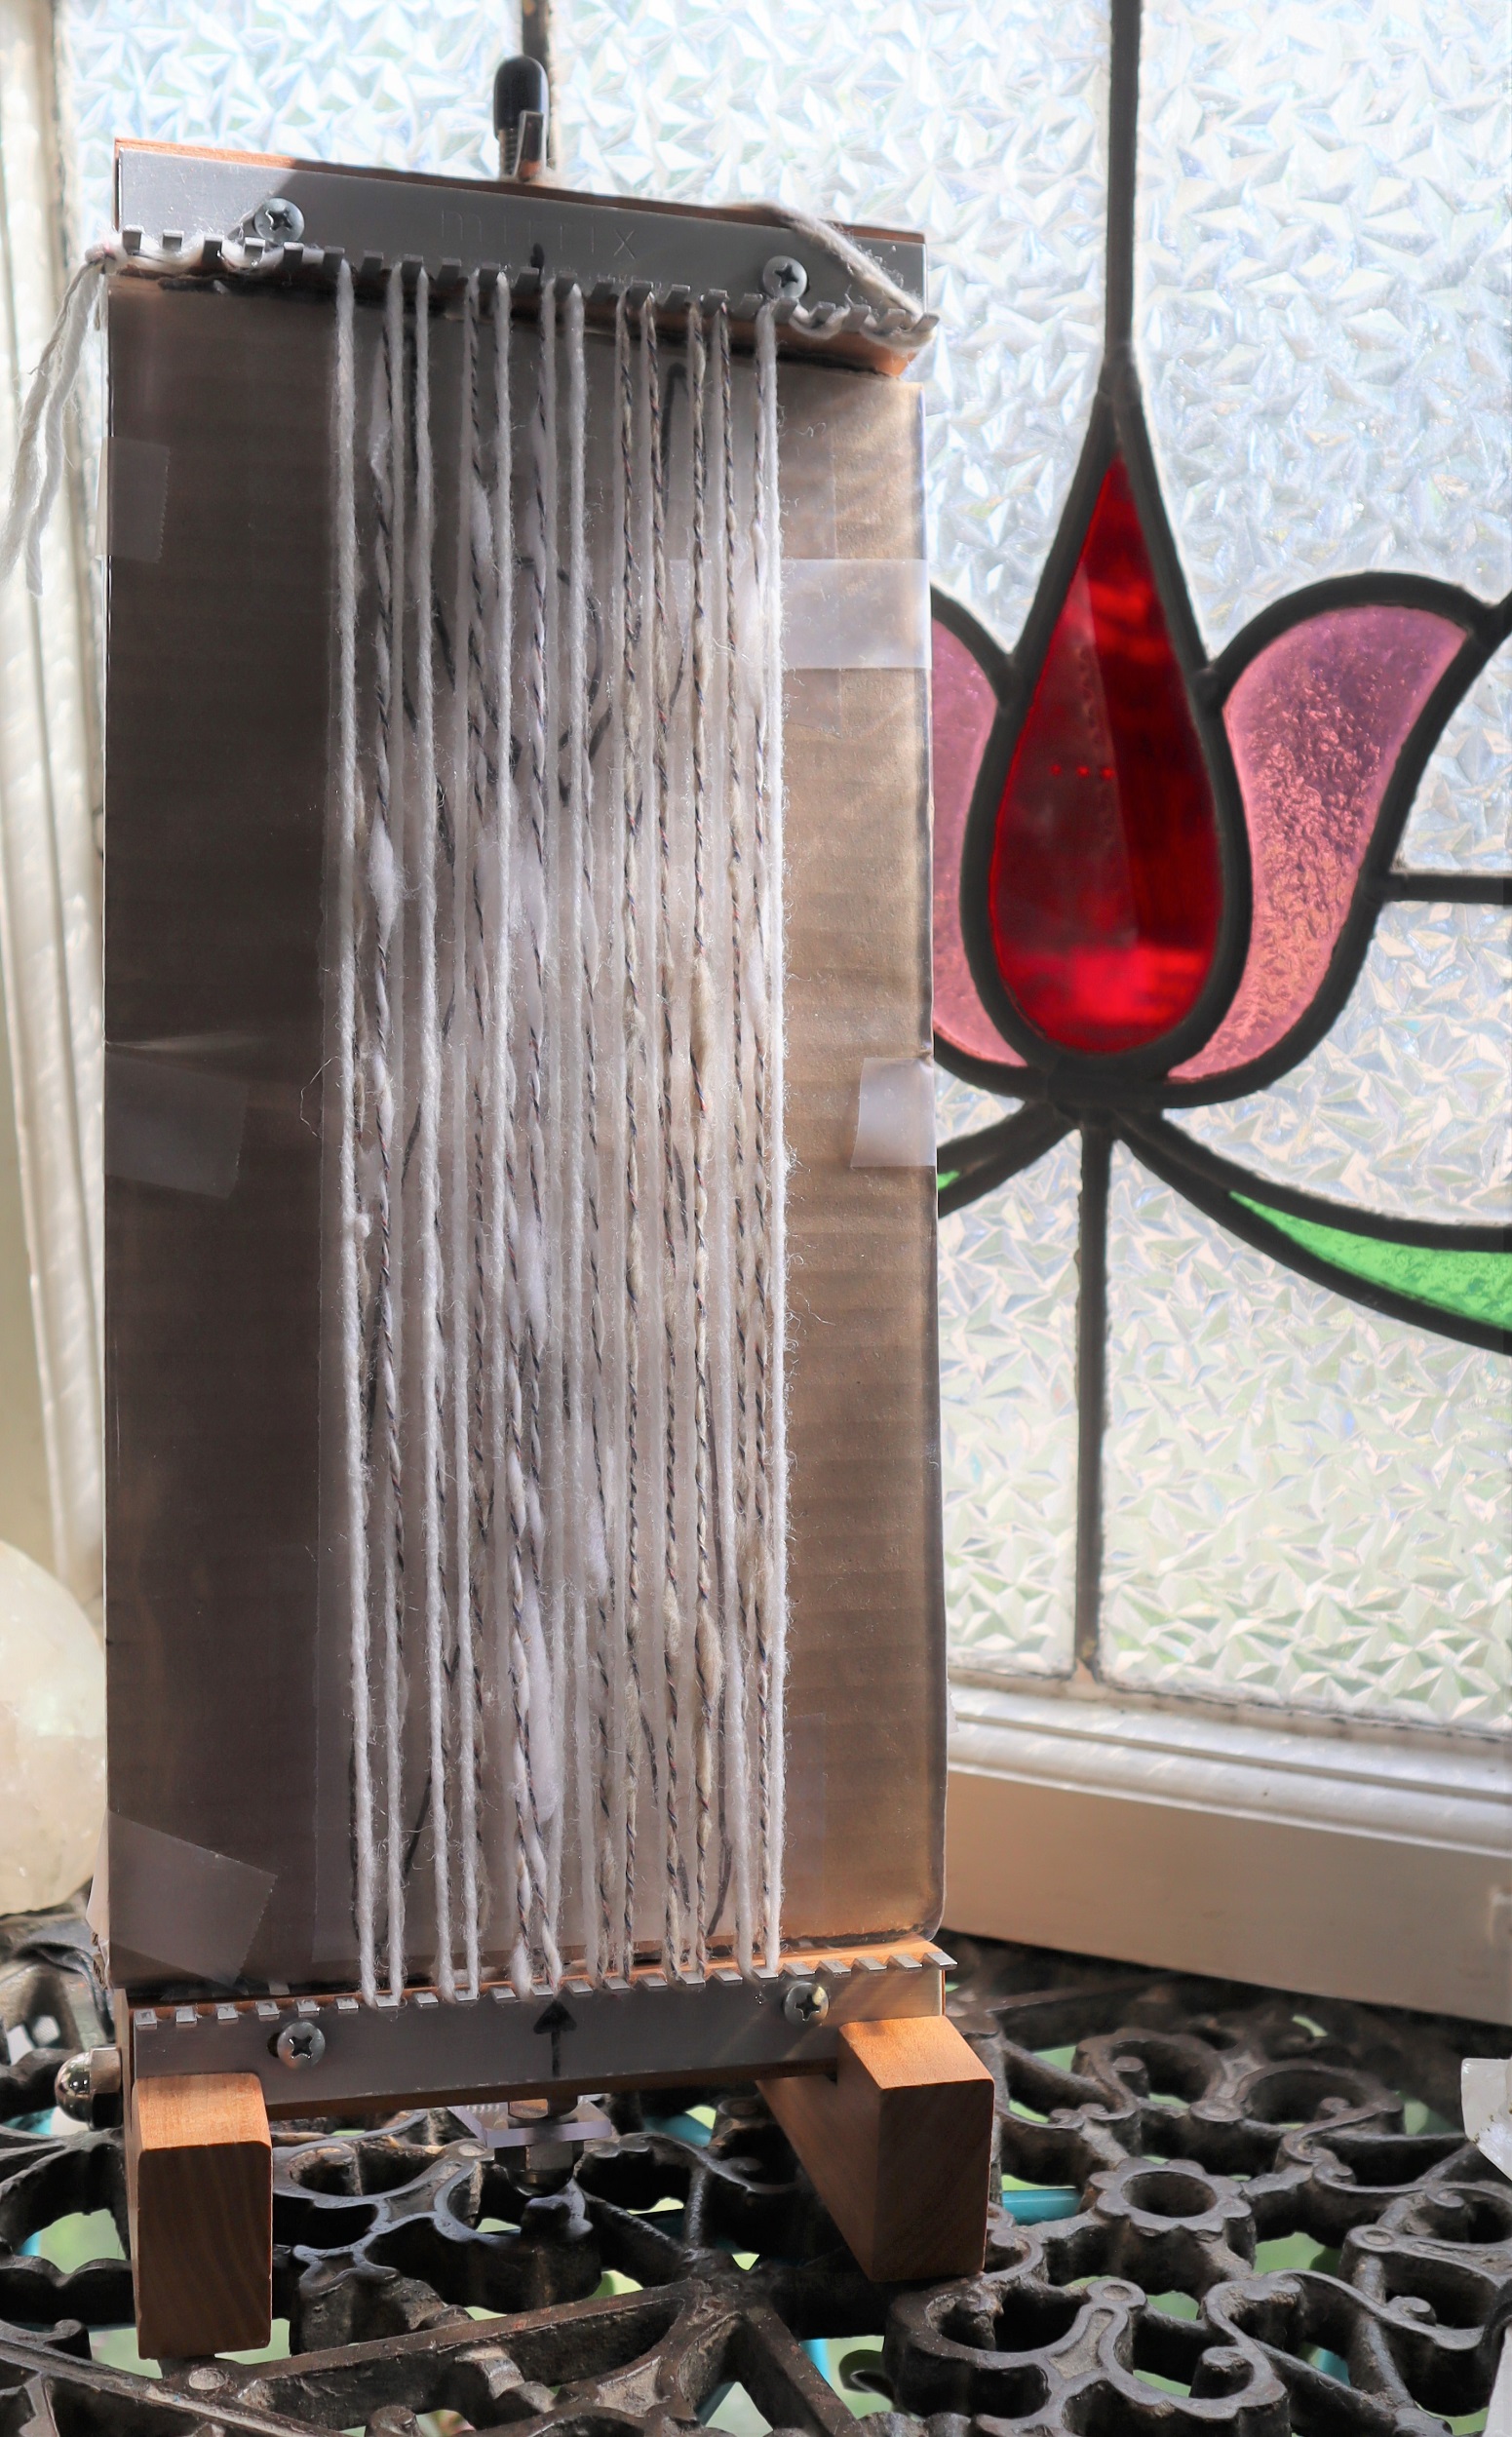
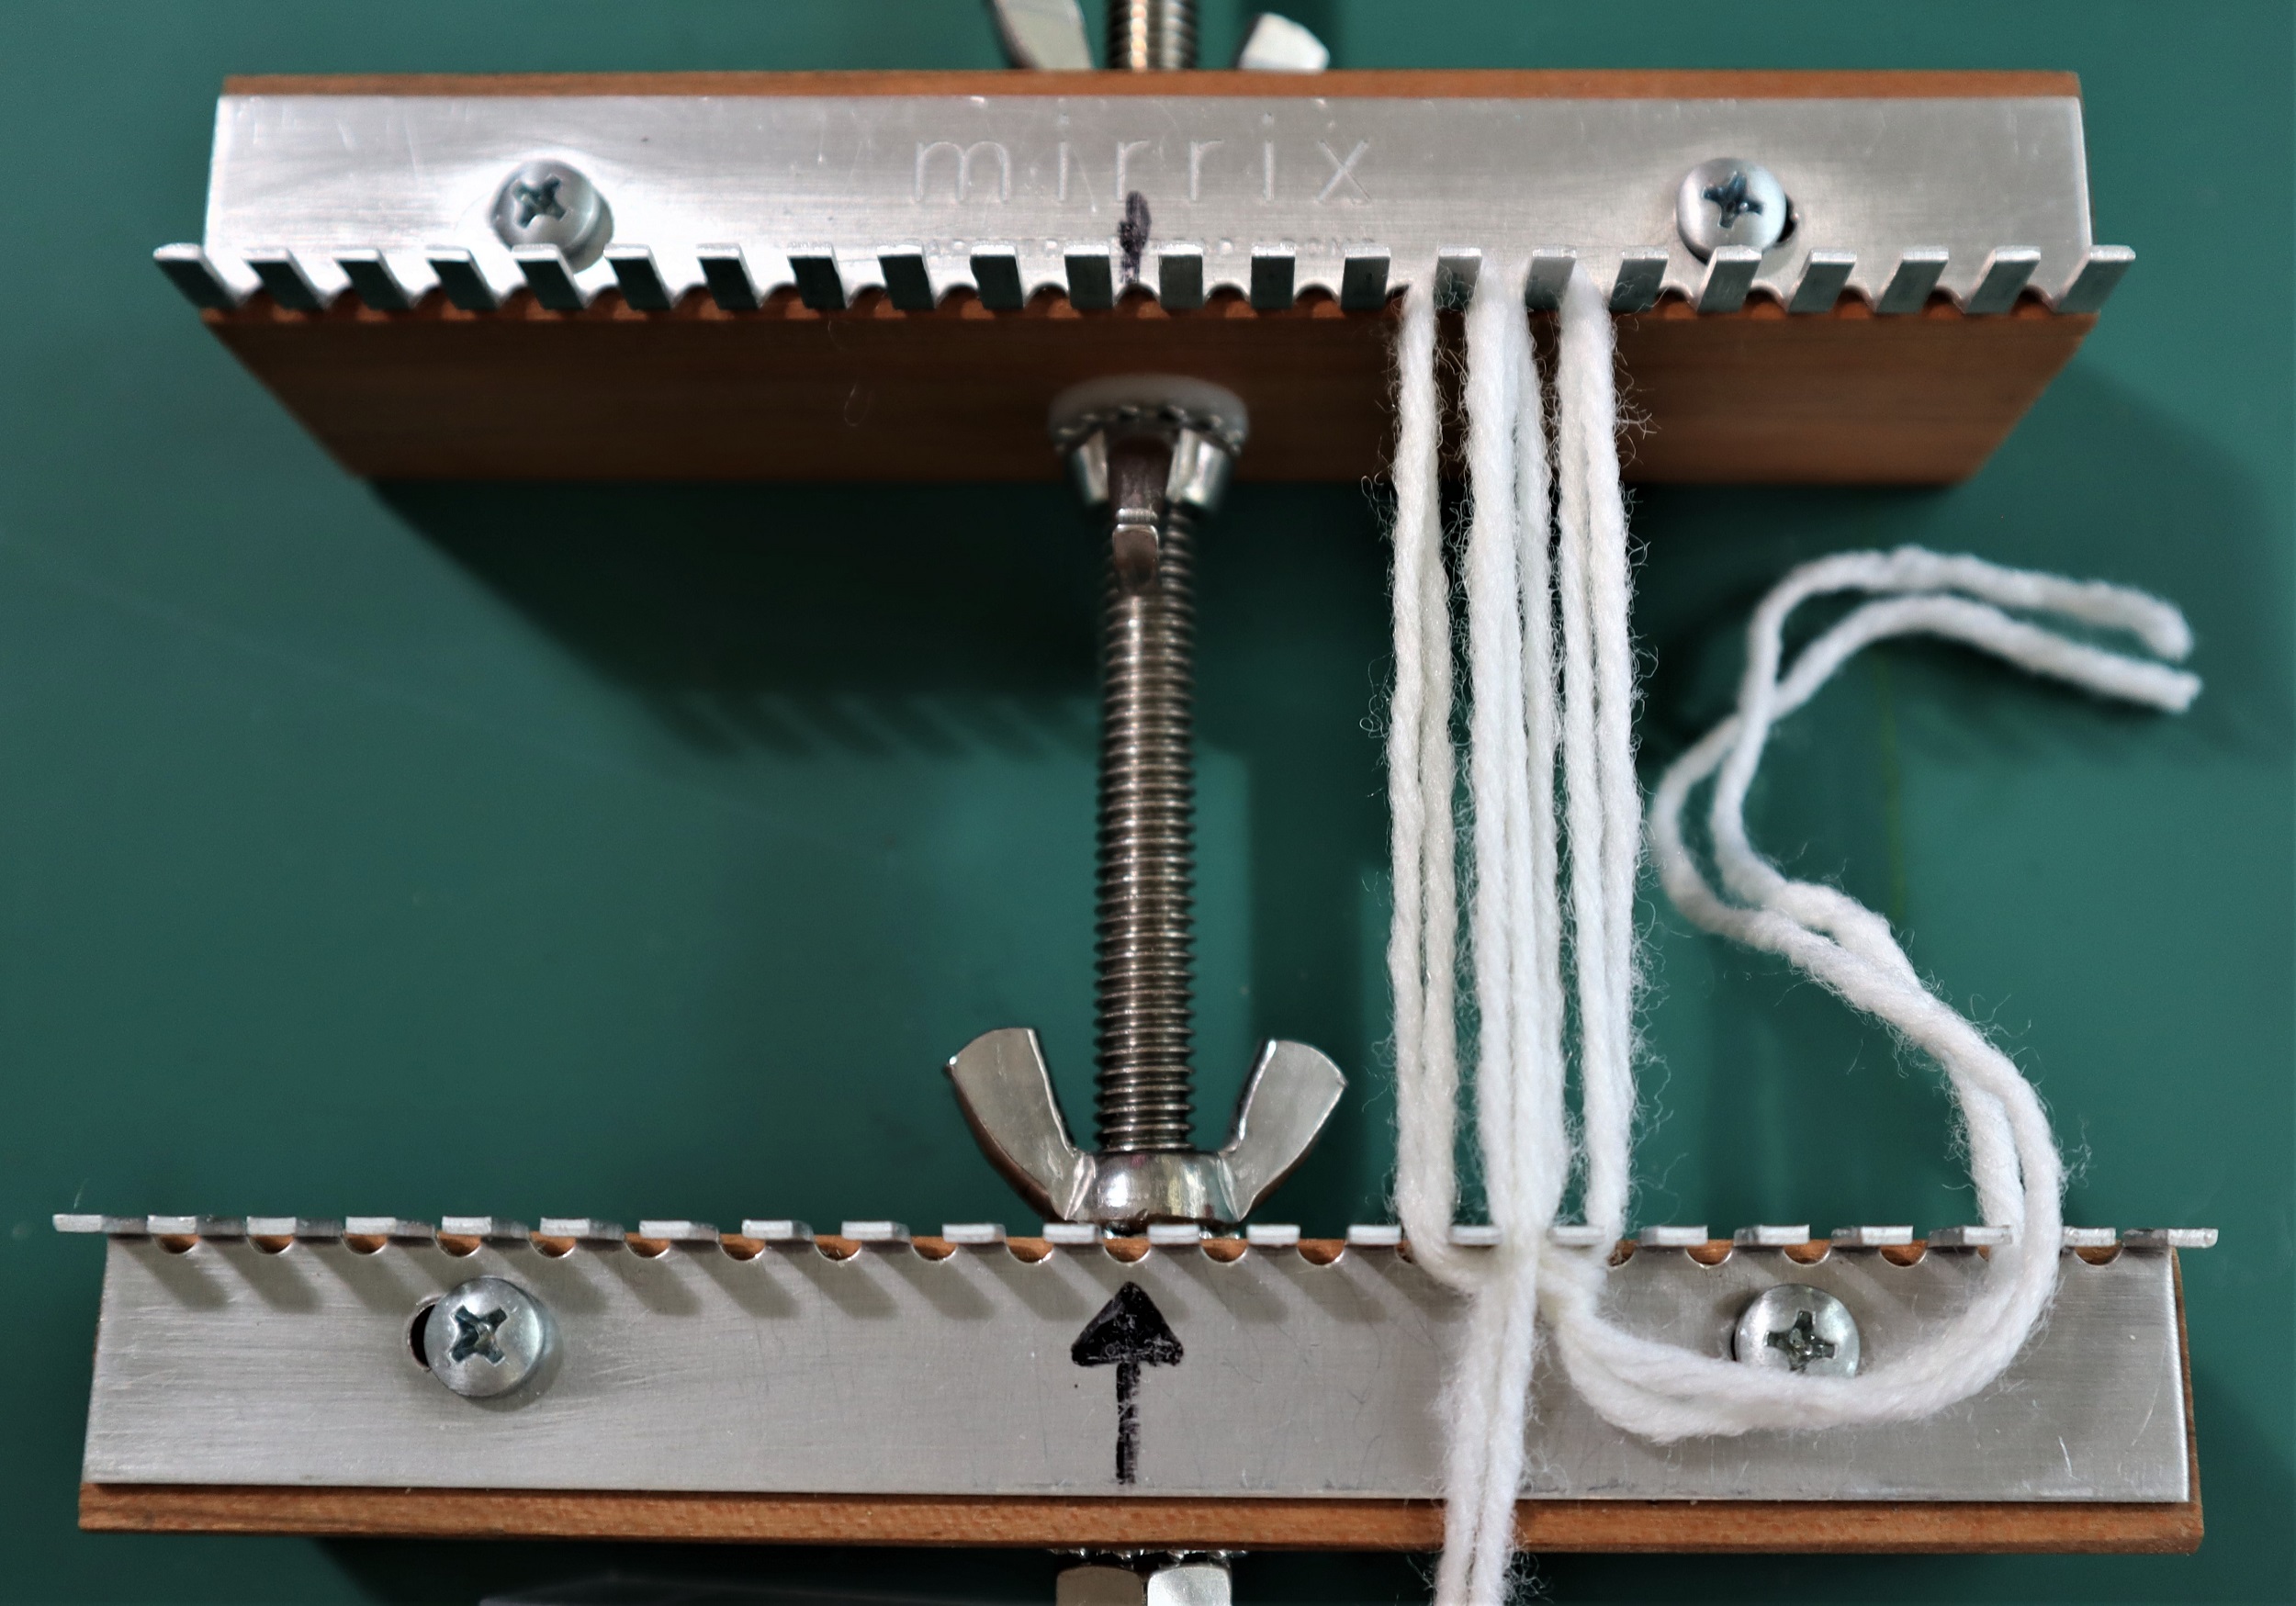
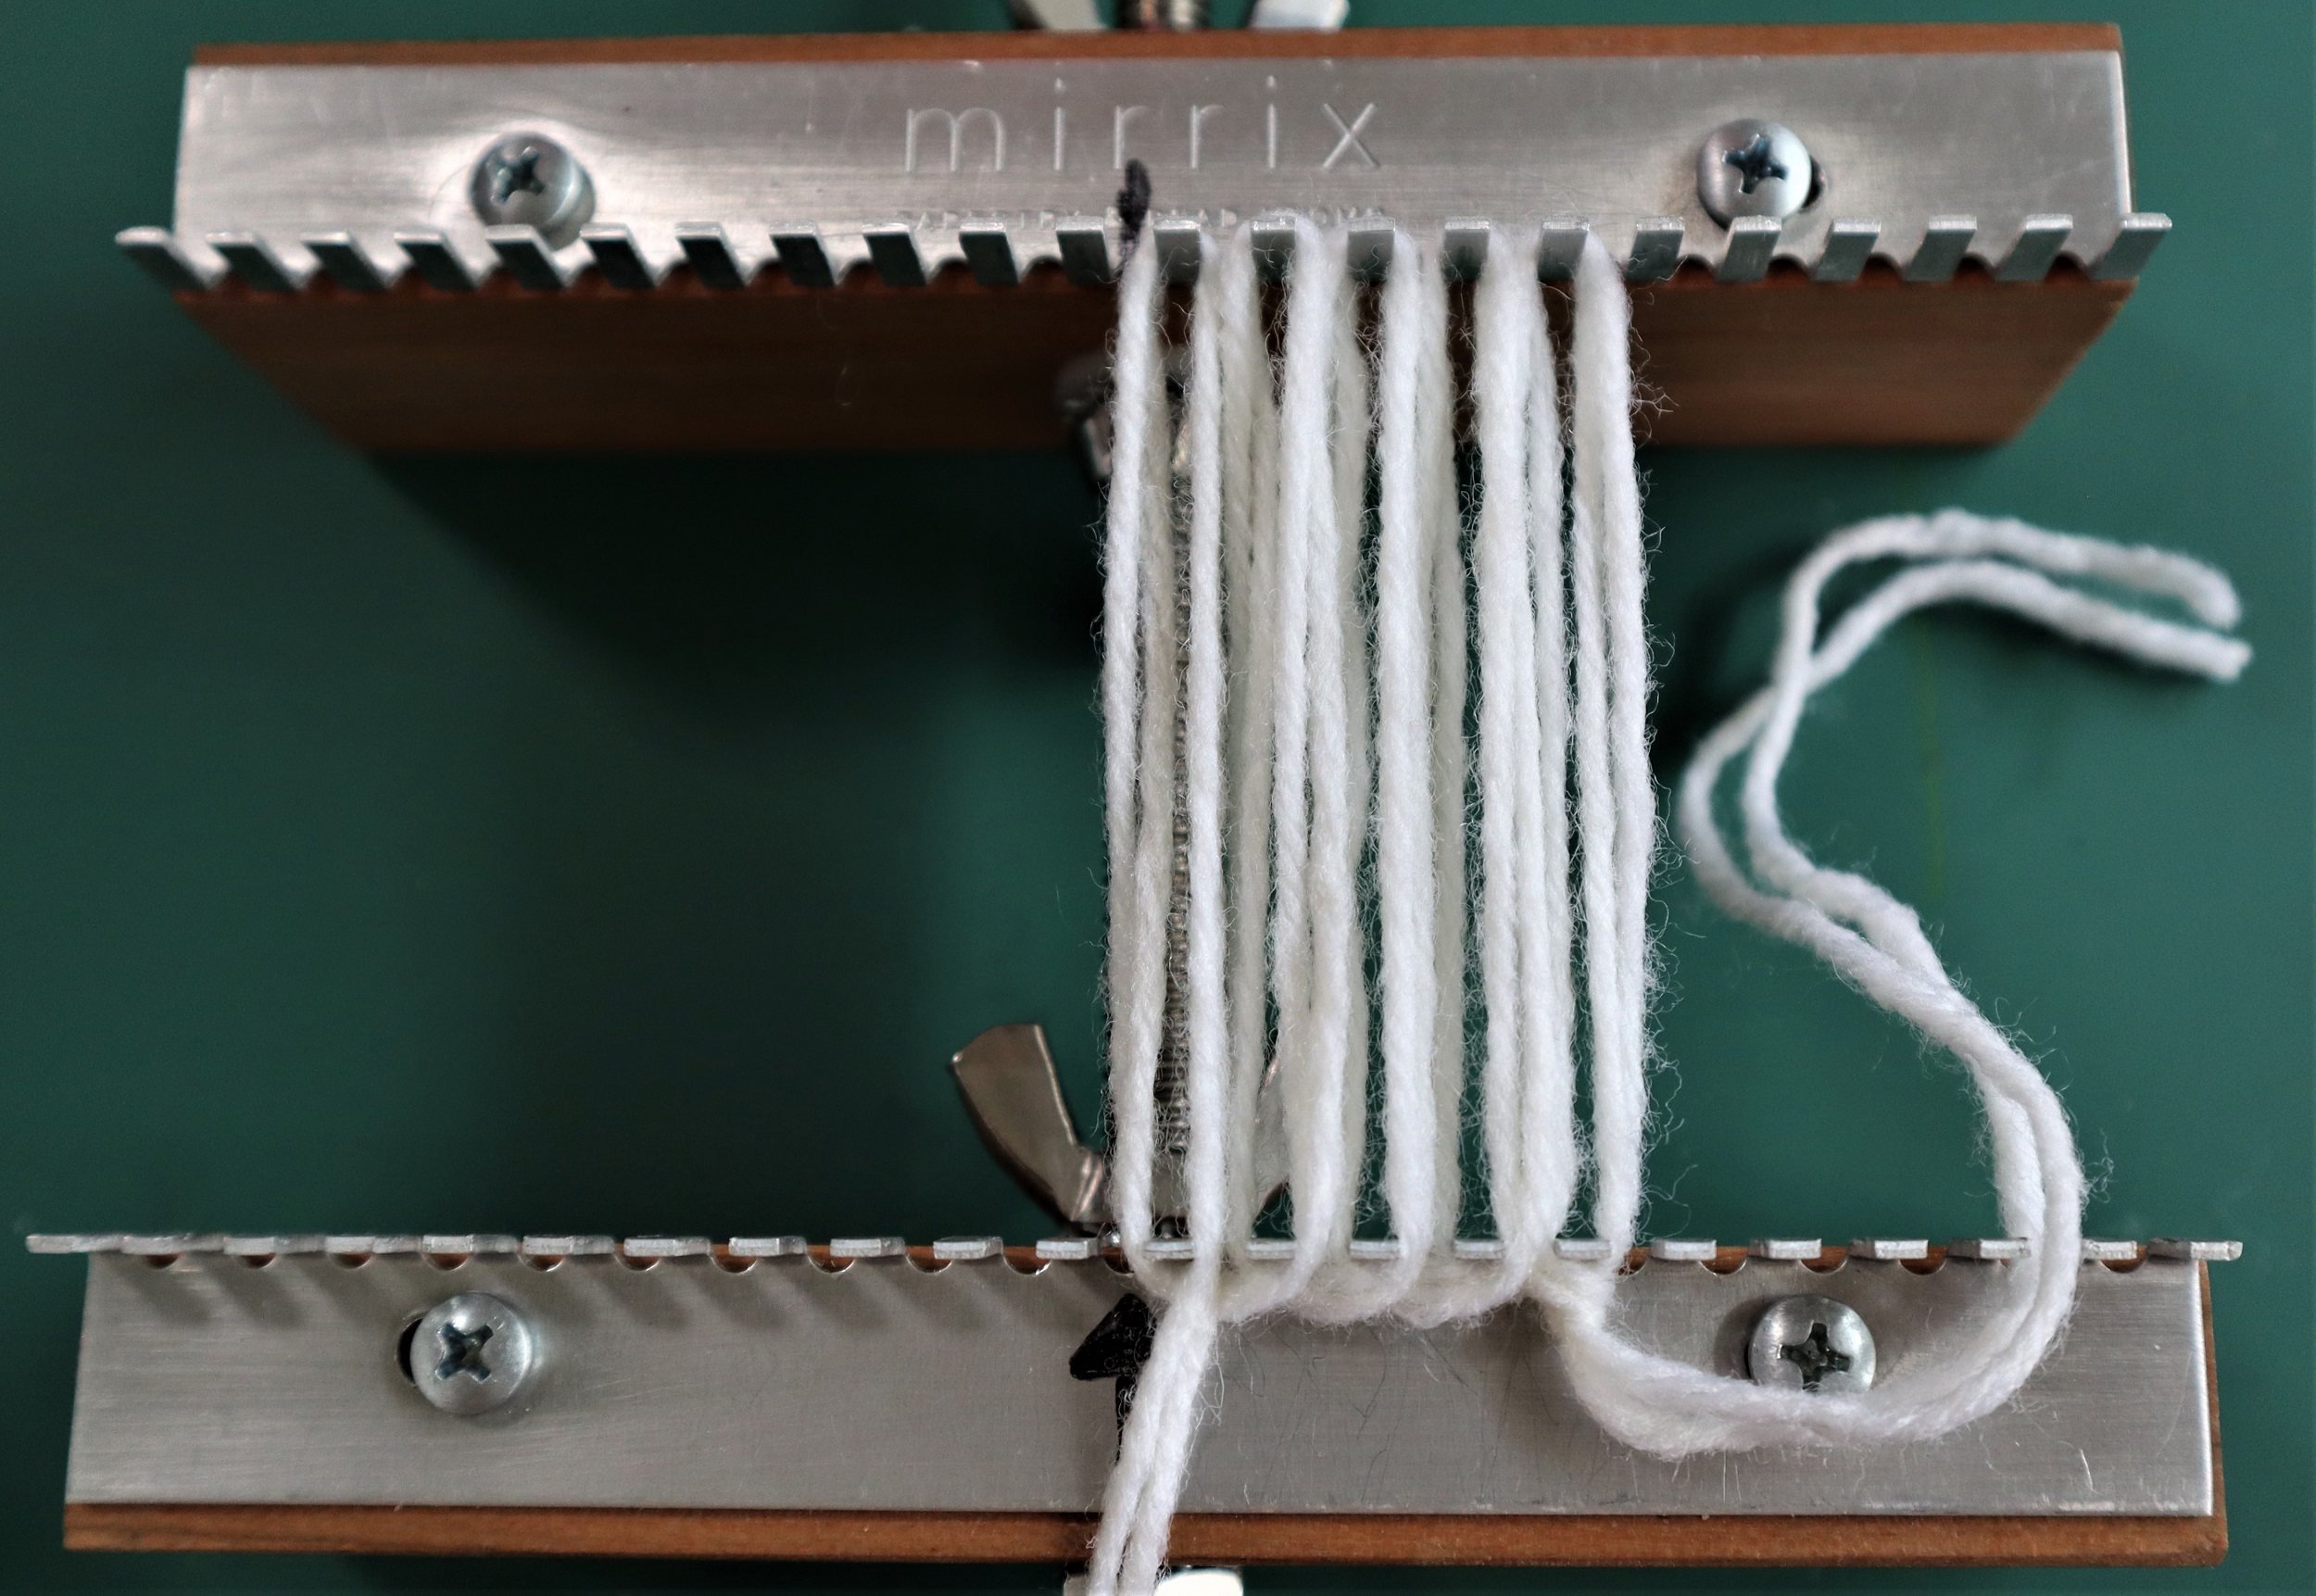
1: SET UP THE LOOM so it is 11 inches/27.5 cm) from the lower set of pegs to the upper set. Lock it into the ‘Sandy Stand’.
Fold the ends of the backing board to the back and slide it in place on the loom.
2: WARP THE LOOM: Following the instructions for the Woven Dancer on page 30 of ‘Innovative Weaving on the Frame Loom’, with 1 strand of #4 Medium weight (Worsted or Sport weight) yarn white and 1 strand grey held together as if they are a single strand:
Skip 6 pegs at each side of the loom and warp the loom, following the instructions in the book closely.
3: WEAVING:
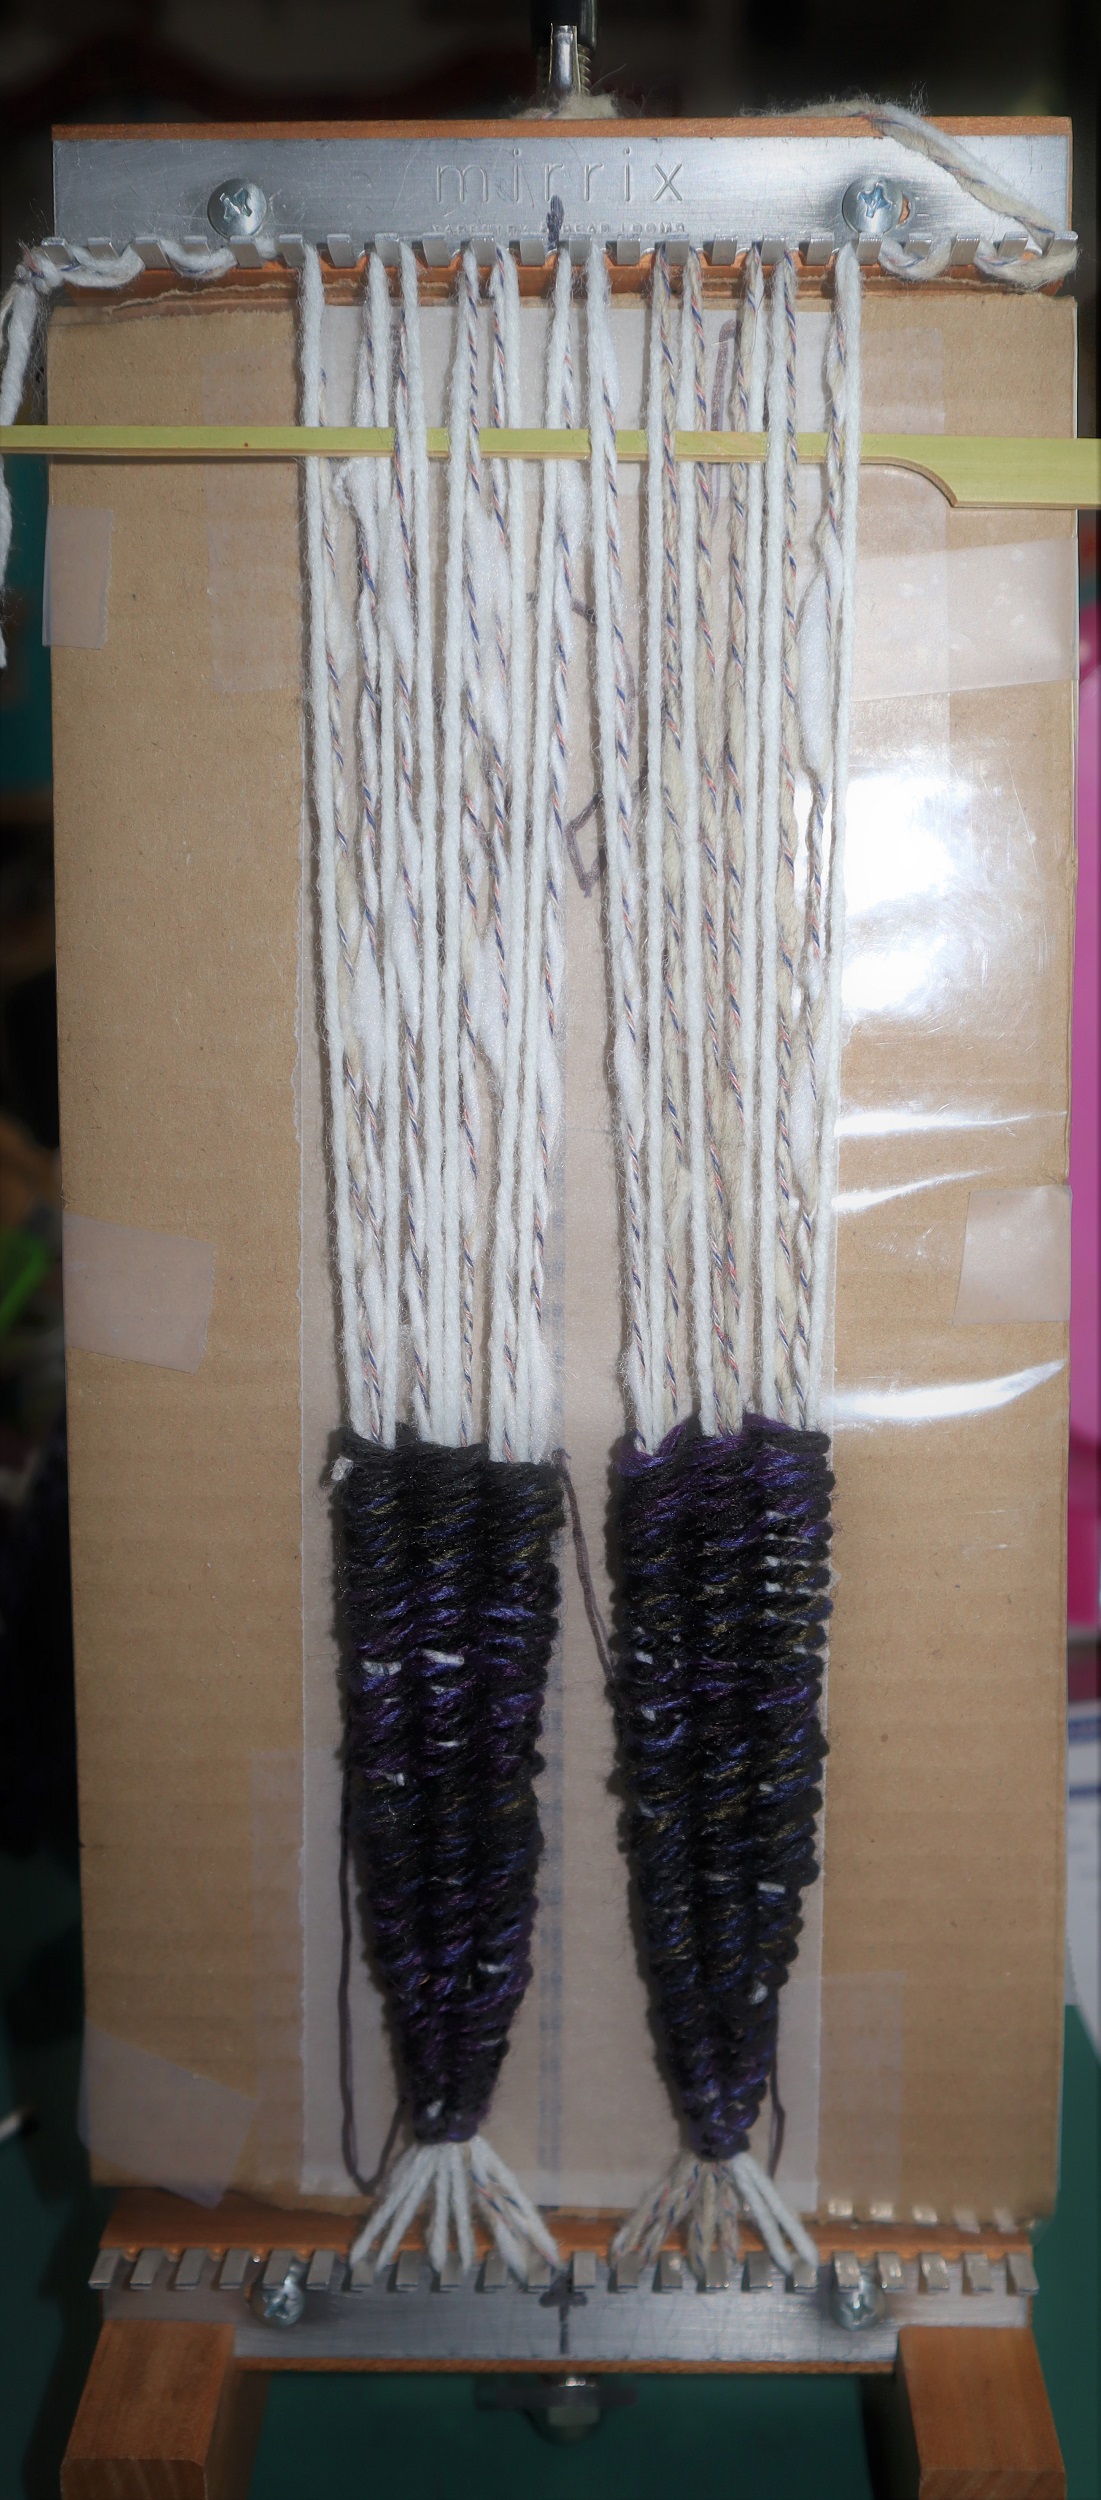
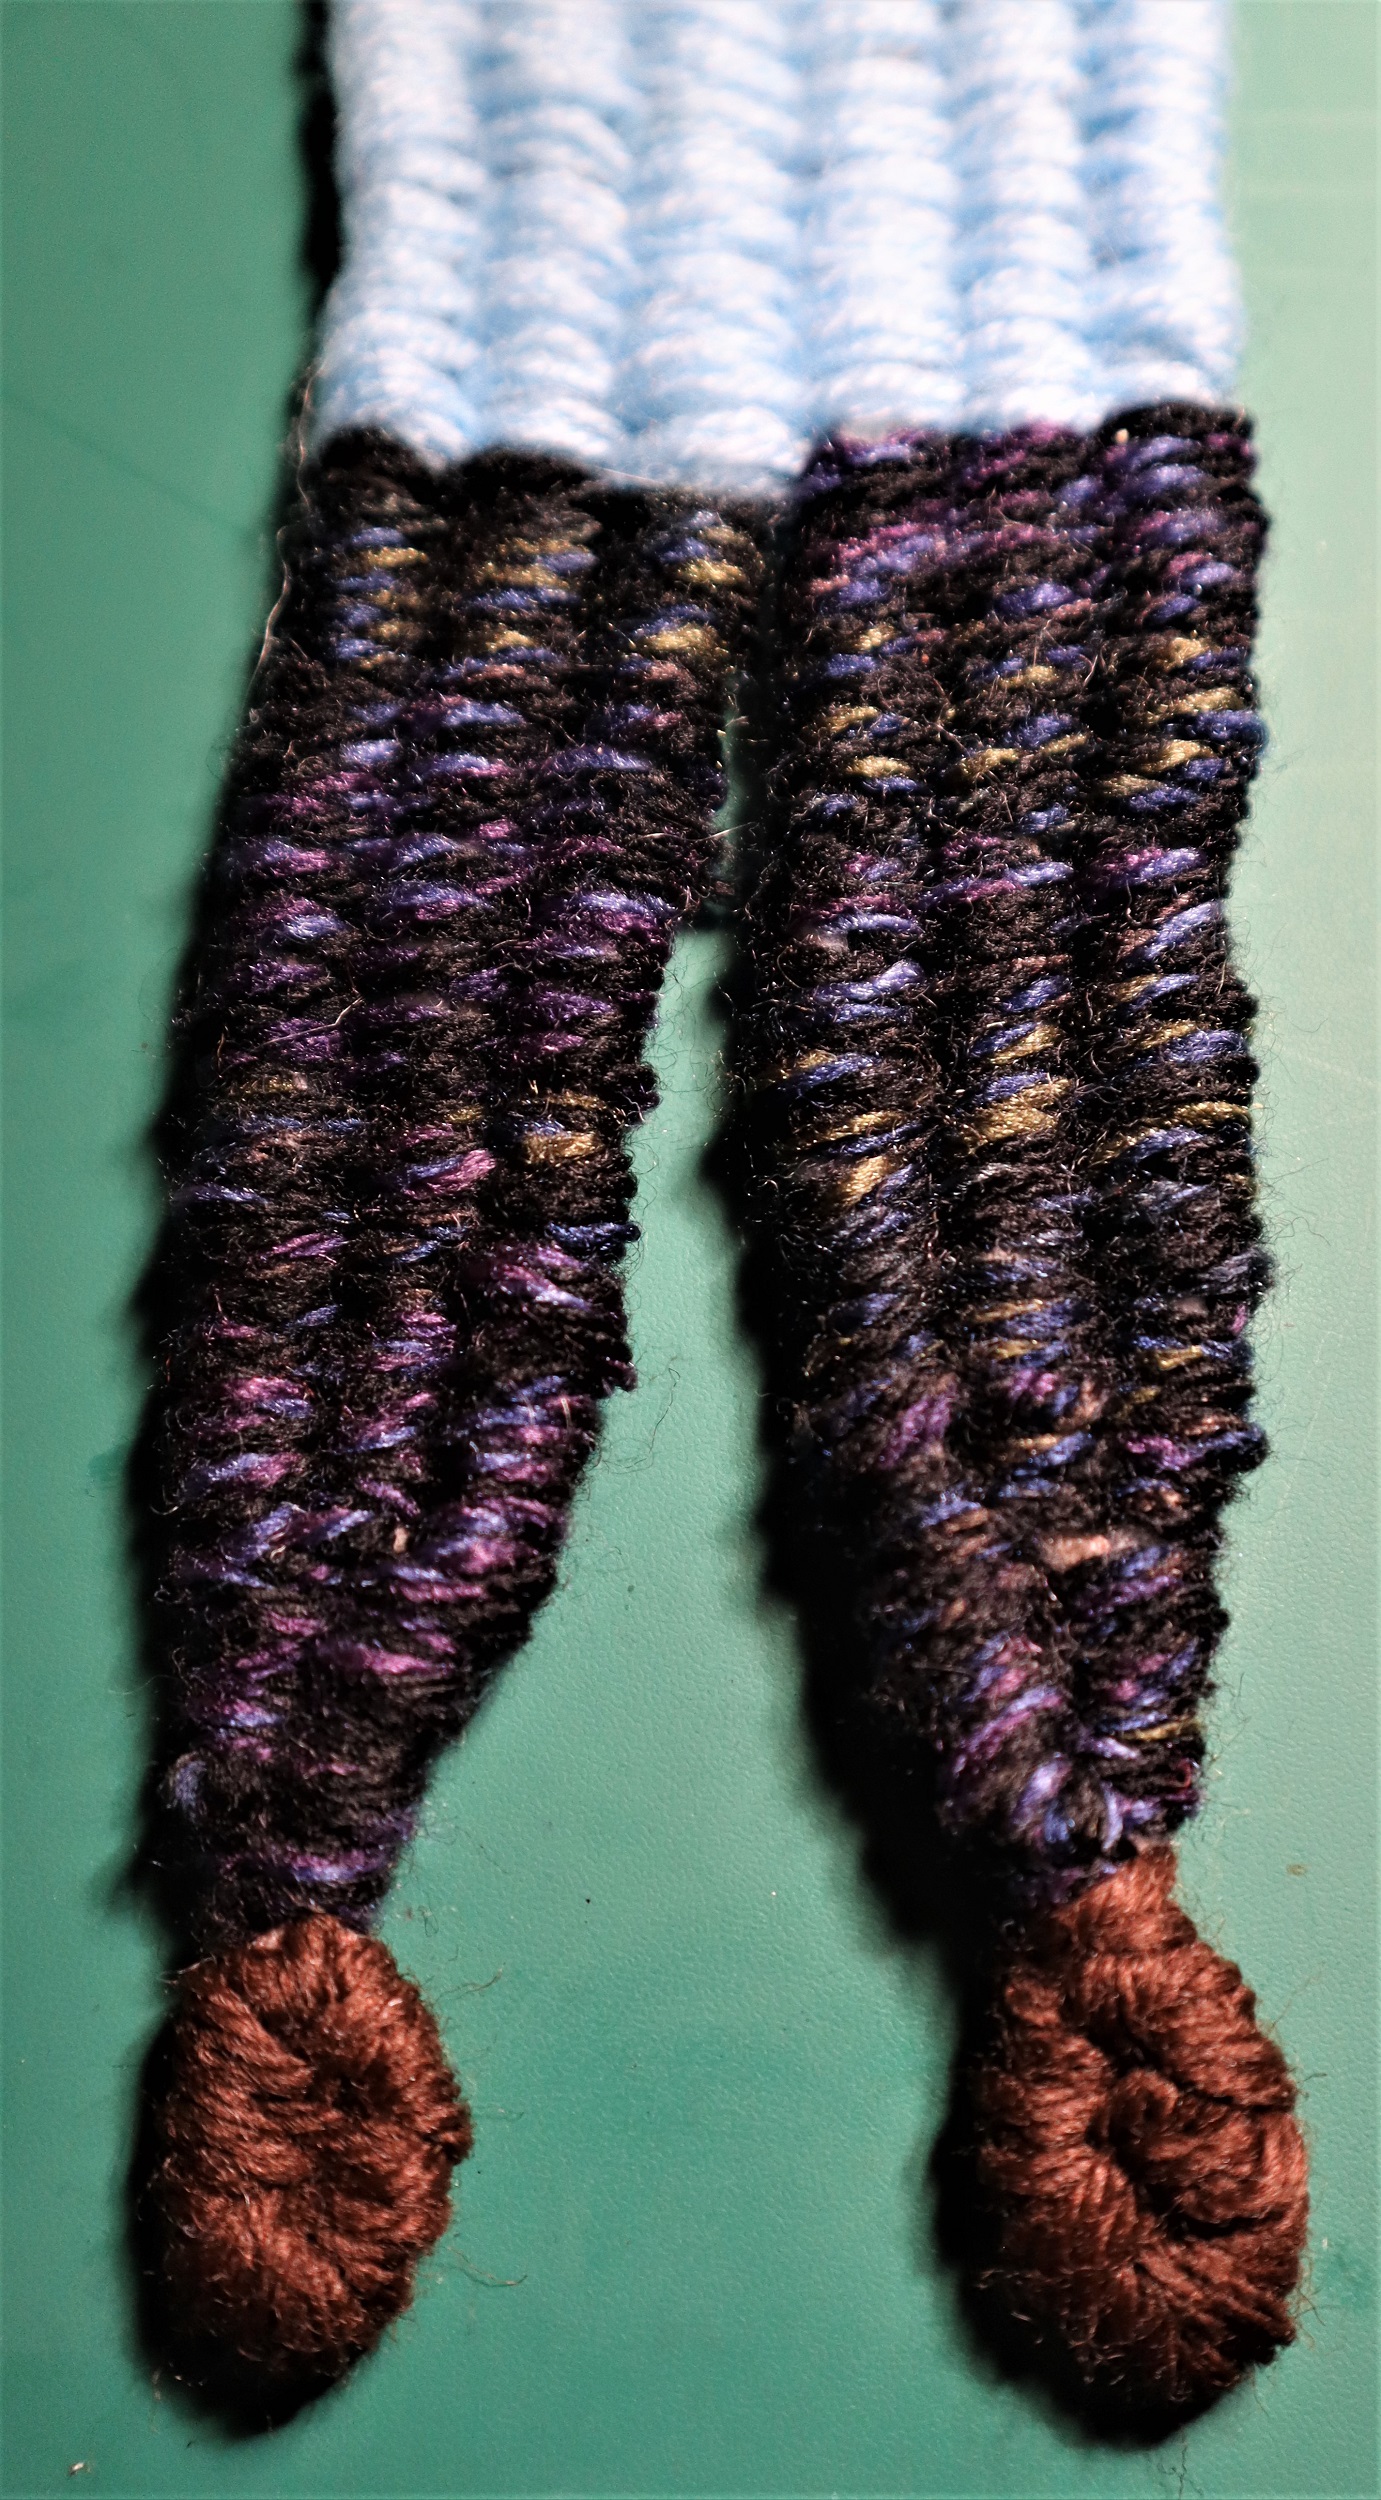
LEGS:
Leaving only an inch or of a tail end rather than the long tail end listed in the instructions in the book, weave the legs with 2 strands of black yarn held together as if they are a single strand, and packing the weaving down closely to completely cover the warp strands. Follow the instructions in the book for weaving the legs, but noting that you will be beating the weft yarn in more densely than in the book.
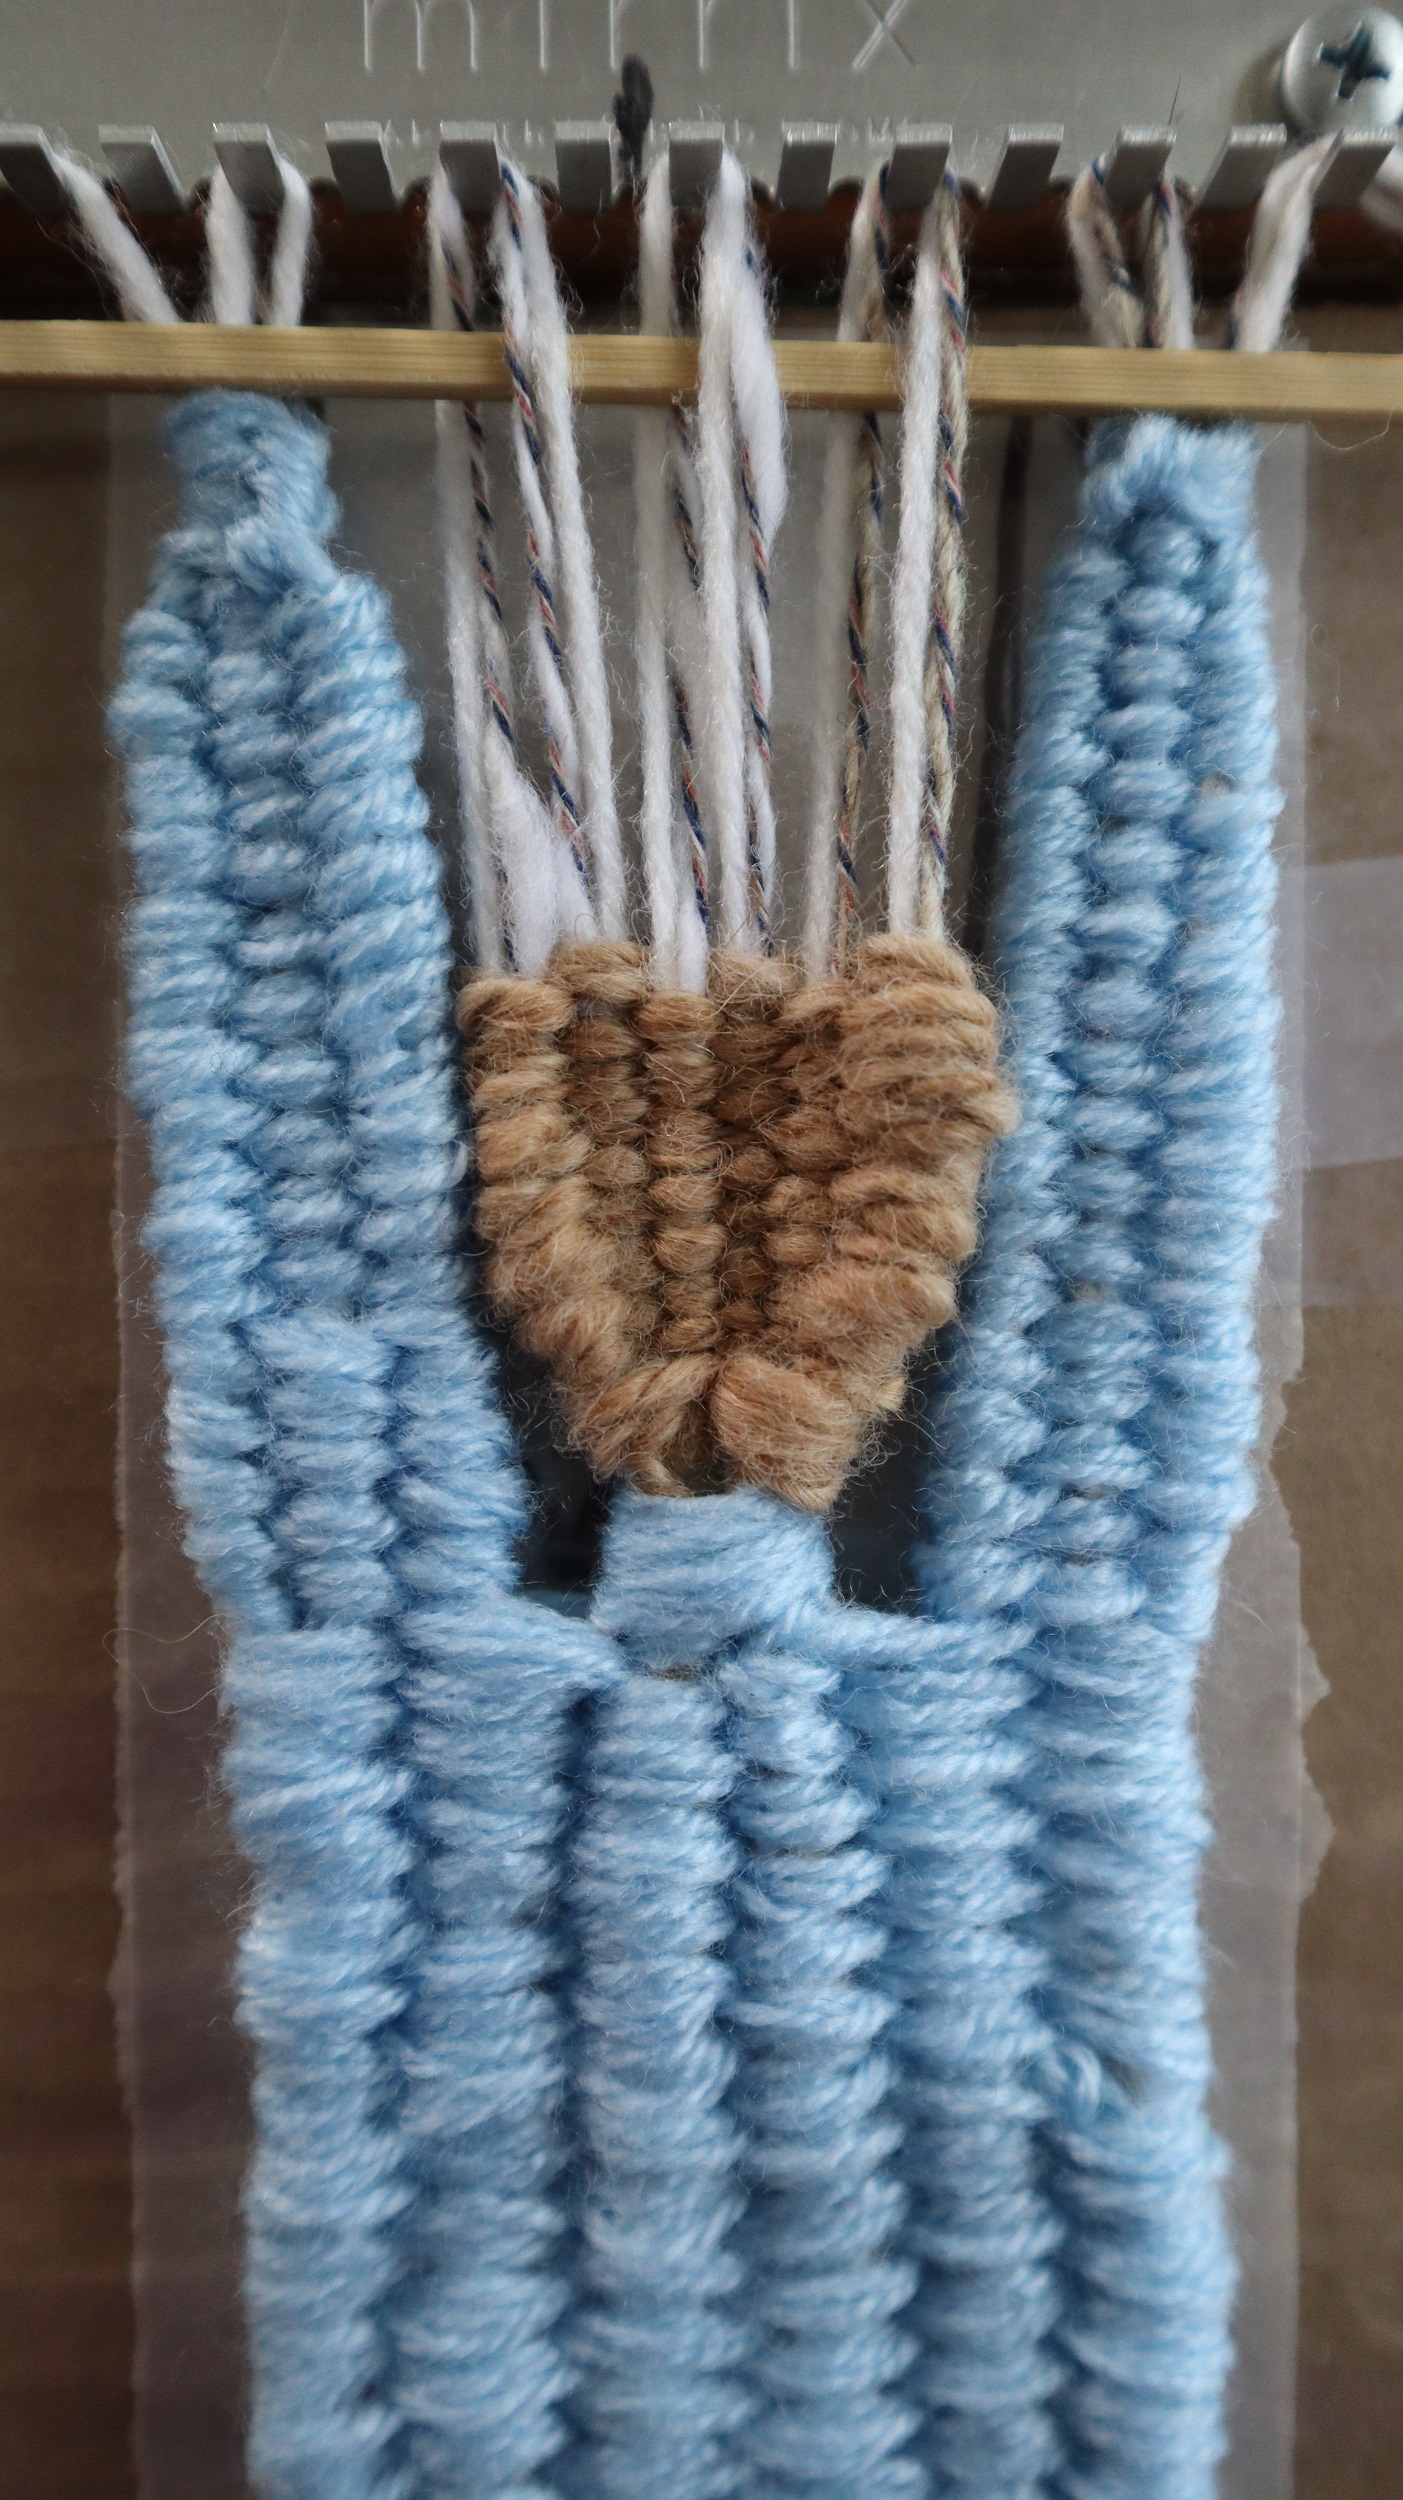
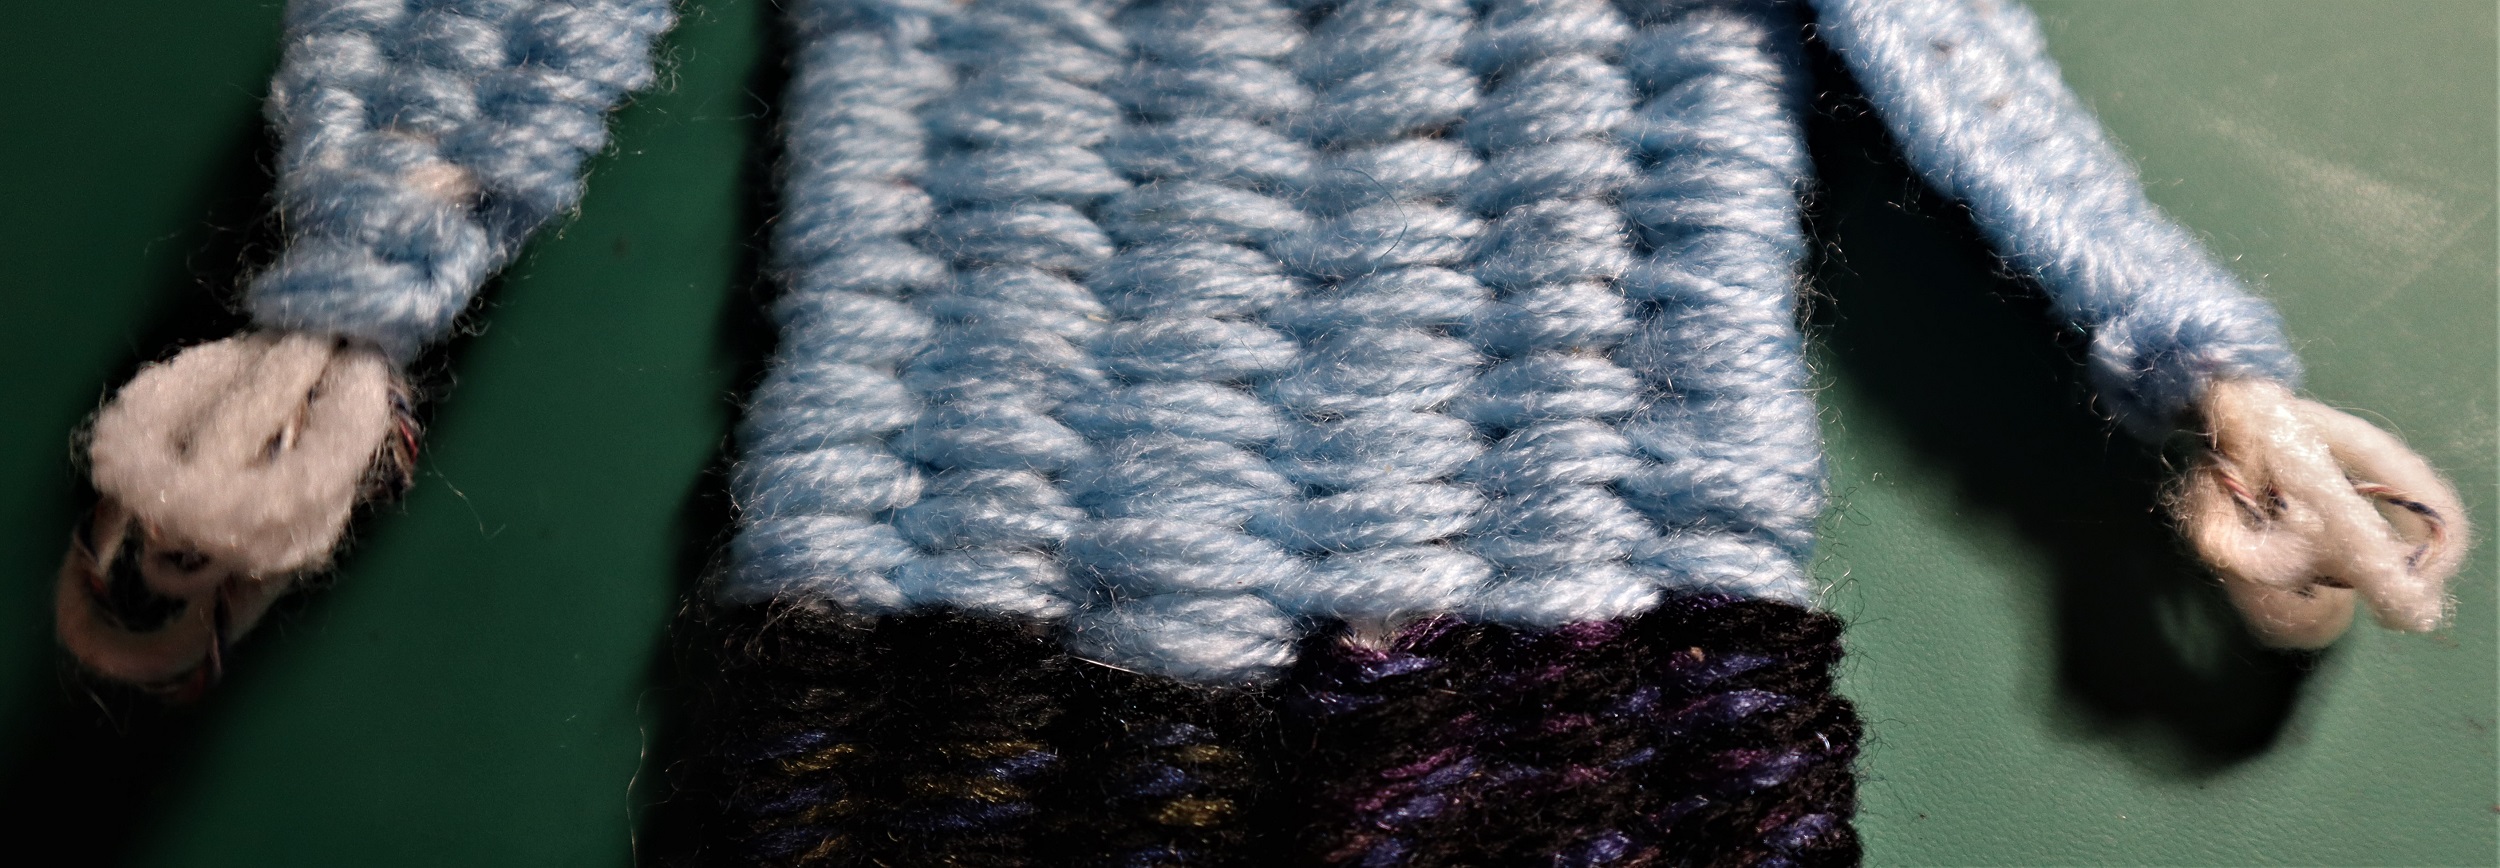
SWEATER:
With 2 strands of light blue yarn held together as if they are a single strand, weave up to the neck. Beat the weft so it completely covers the warp strands.
DO NOT pull in the waistline as it is drawn in the book. Weave the sweater straight up to the shoulders.
Wrap the neck with the blue yarn and weave in the ends.
SLEEVES:
Weave the sleeves following the instructions for the arms, but, once again, beat the weft so it completely covers the warp strands.
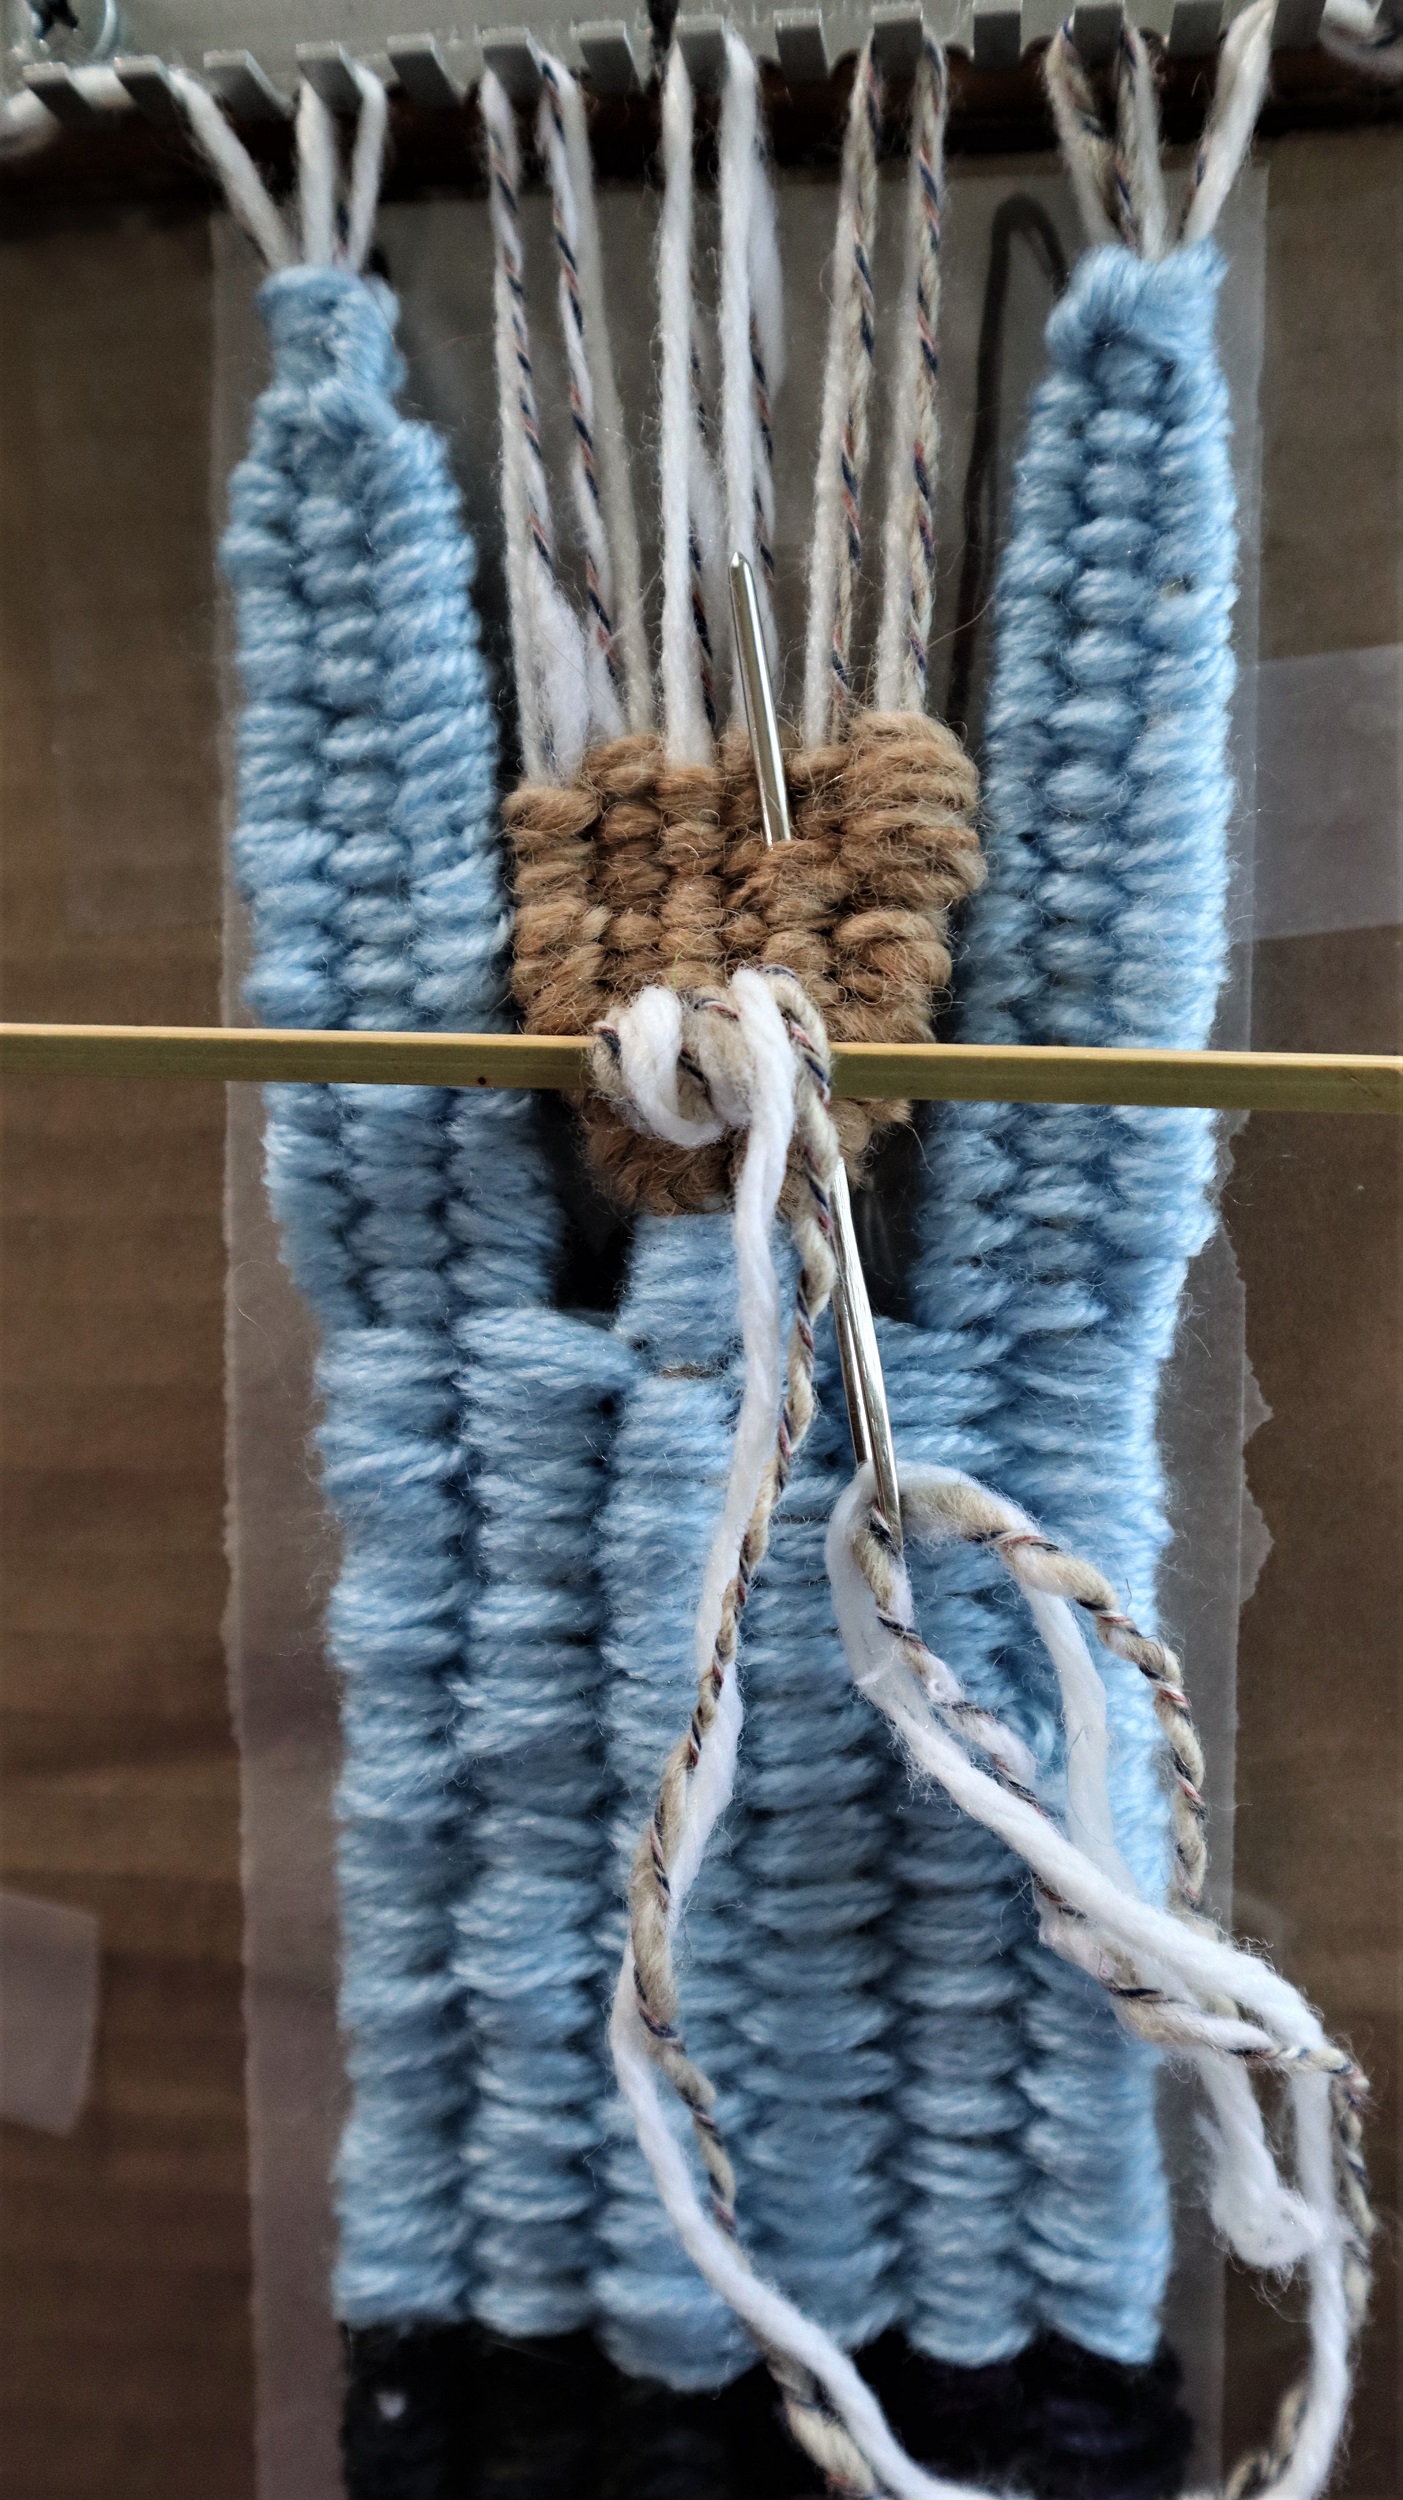
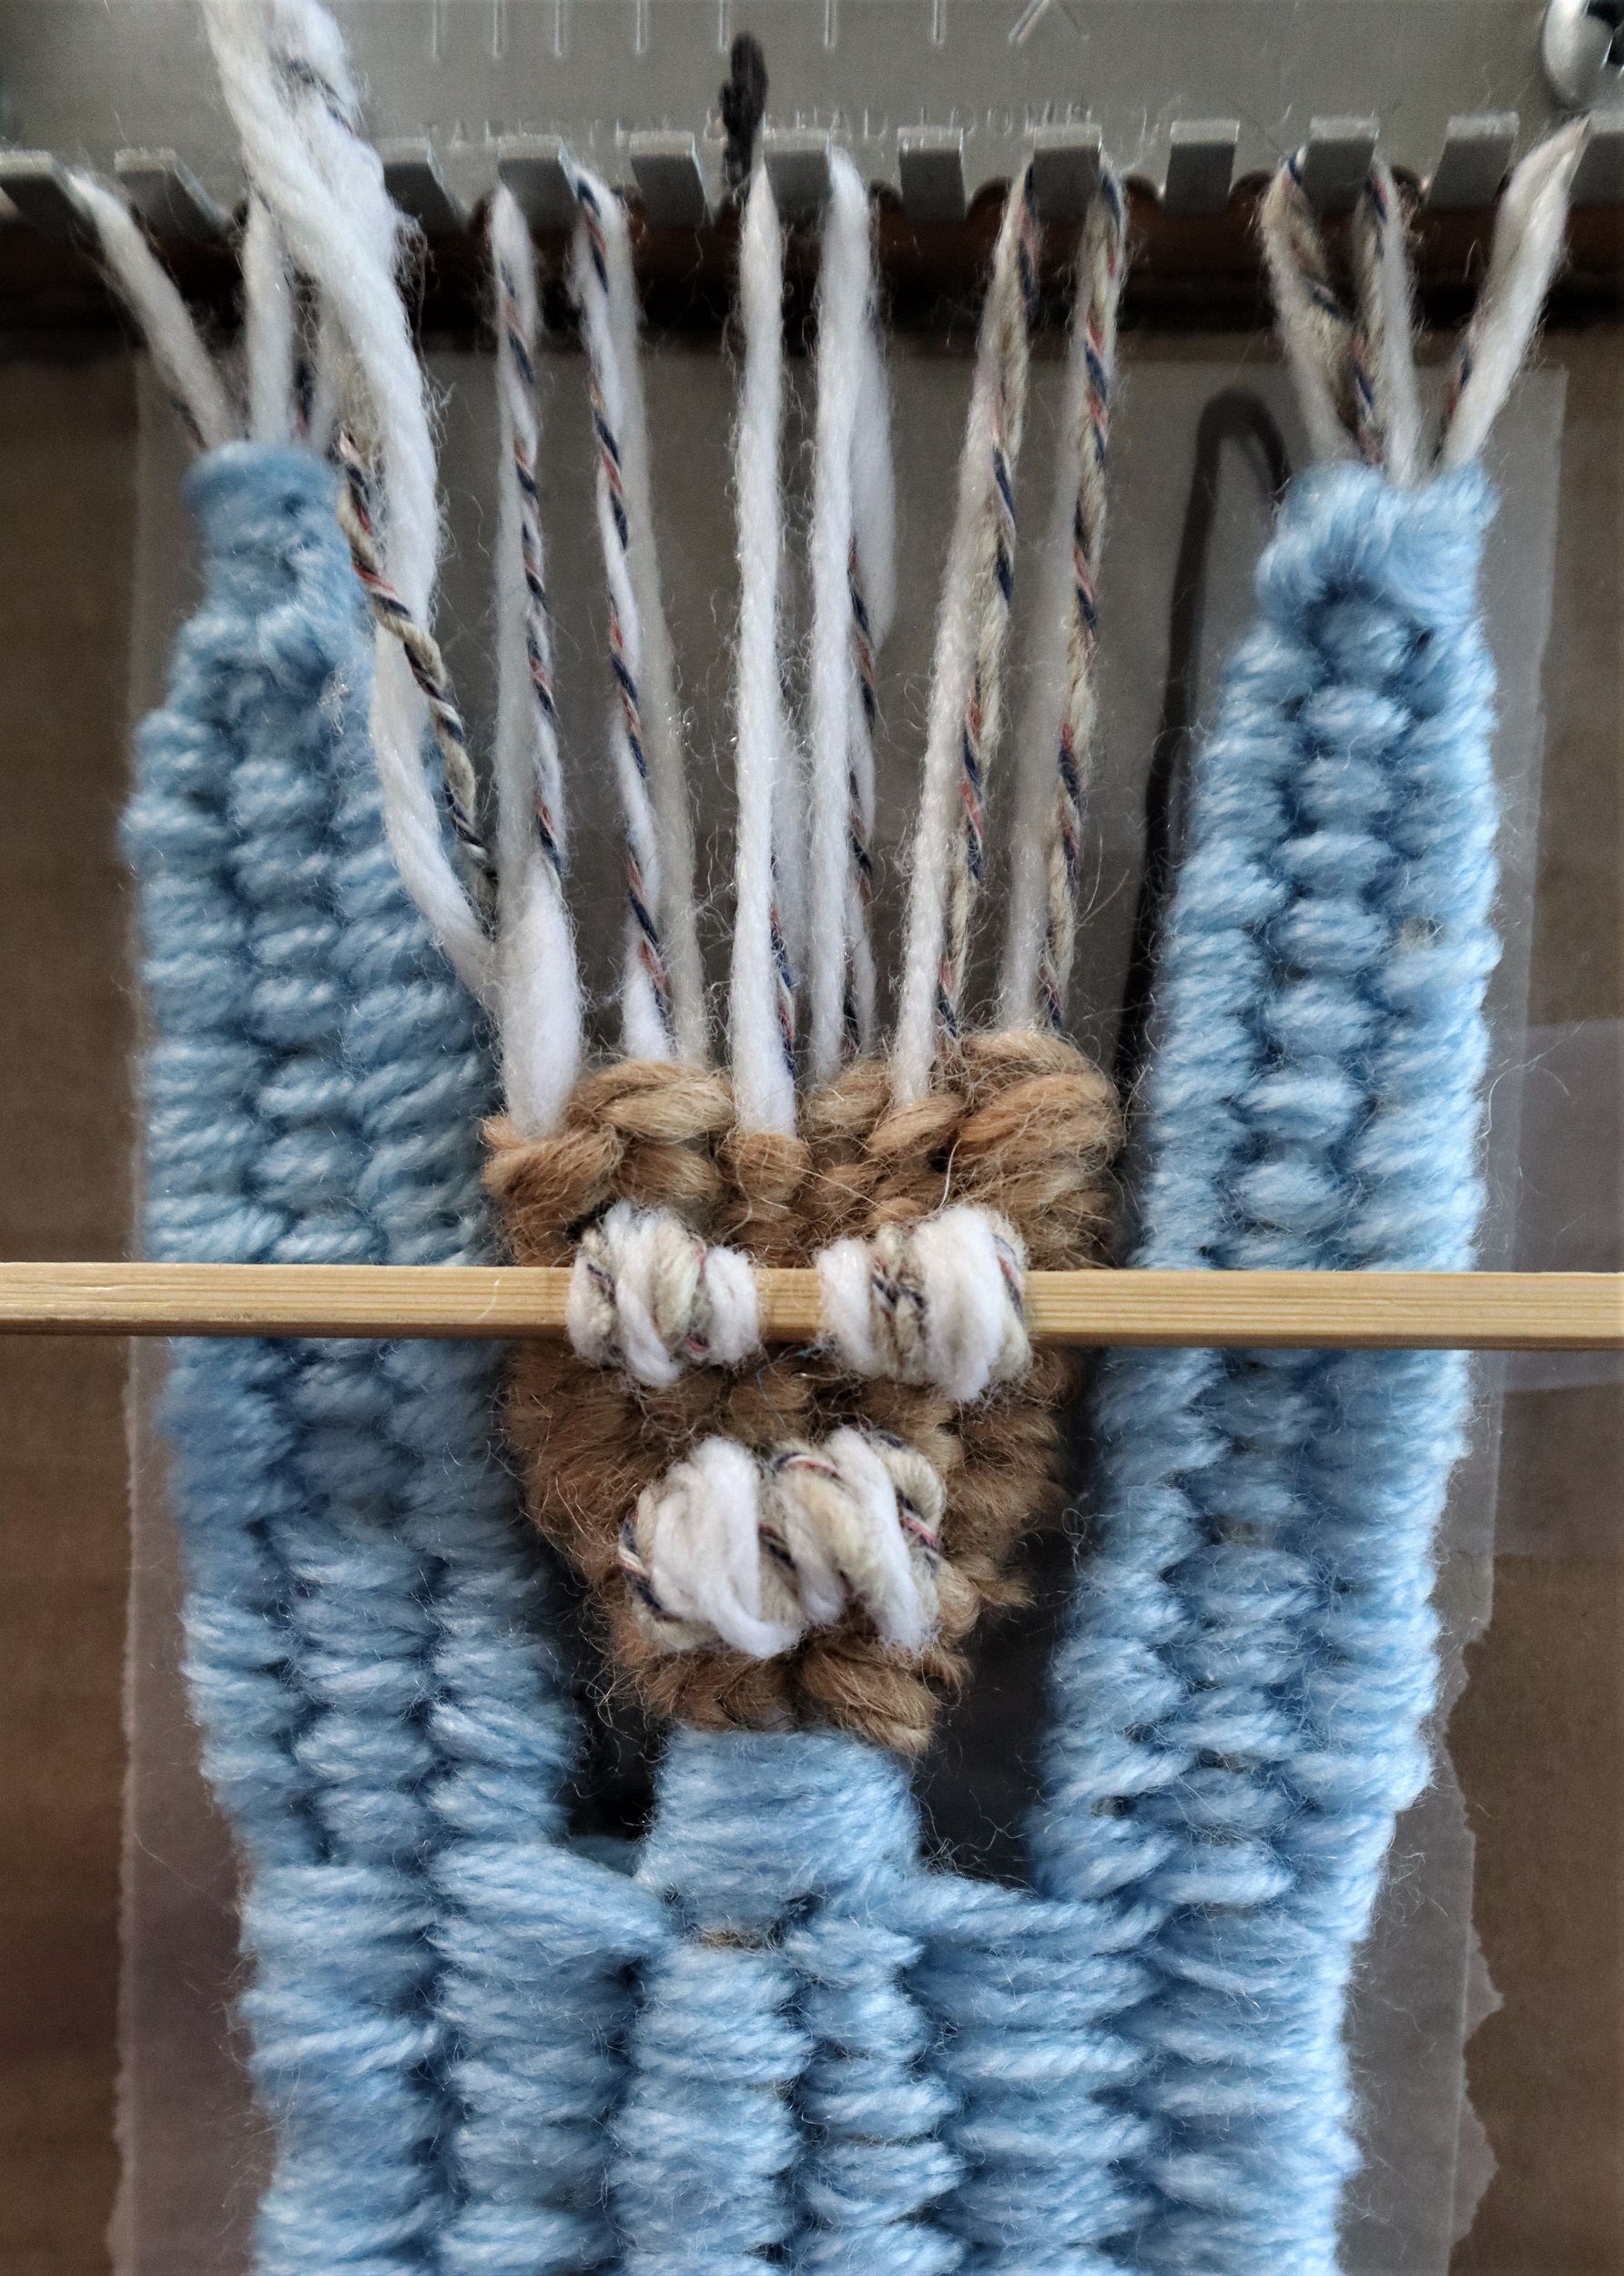
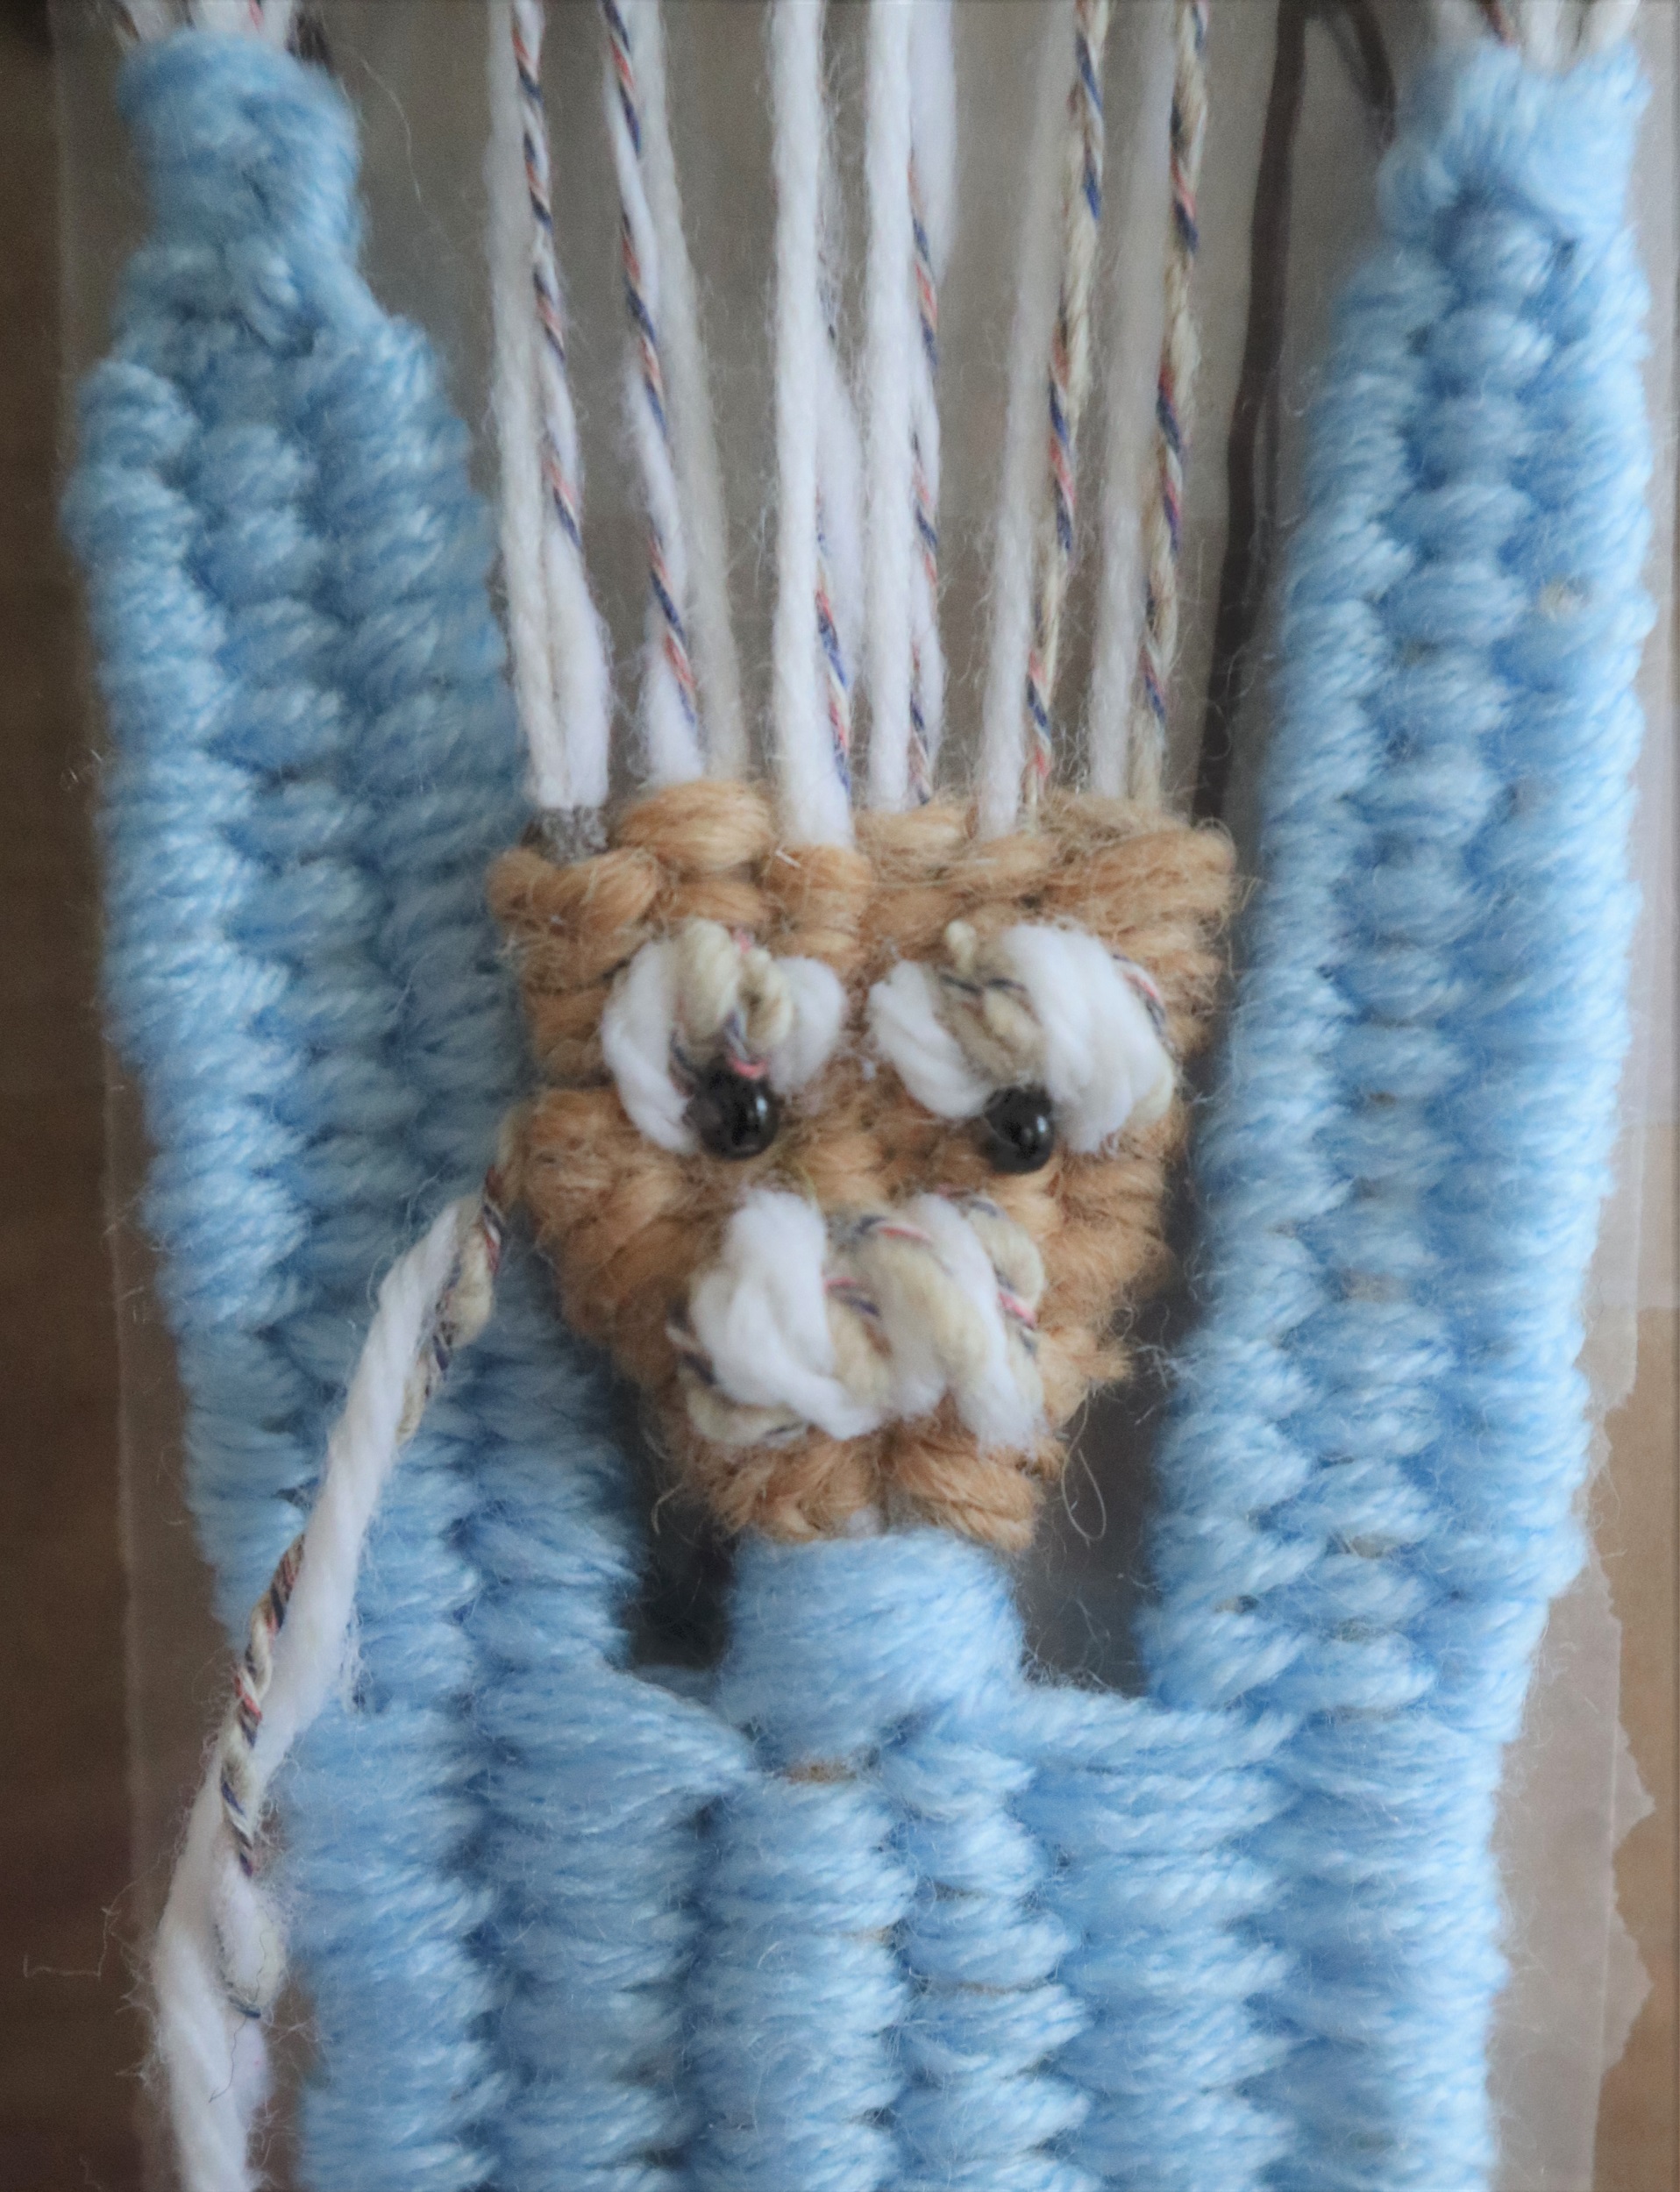
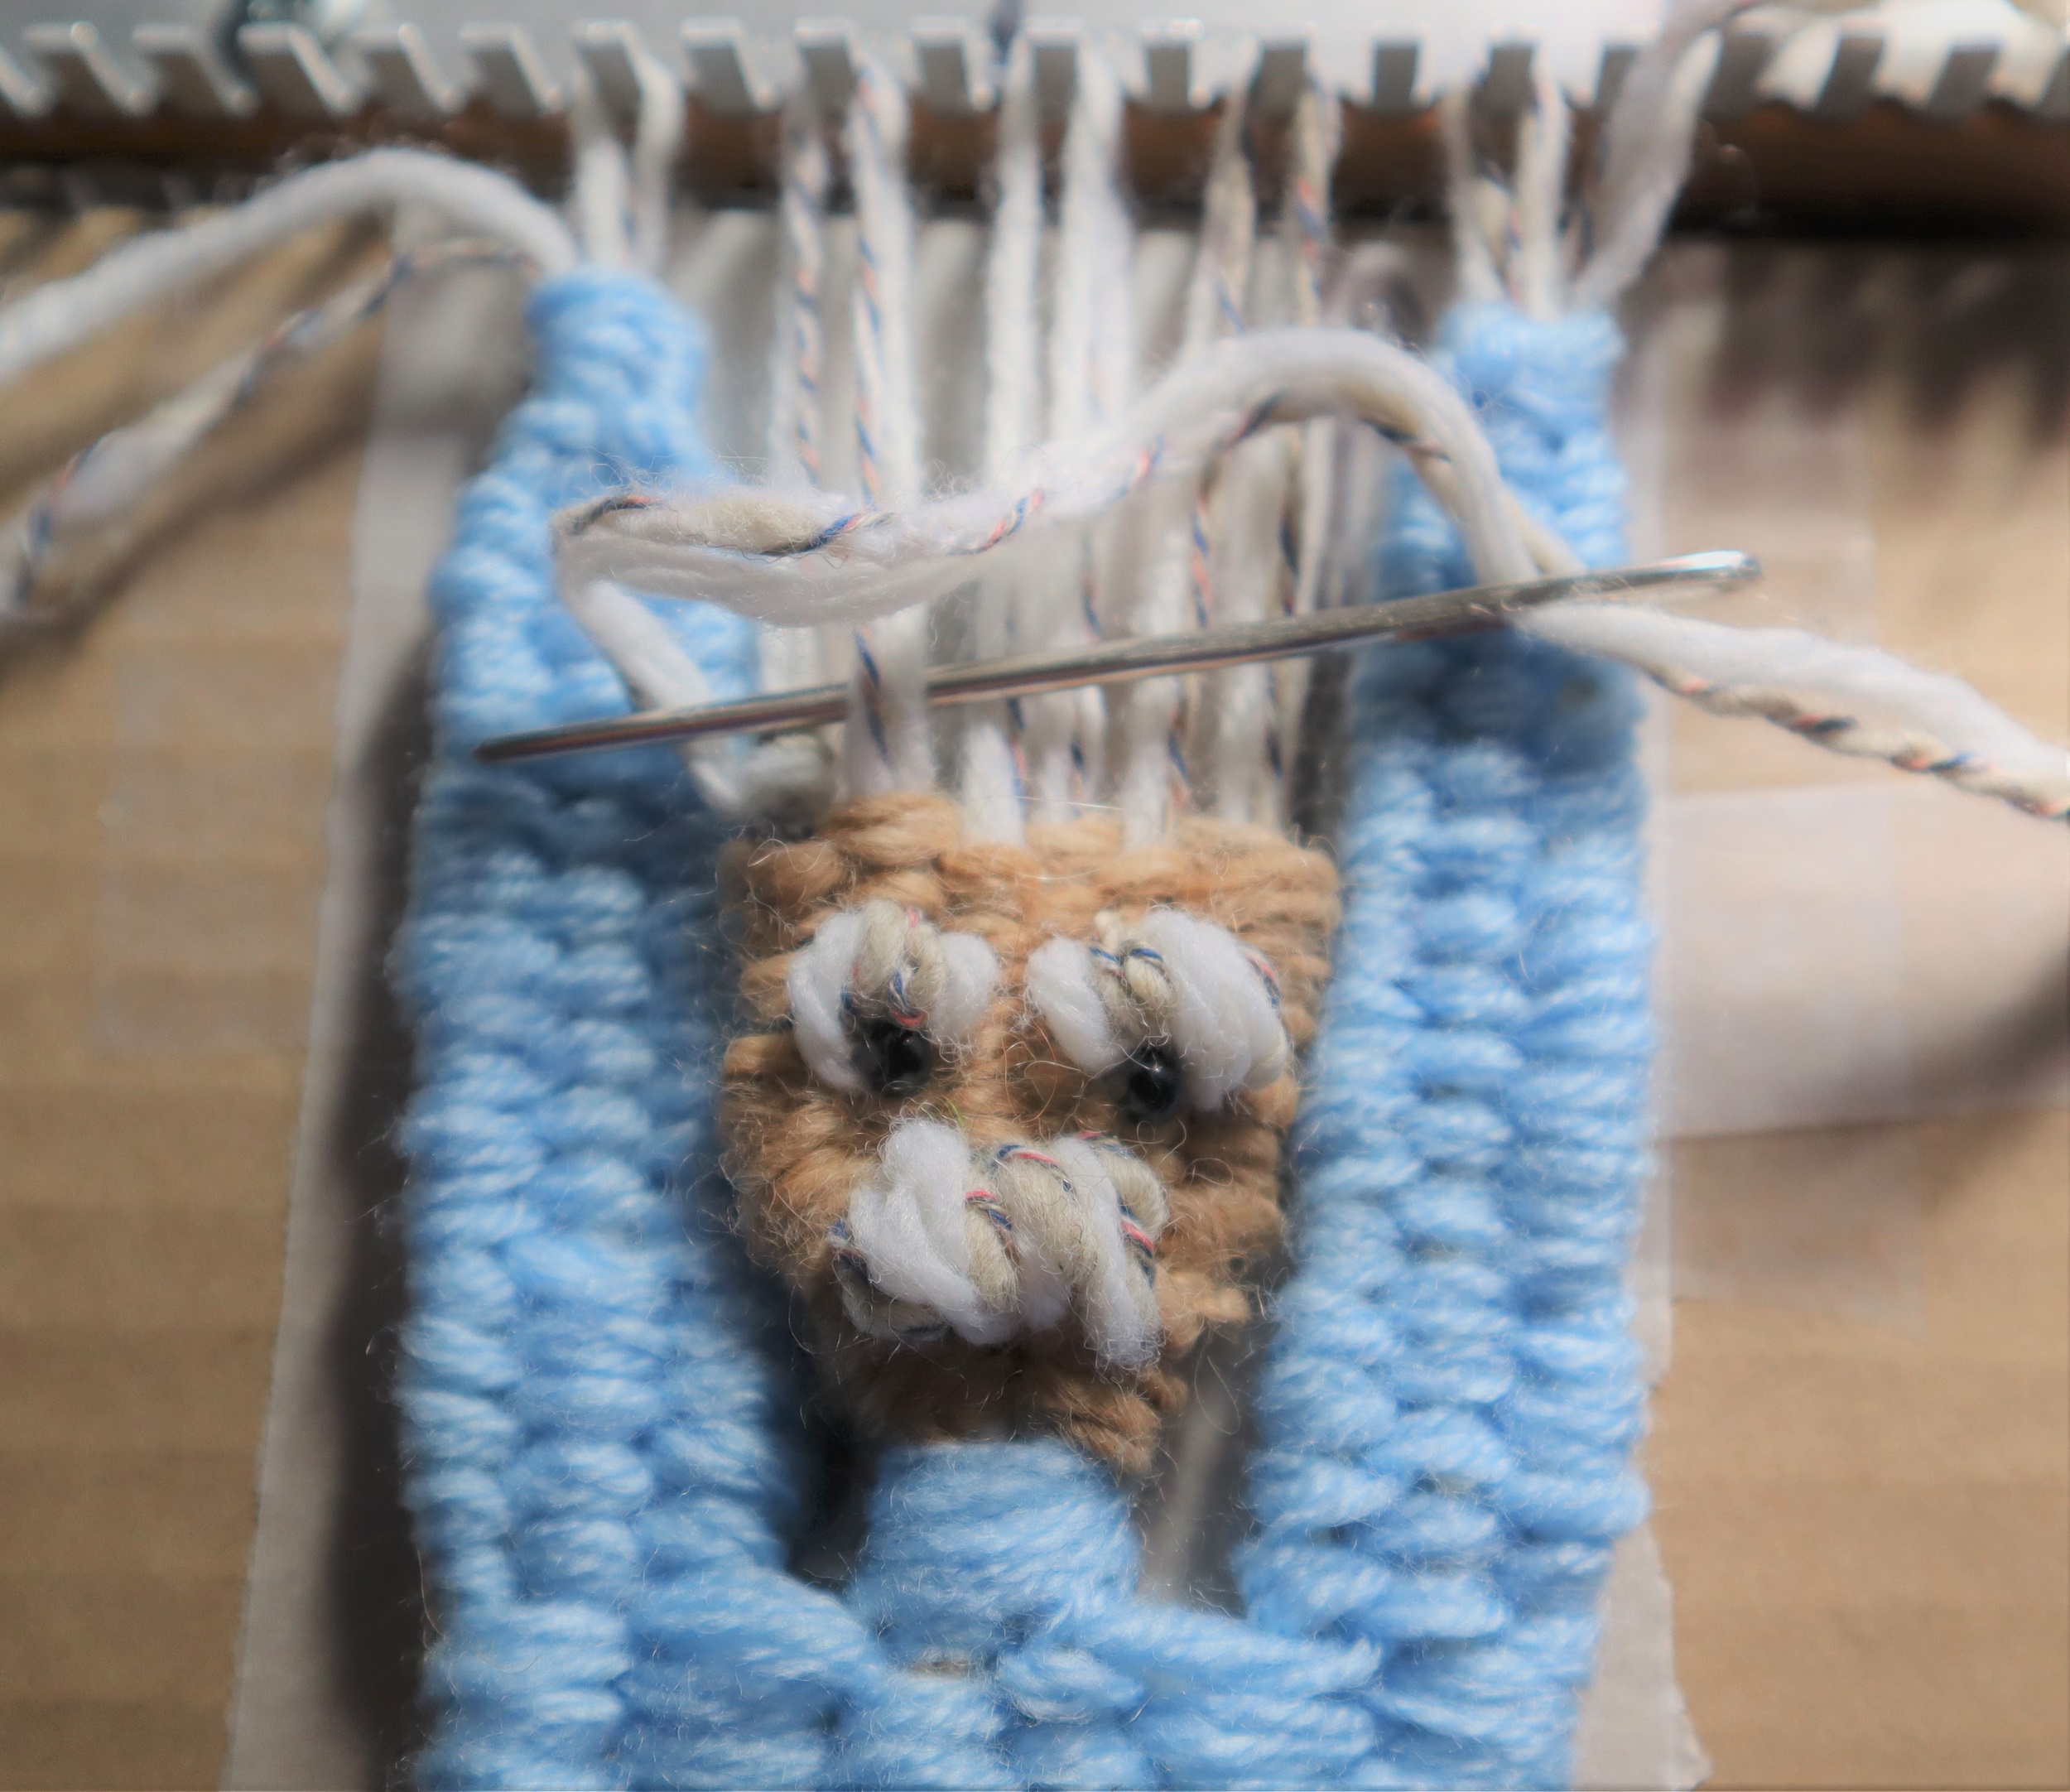
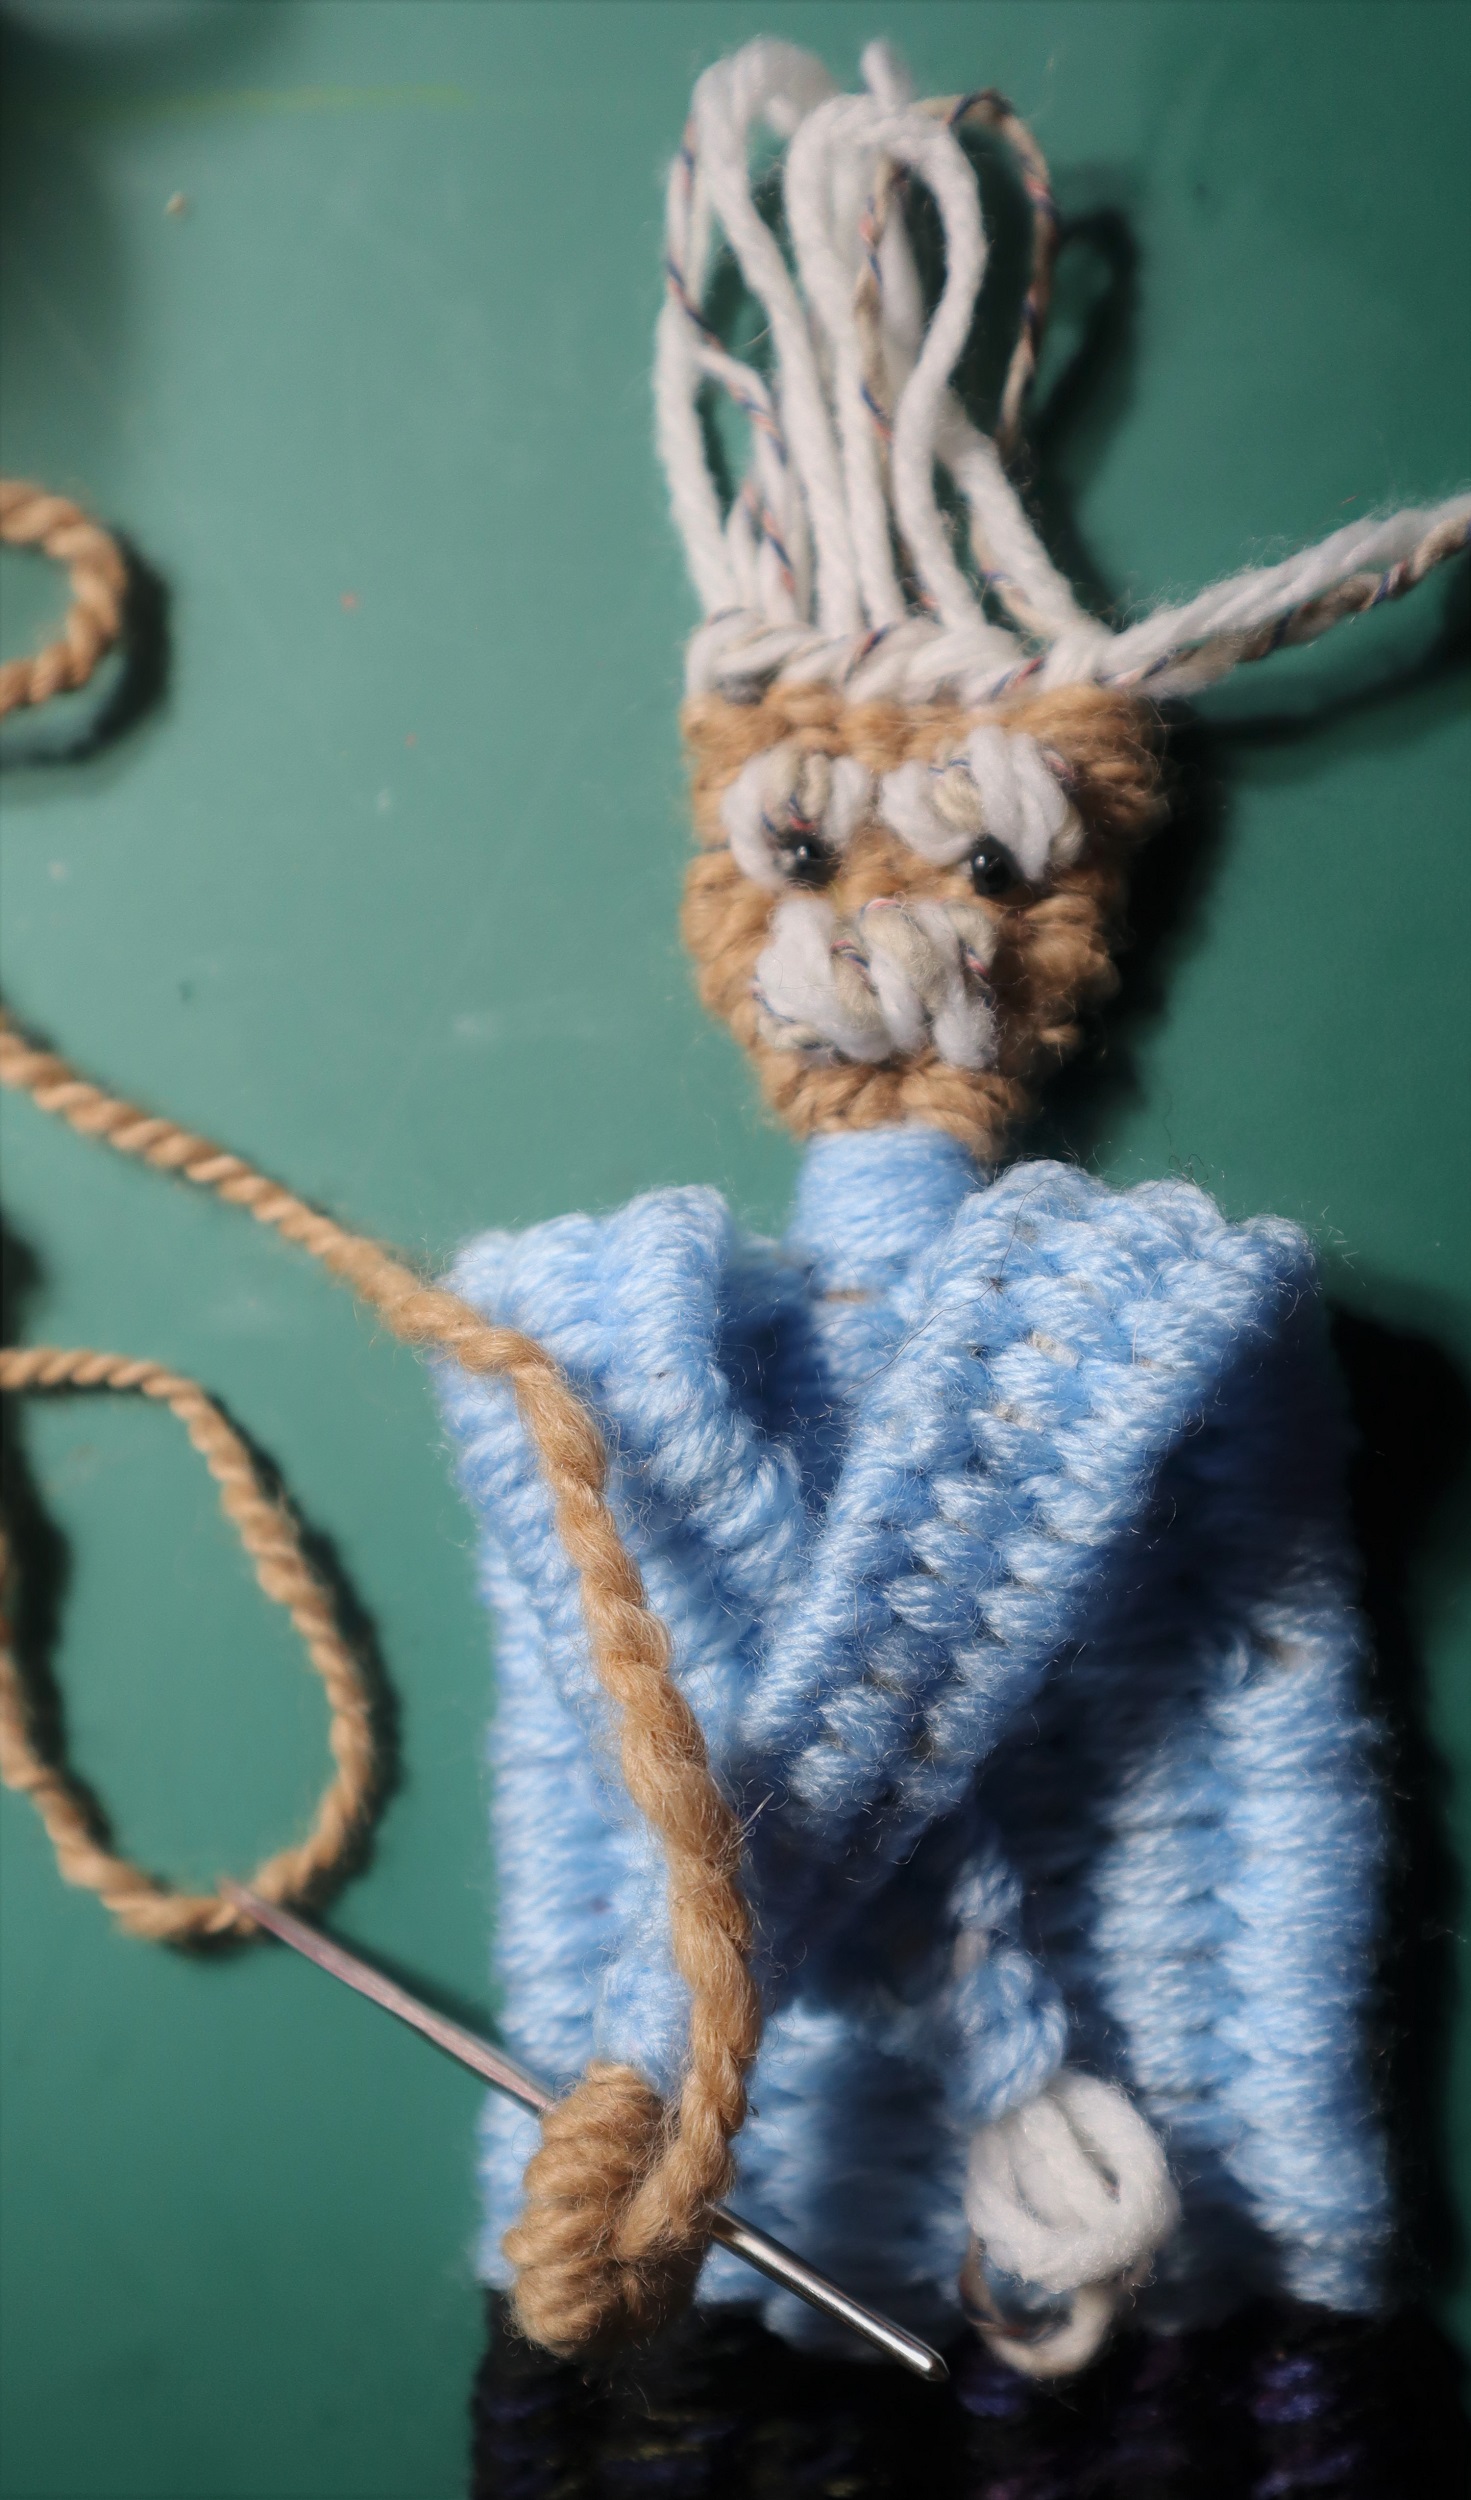
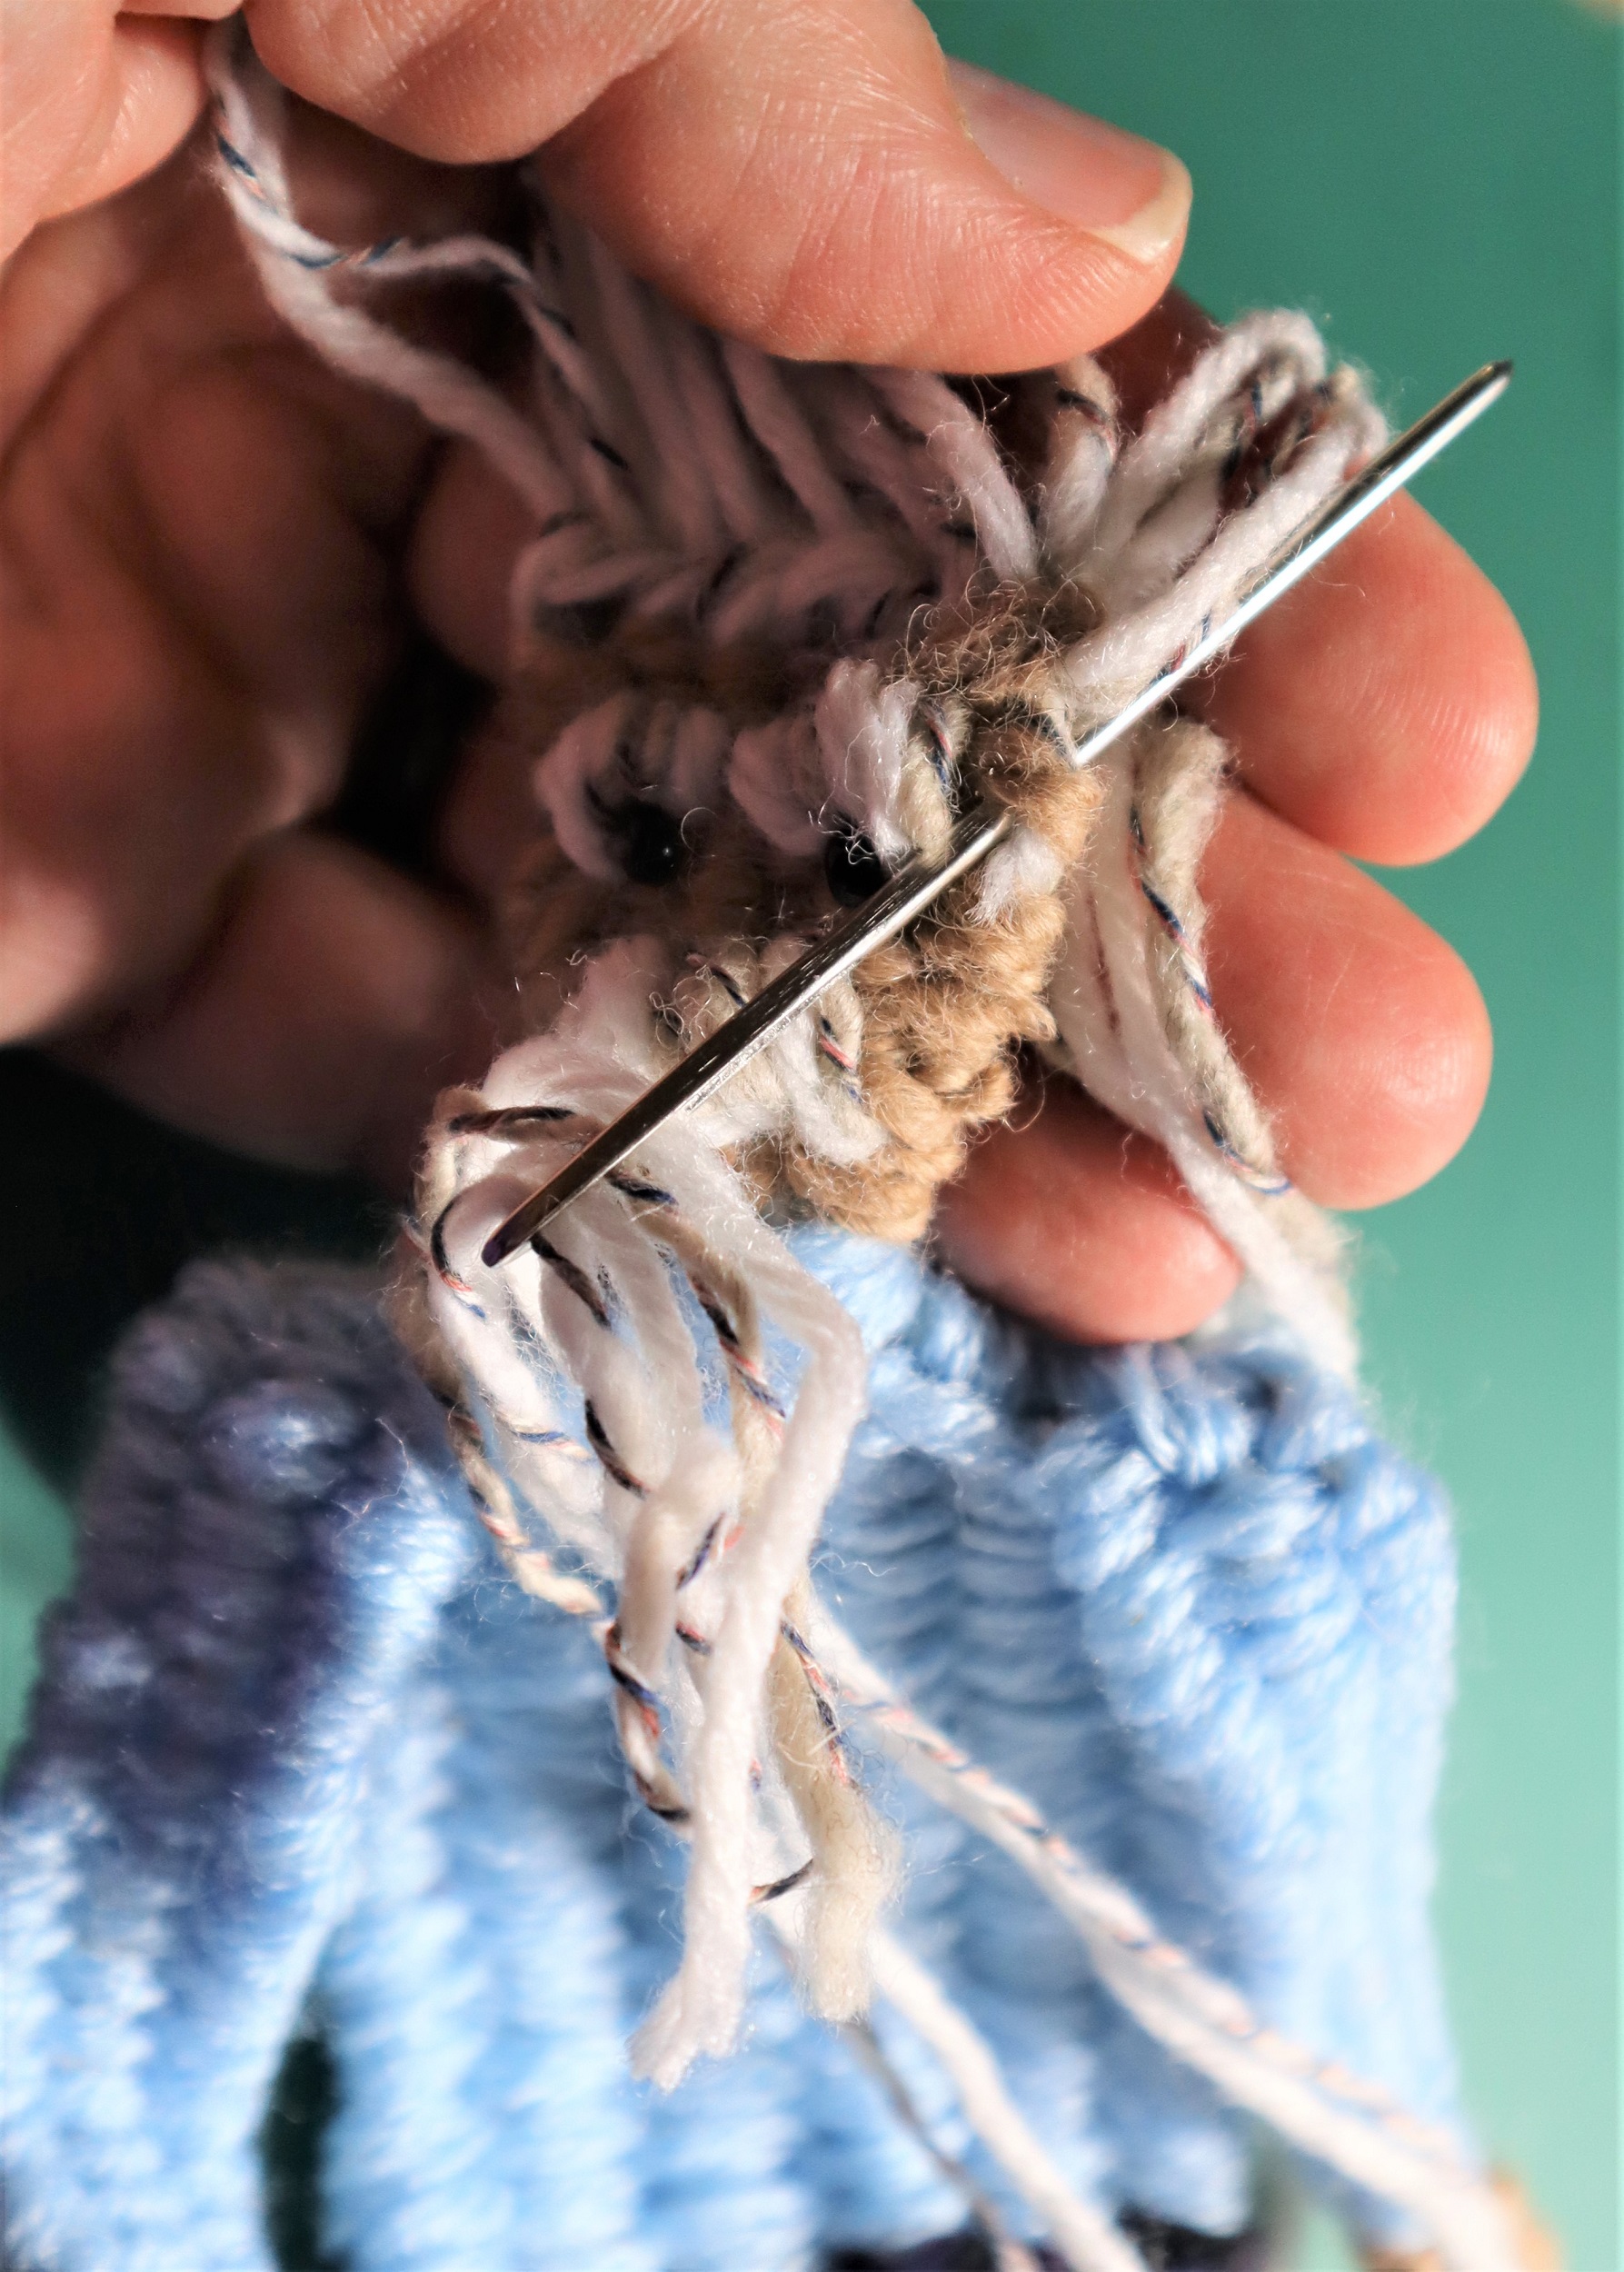
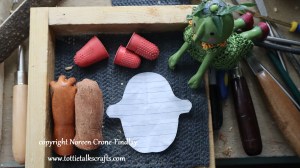
FACE:
With skin tone yarn, weave the face, weaving under 1/over 1 and over 1/under 1.
MOUSTACHE:
Stitch loosely over the shed stick with 1 strand of white yarn and 1 strand grey yarn held together as if they are a single strand at least 3 times. Take the ends to the back of the head.
EYEBROWS:
Take 2 slightly tighter stitches over the shed stick for each eyebrow.
EYES:
Stitch 2 small black ‘e’ size beads on for eyes.
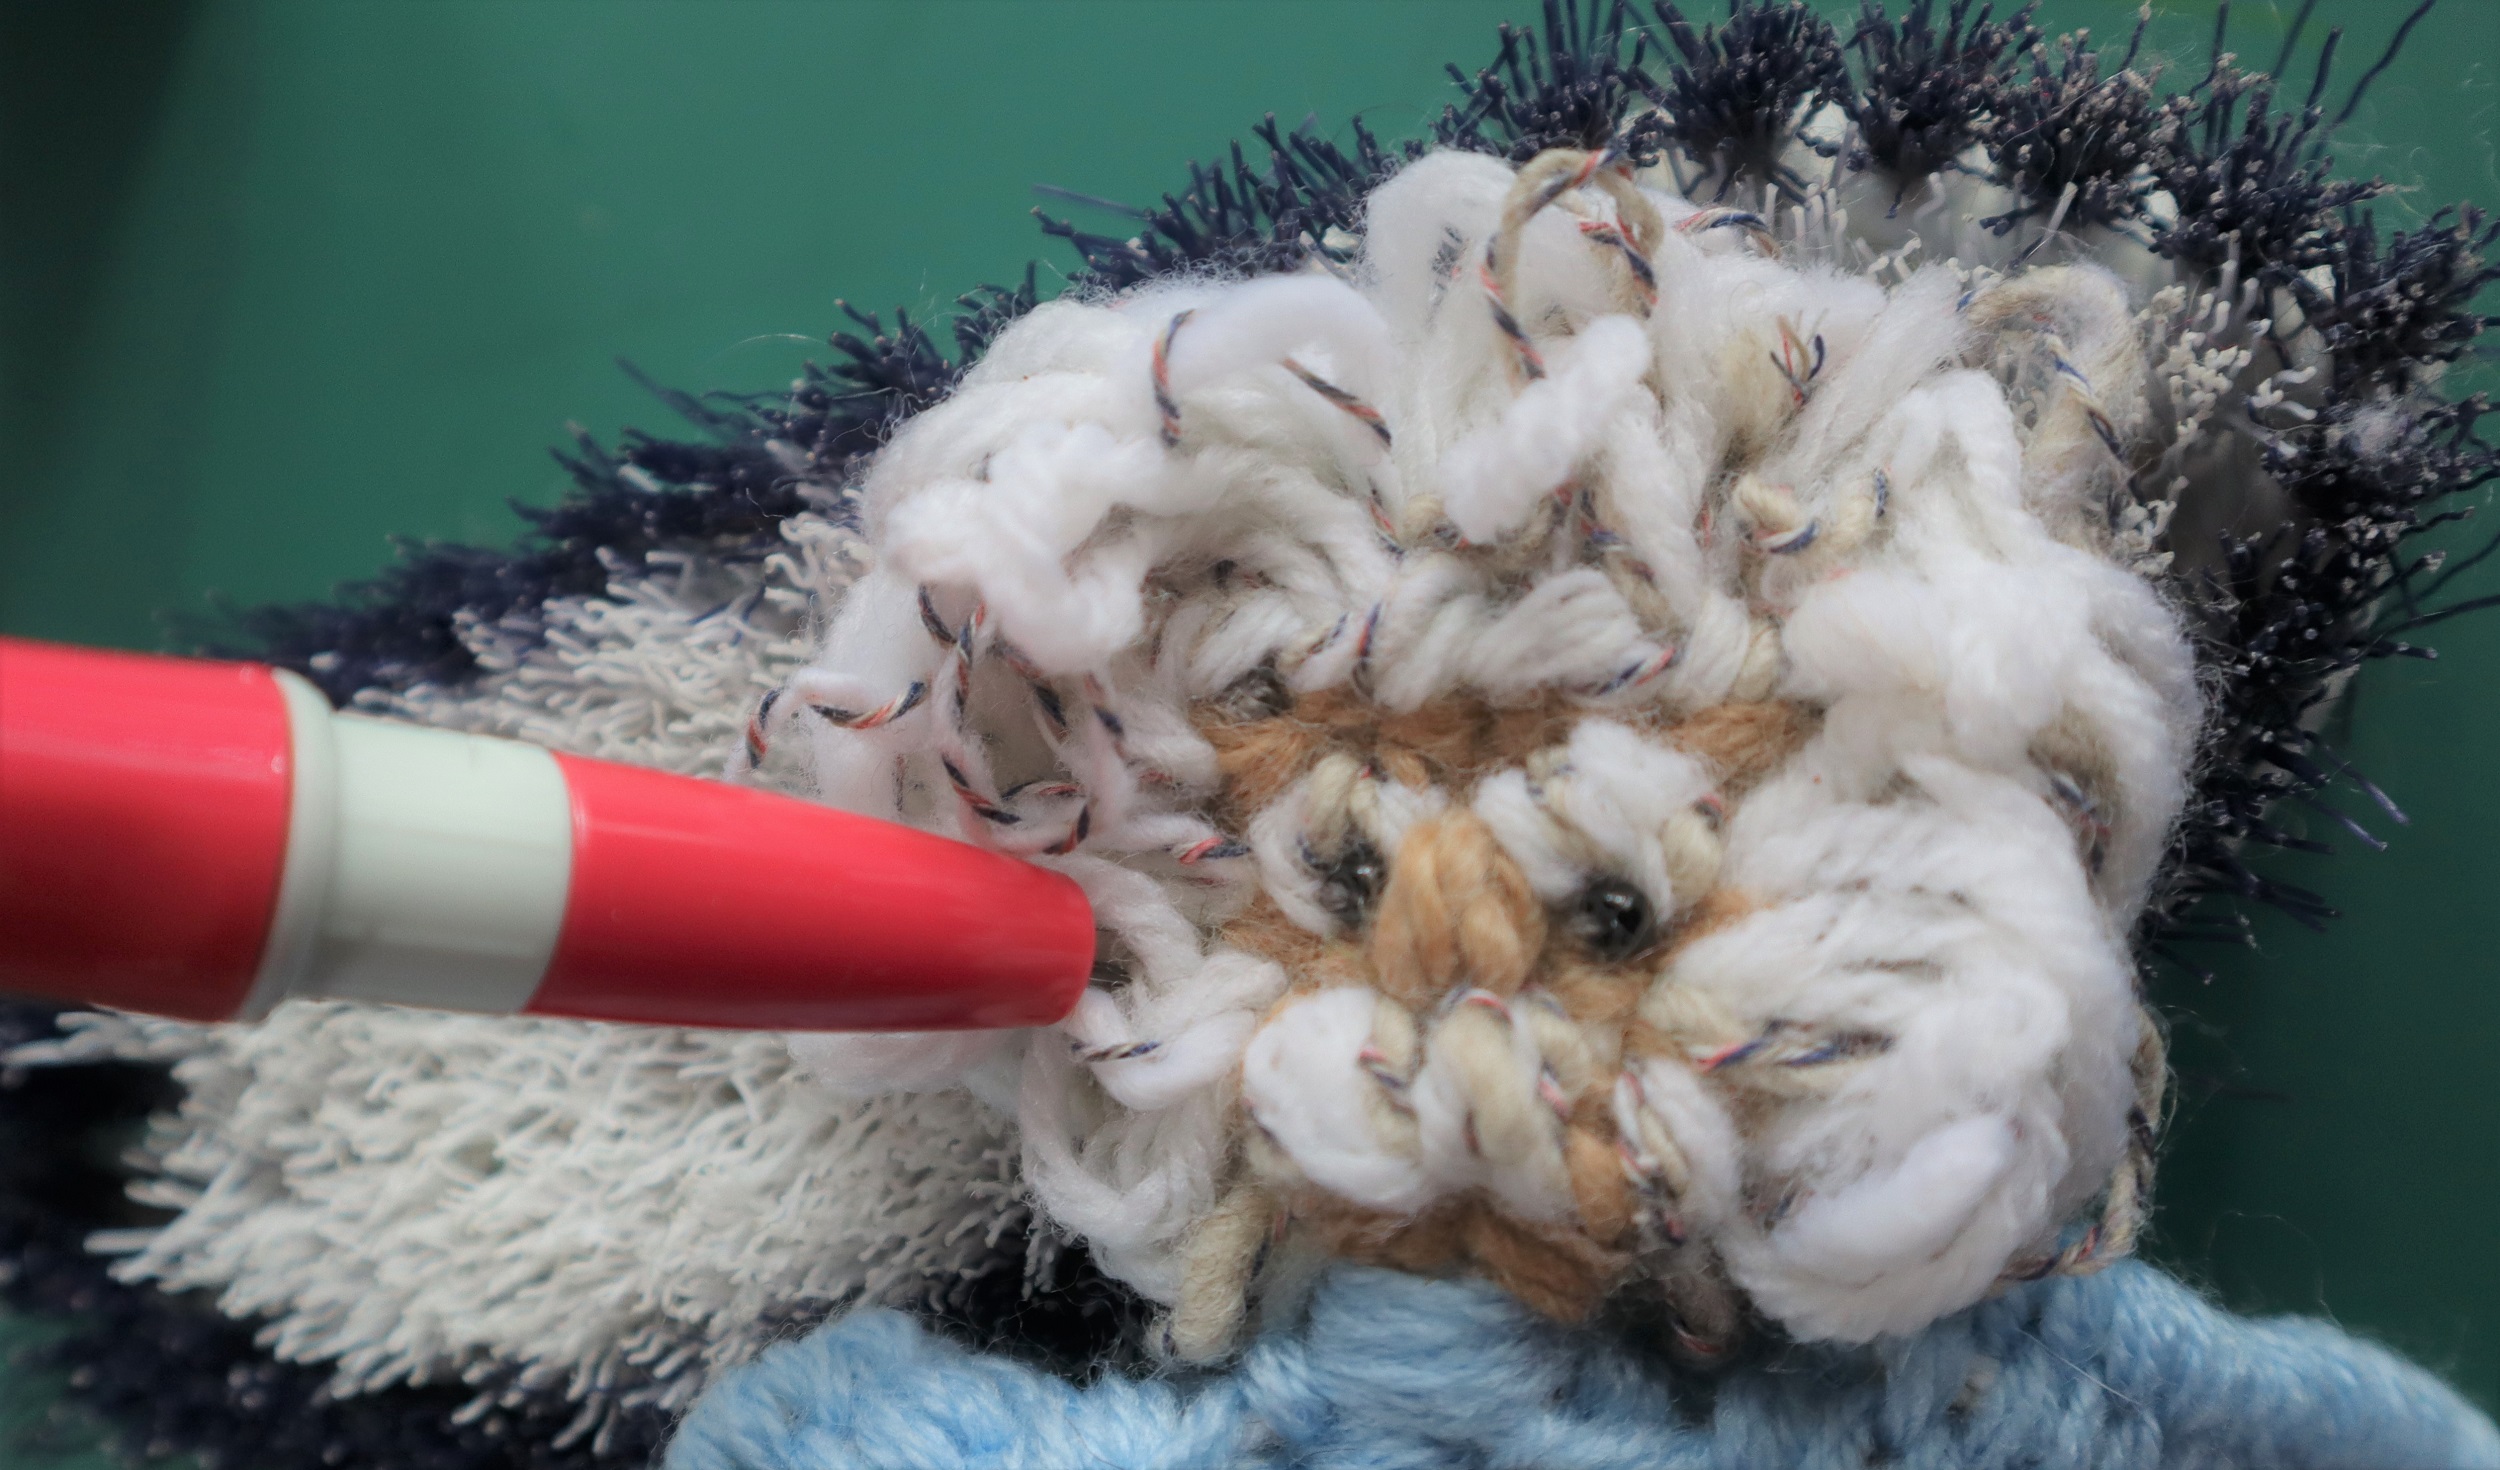
HAIRLINE:
Lock the top of the head in place by stitching around each warp strand at the top of the forehead.
Lift Einstein off the loom.
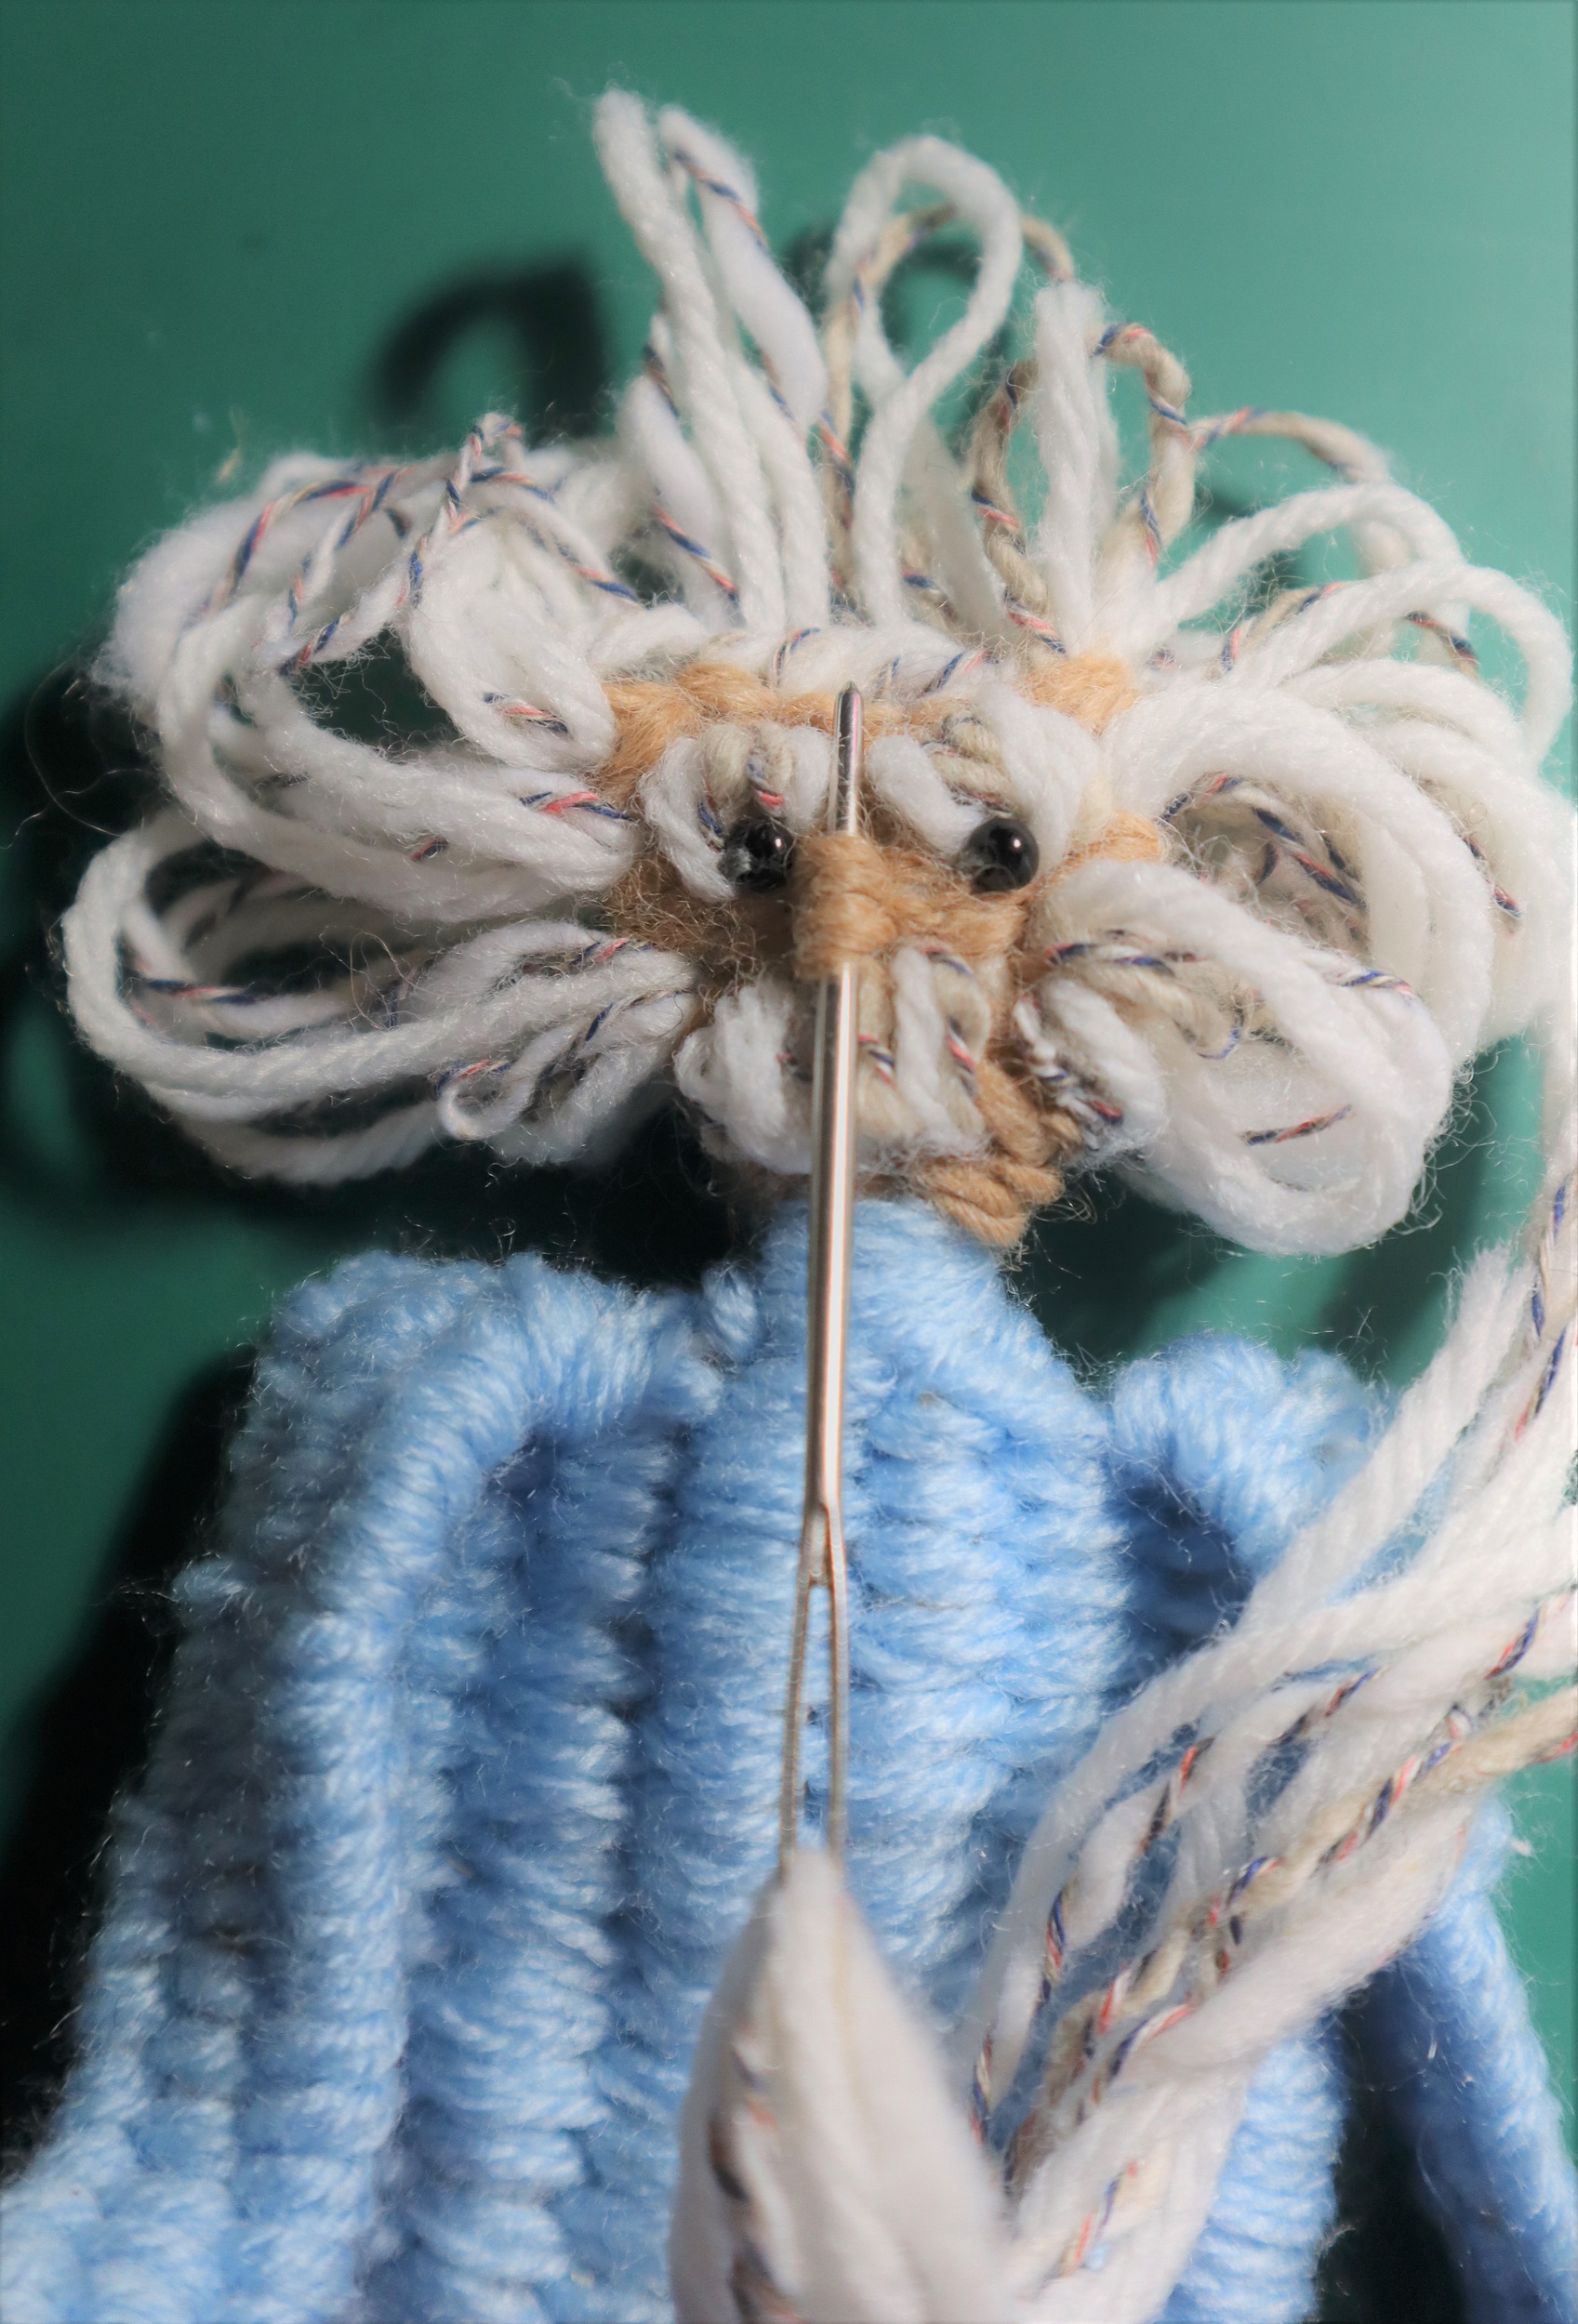
NOSE:
Stitch 2 vertical stitches with skin tone yarn.
SHOES:
With Brown yarn follow the instructions for the feet on page 36. Weave the yarn ends into the legs.
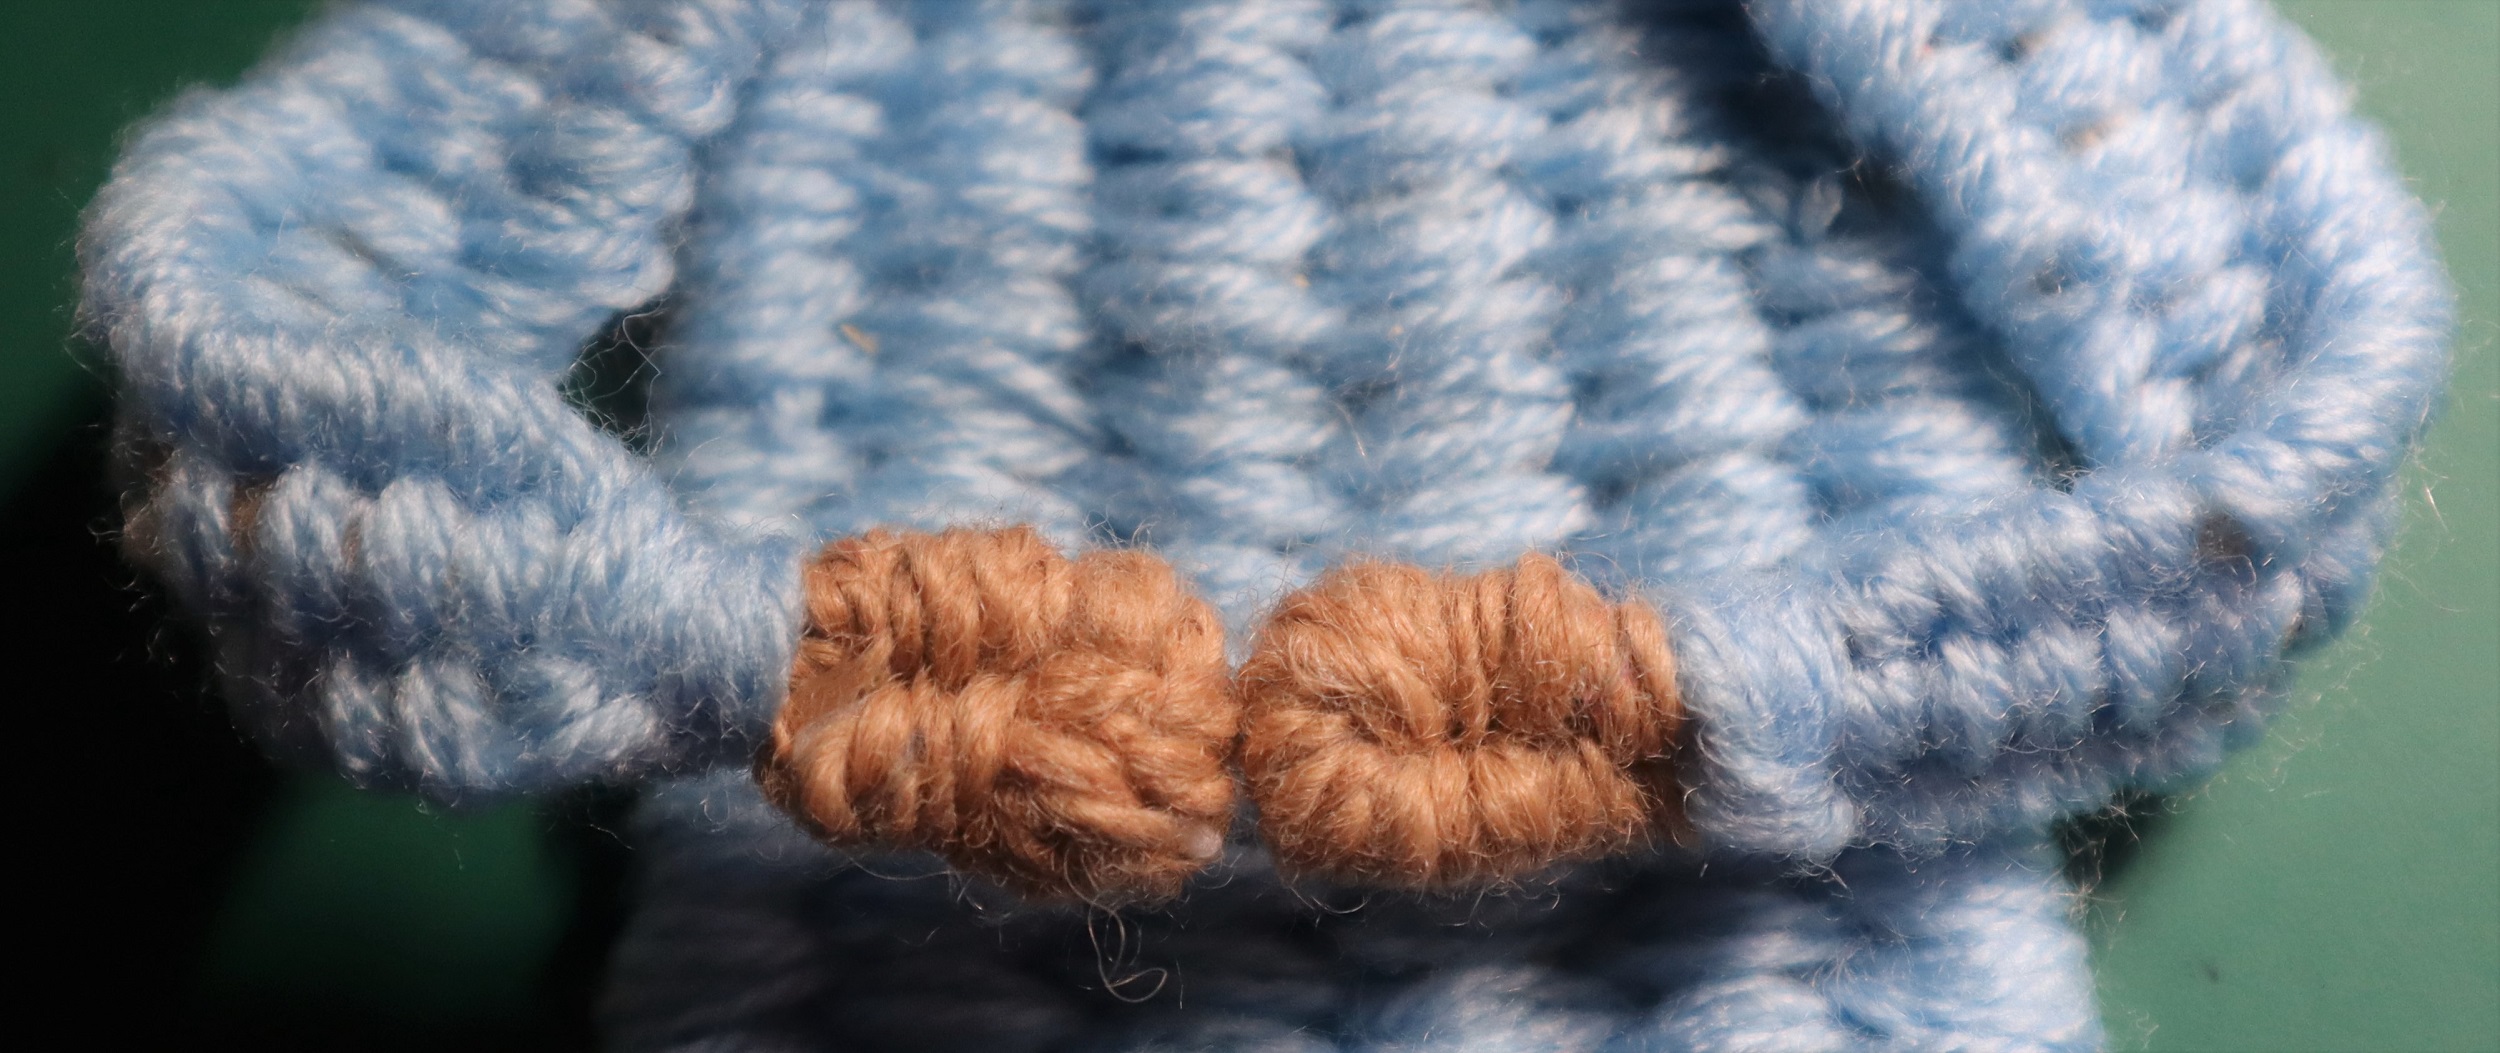
HANDS:
Weave in the single strand at the side of each hand into the arm so that it is the same size as the loop of the hand.
With skin tone yarn make hands the same way as the feet. Weave the yarn ends into the arms.
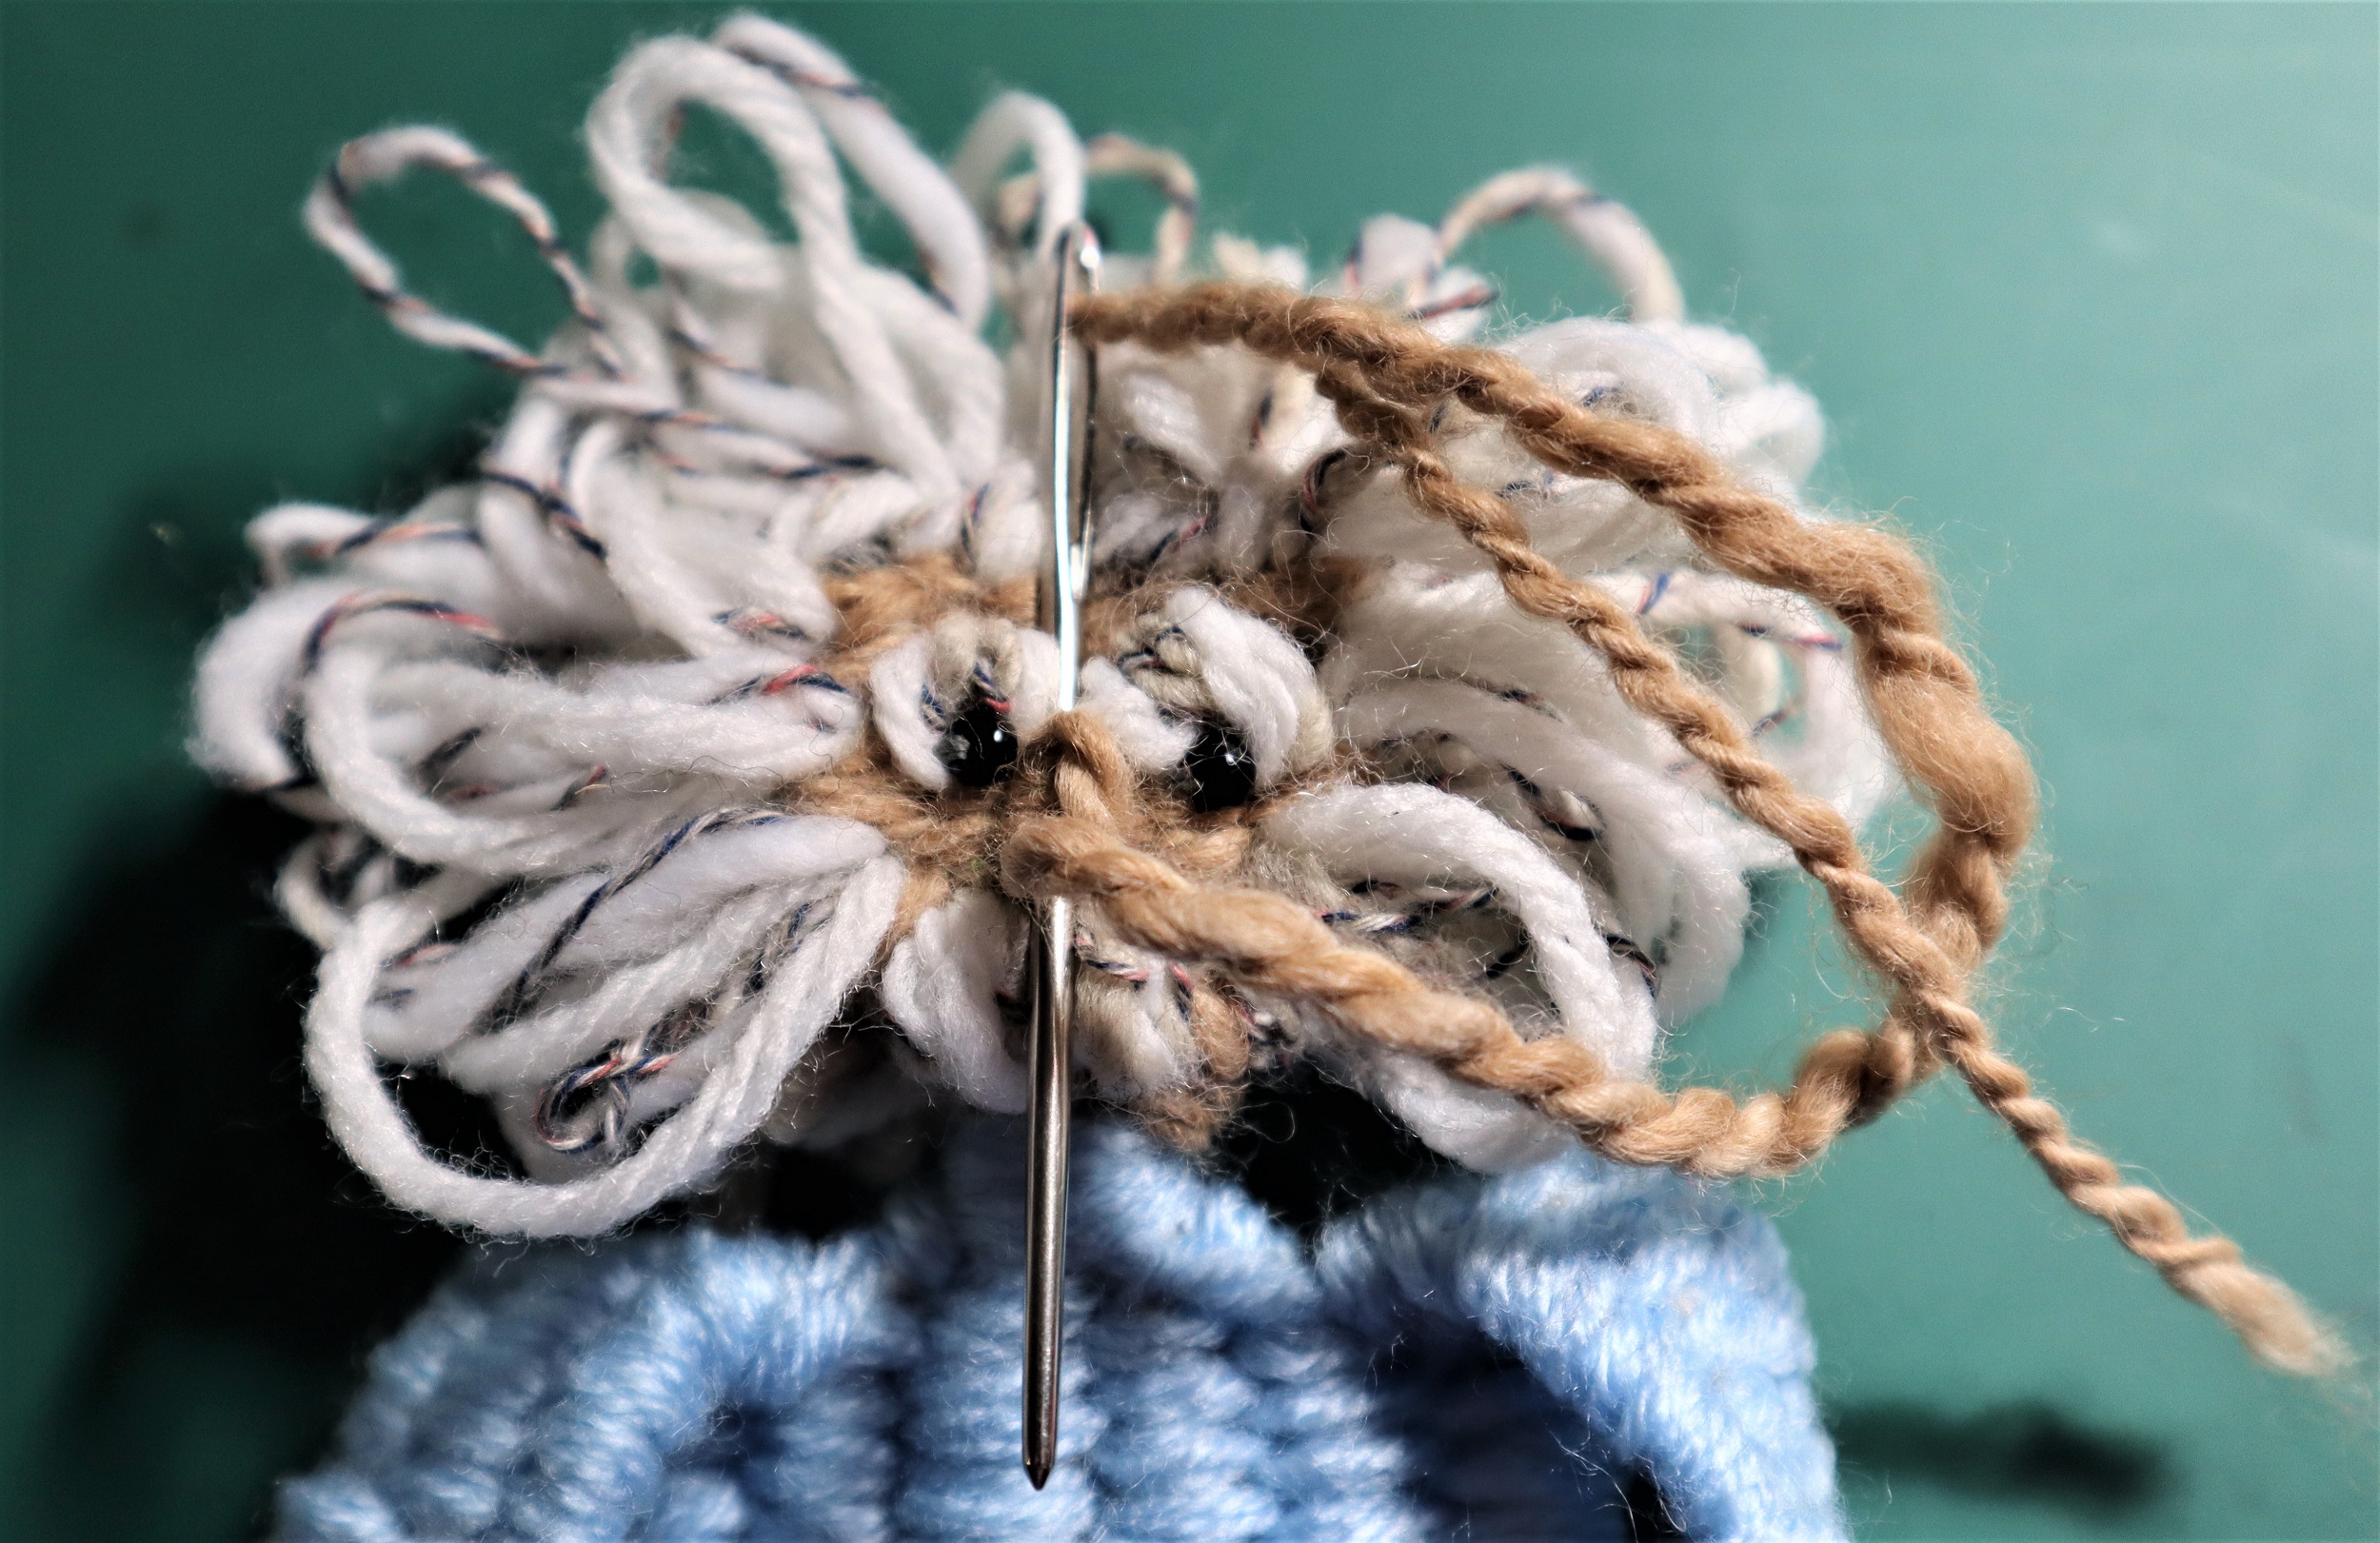
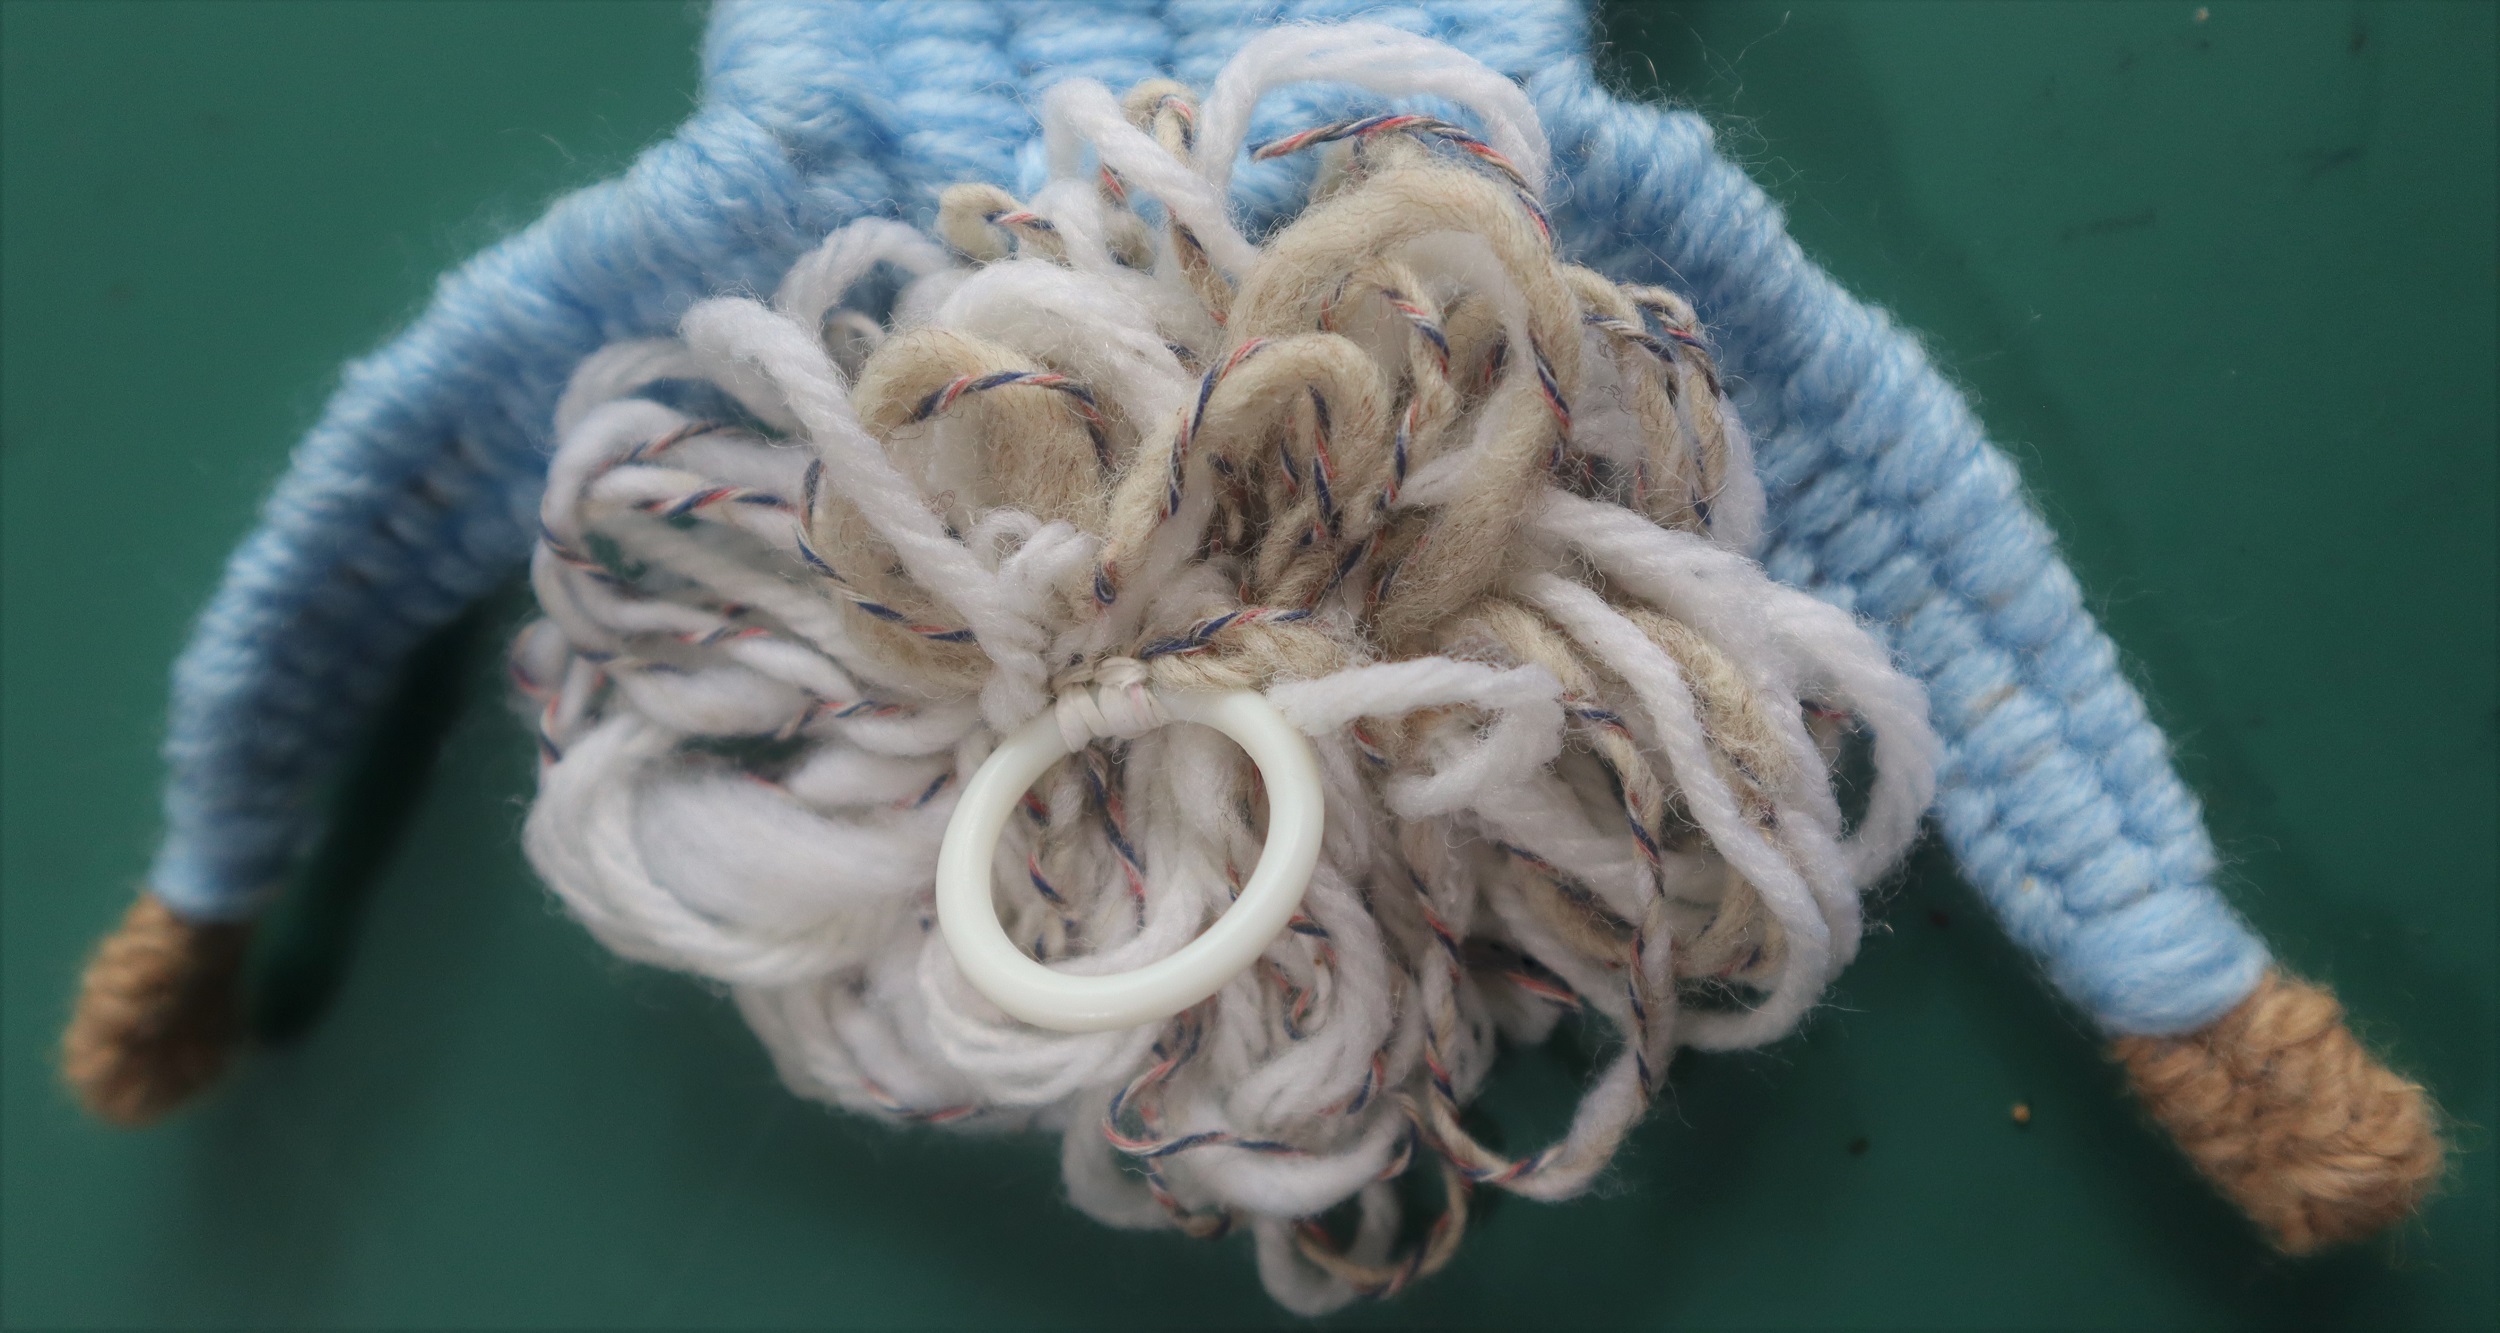
HAIR:
Stitch loops of hair yarn around the edges of the face and on the back of the head.
Use felting needles to finalize the loops into the ‘dandelion’ shape of his classic signature hairstyle.
FINISHING:
1: Steam the woven figure on the wrong side with a steam iron, being sure to not touch the iron to the weaving.
Finger press the arms down and the hair into place.
Weave in the ends.
Trim any ends.
2: Sew a plastic or metal ring to the back of the head for hanging the banner.
To see all the links for the ‘How To’ posts for the “Imagine” Banner Weave along, please go to L I N K S
To order the loom, book and extras kit for the Weave Along from Mirrix, please go to K I T
FREE FORM WEAVING: HOMAGE TO ALBERT EINSTEIN:
Albert Einstein is woven (with a few extrapolations and a slight adjustment to the waistline) following the instructions for the Woven Dancer on page 30 of “Innovative Weaving on the Frame Loom”.
In order to hold the pattern onto the loom, a backing board is needed.
INSTRUCTIONS:
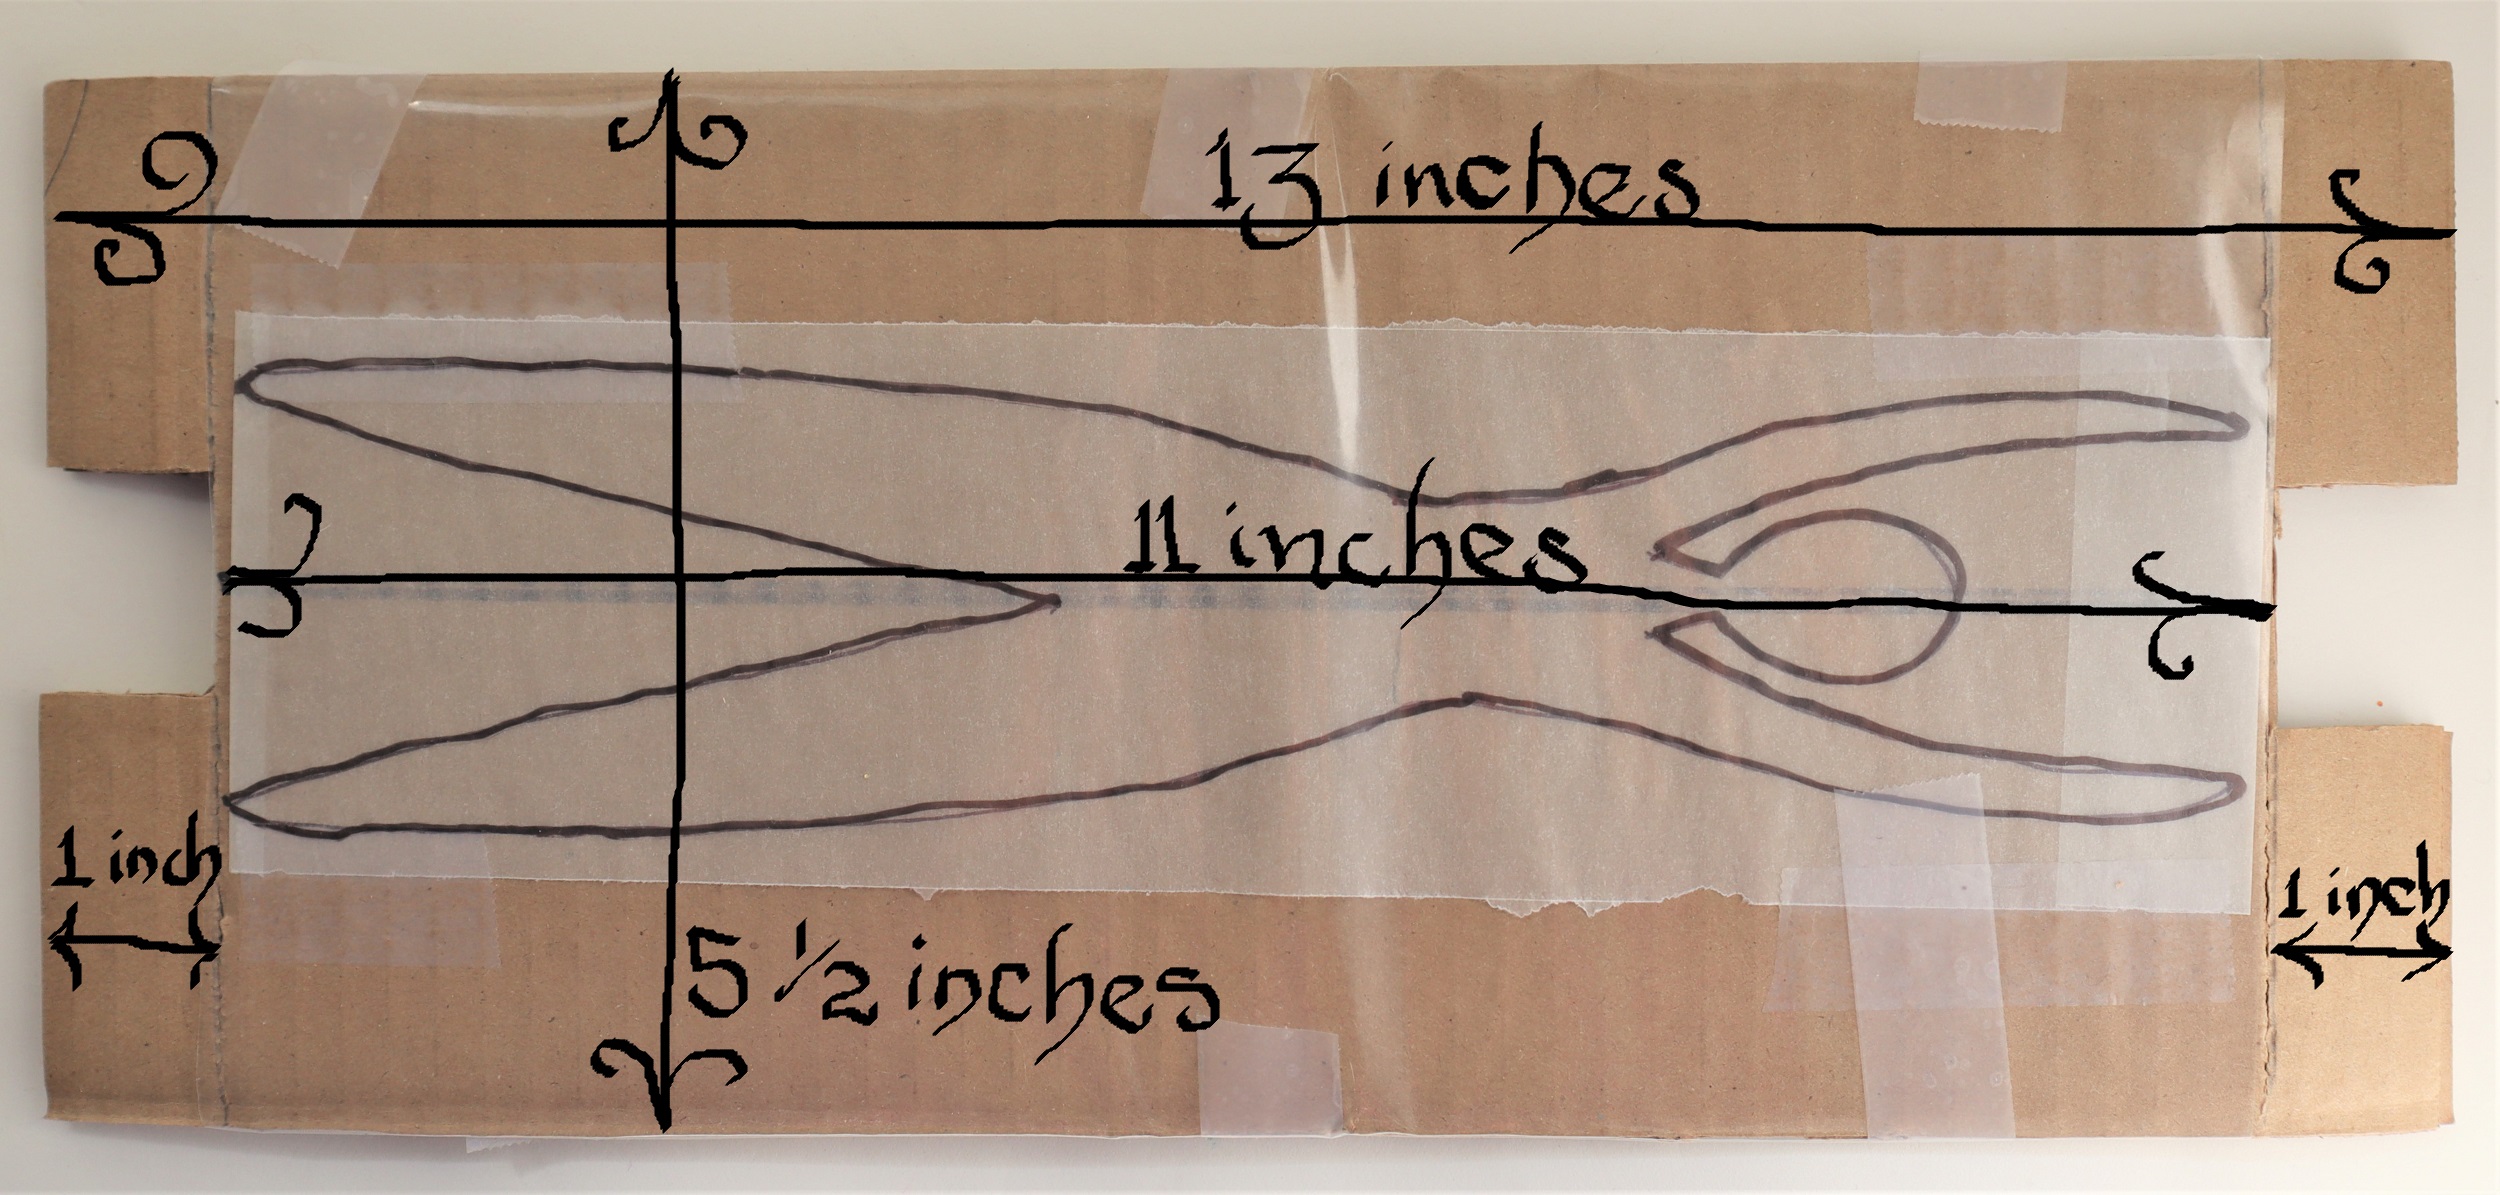
HOW TO MAKE THECARDBOARD BACKING BOARD FOR THE SAFFRON LOOM:
1: With the corrugations running the length of the piece: Cut 2 pieces of corrugated cardboard that are 13 inches/32.5 cm long by 5 1/2 inches/13.75 cm wide.
2: Tape or glue the 2 pieces of cardboard together.
3: Score a line with a ballpoint pen or knitting needle 1 inch/2.5 cm from each end.
4: Cut a notch out of the center of each end piece that is 1 inch/2.5 cm by 1 inch/2.5 cm.
5: Trace the pattern for the largest Woven Dancer onto plain paper or graph paper and center it on the backing board.
6: Tape it in place, then tape a piece of clear plastic, either from recycled plastic or a plastic page protector over the pattern.
To see all the links for the ‘How To’ posts for the “Imagine” Banner Weave along, please go to L I N K S
To order the loom, book and extras kit for the Weave Along from Mirrix, please go to K I T
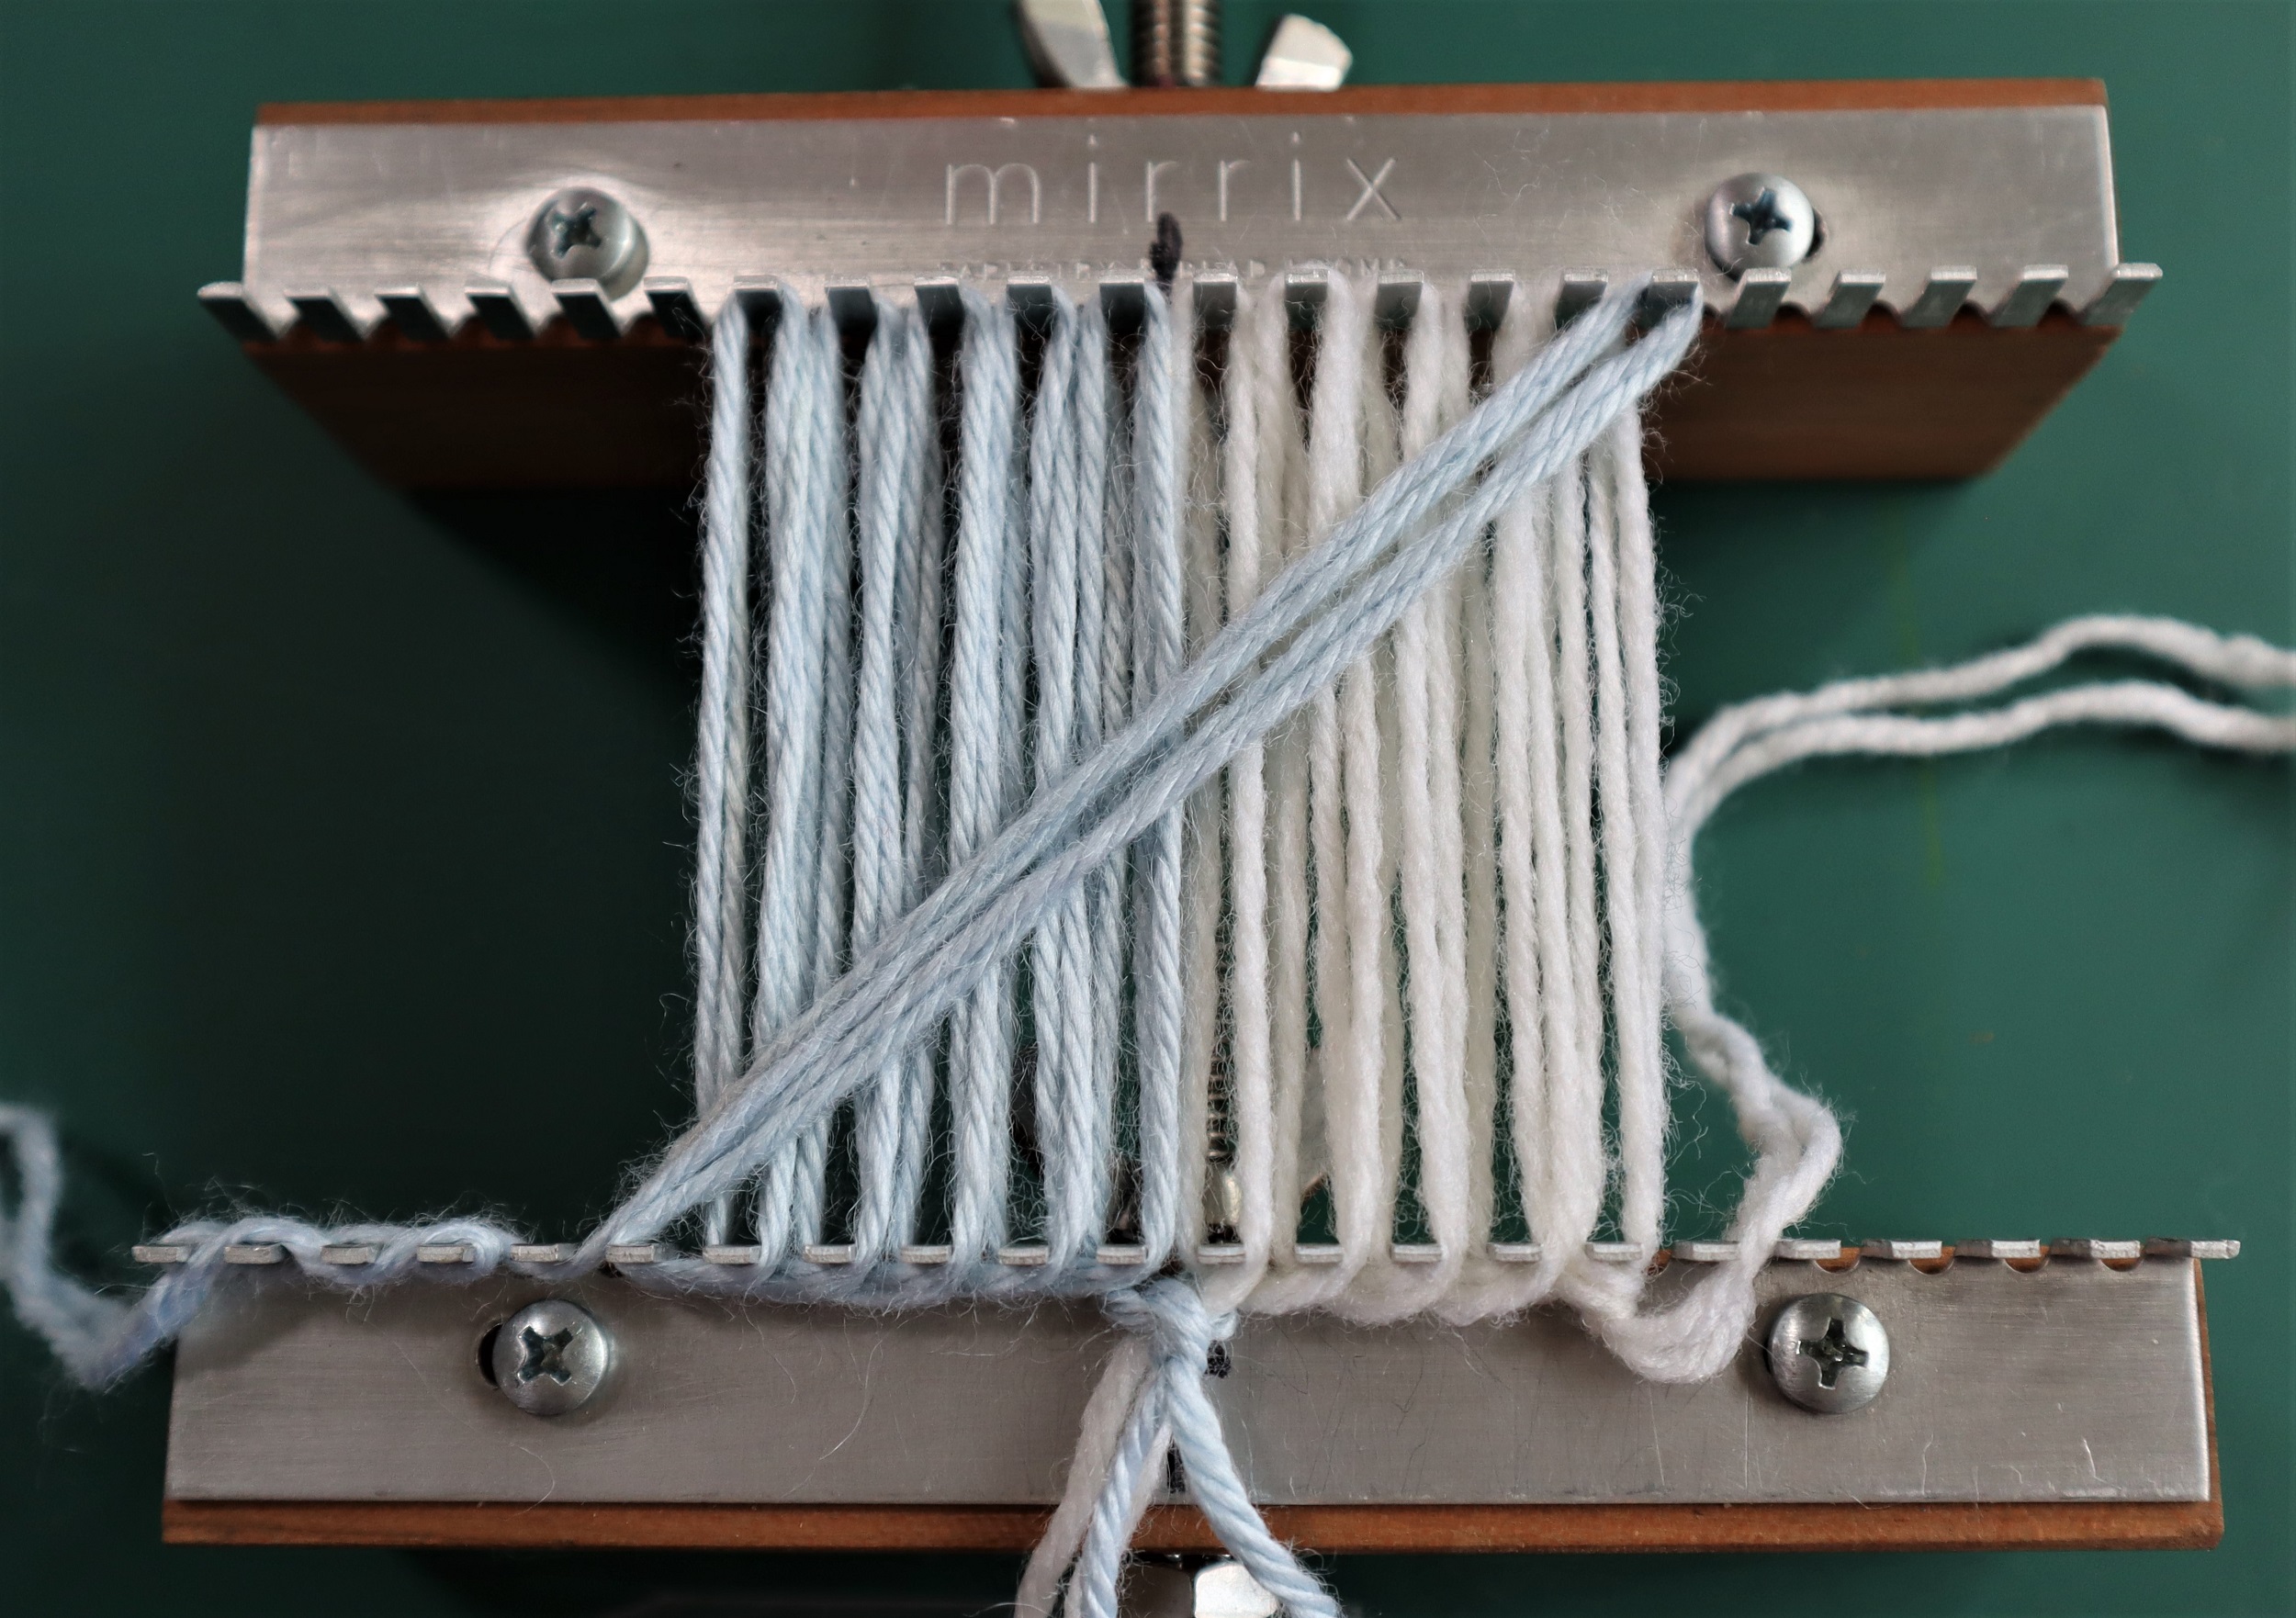
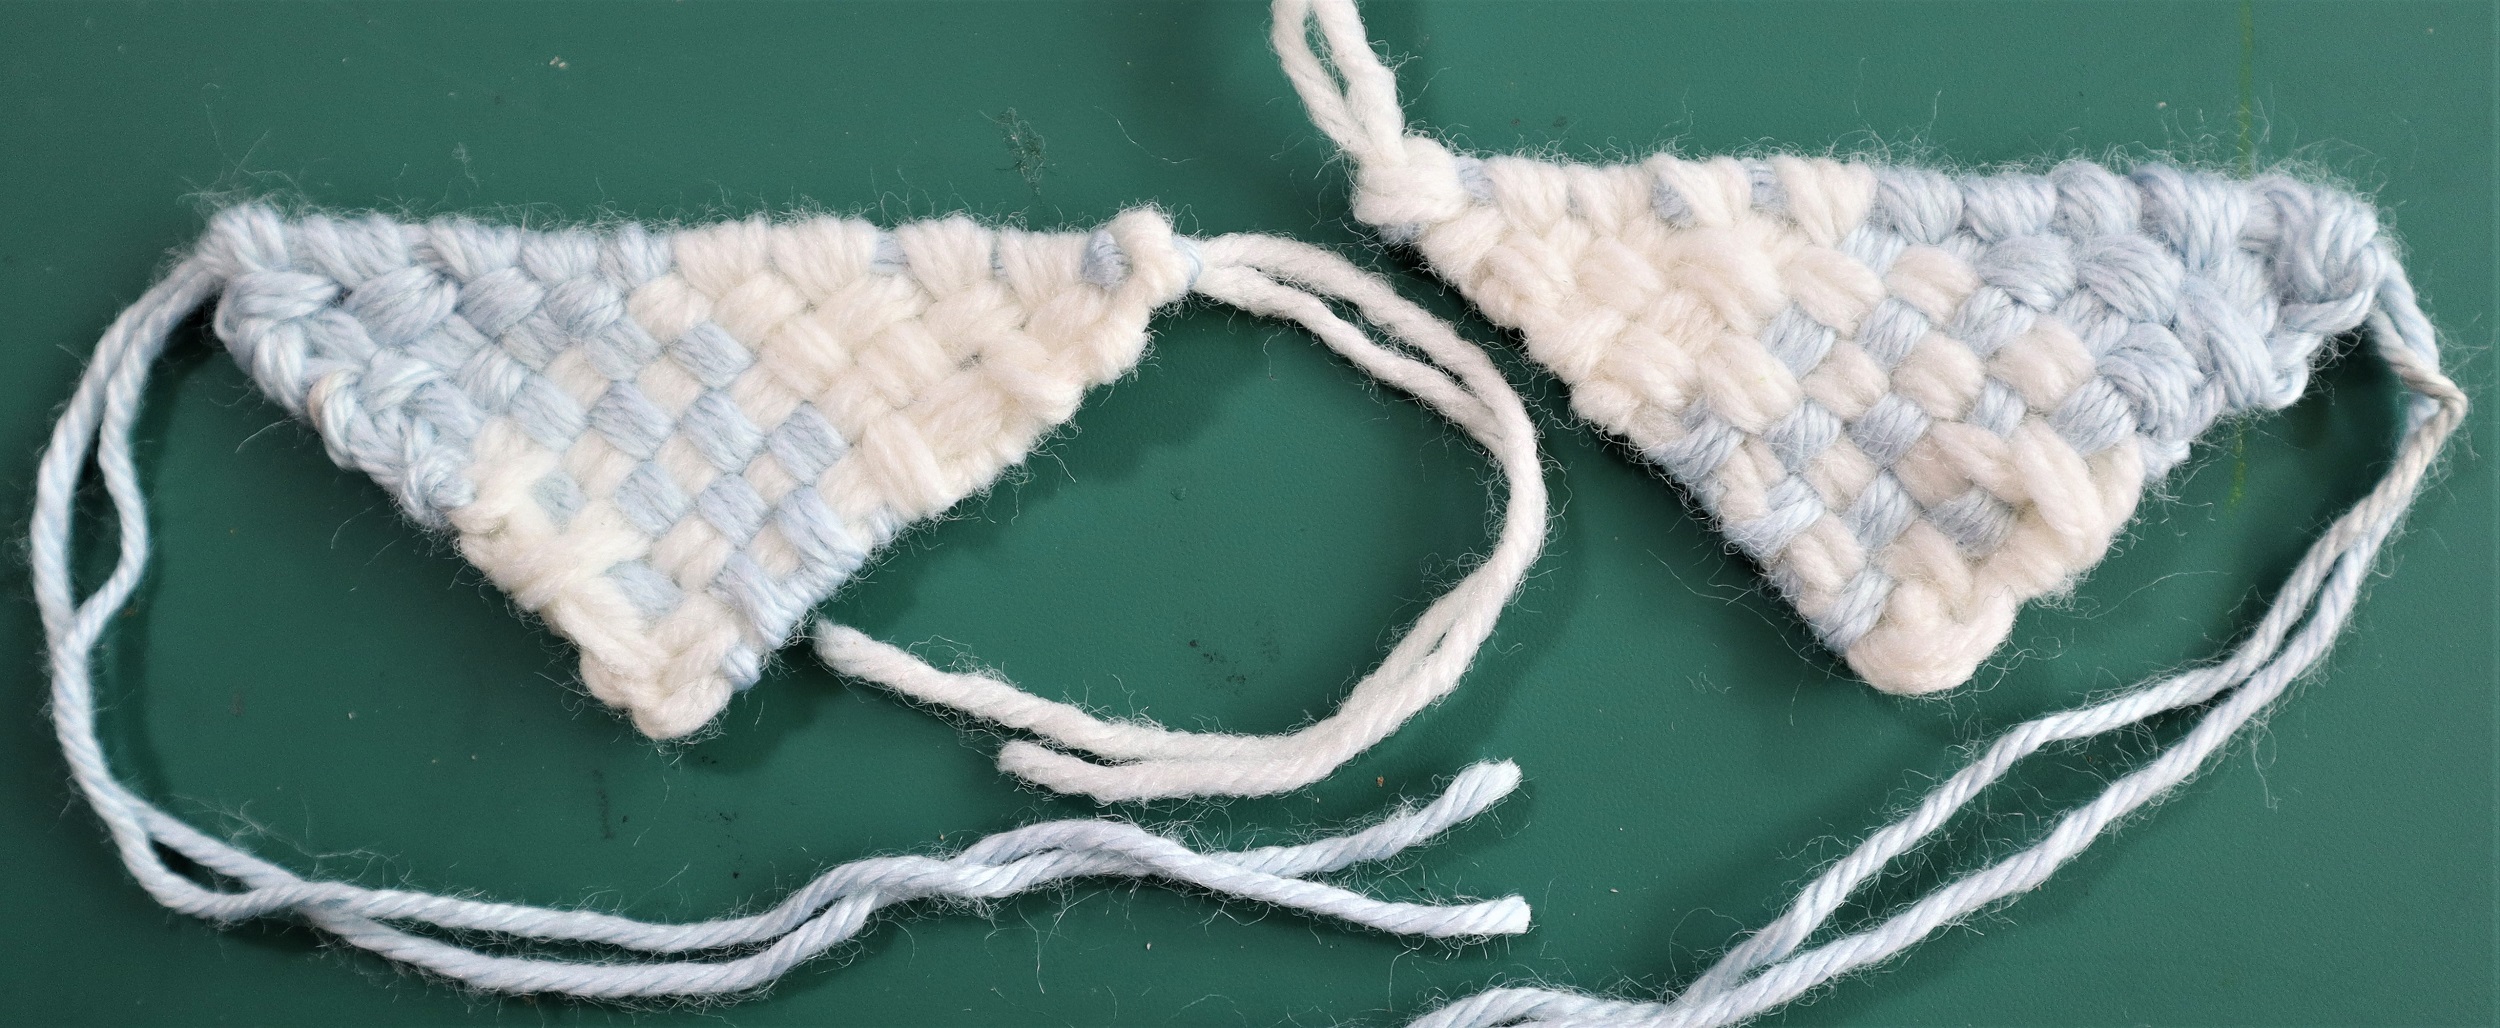
HOW TO WEAVETHE TRIANGLES:
Make 2.
1: SET UP THE LOOM so it is 2 1/2 inches (approximately 6.25 cm) from the lower set of pegs to the upper set. Lock it into the ‘Sandy Stand’.
2: WARP THE LOOM: Following the instructions for warping the Triangle on page 82 of ‘Innovative Weaving on the Frame Loom’, leave 6 sets of pegs at both sides open so just the center 10 pegs are used: Begin at the right hand side.
With 2 strands of white yarn held together as if it is one strand, and 2 strands of pale blue yarn as if it is a single strand, put on 5 loops of white warp strands and then, 5 loops of blue yarn. Cut and tie a knot in the middle.
Diagonal:
Take the blue yarn around the lower left hand peg beside the warp strands up to and around the peg that is adjacent to the warp strands at the top right hand peg
Weave the end of the blue yarn around the lower left hand pegs, back and forth to secure it, then snip the end off.
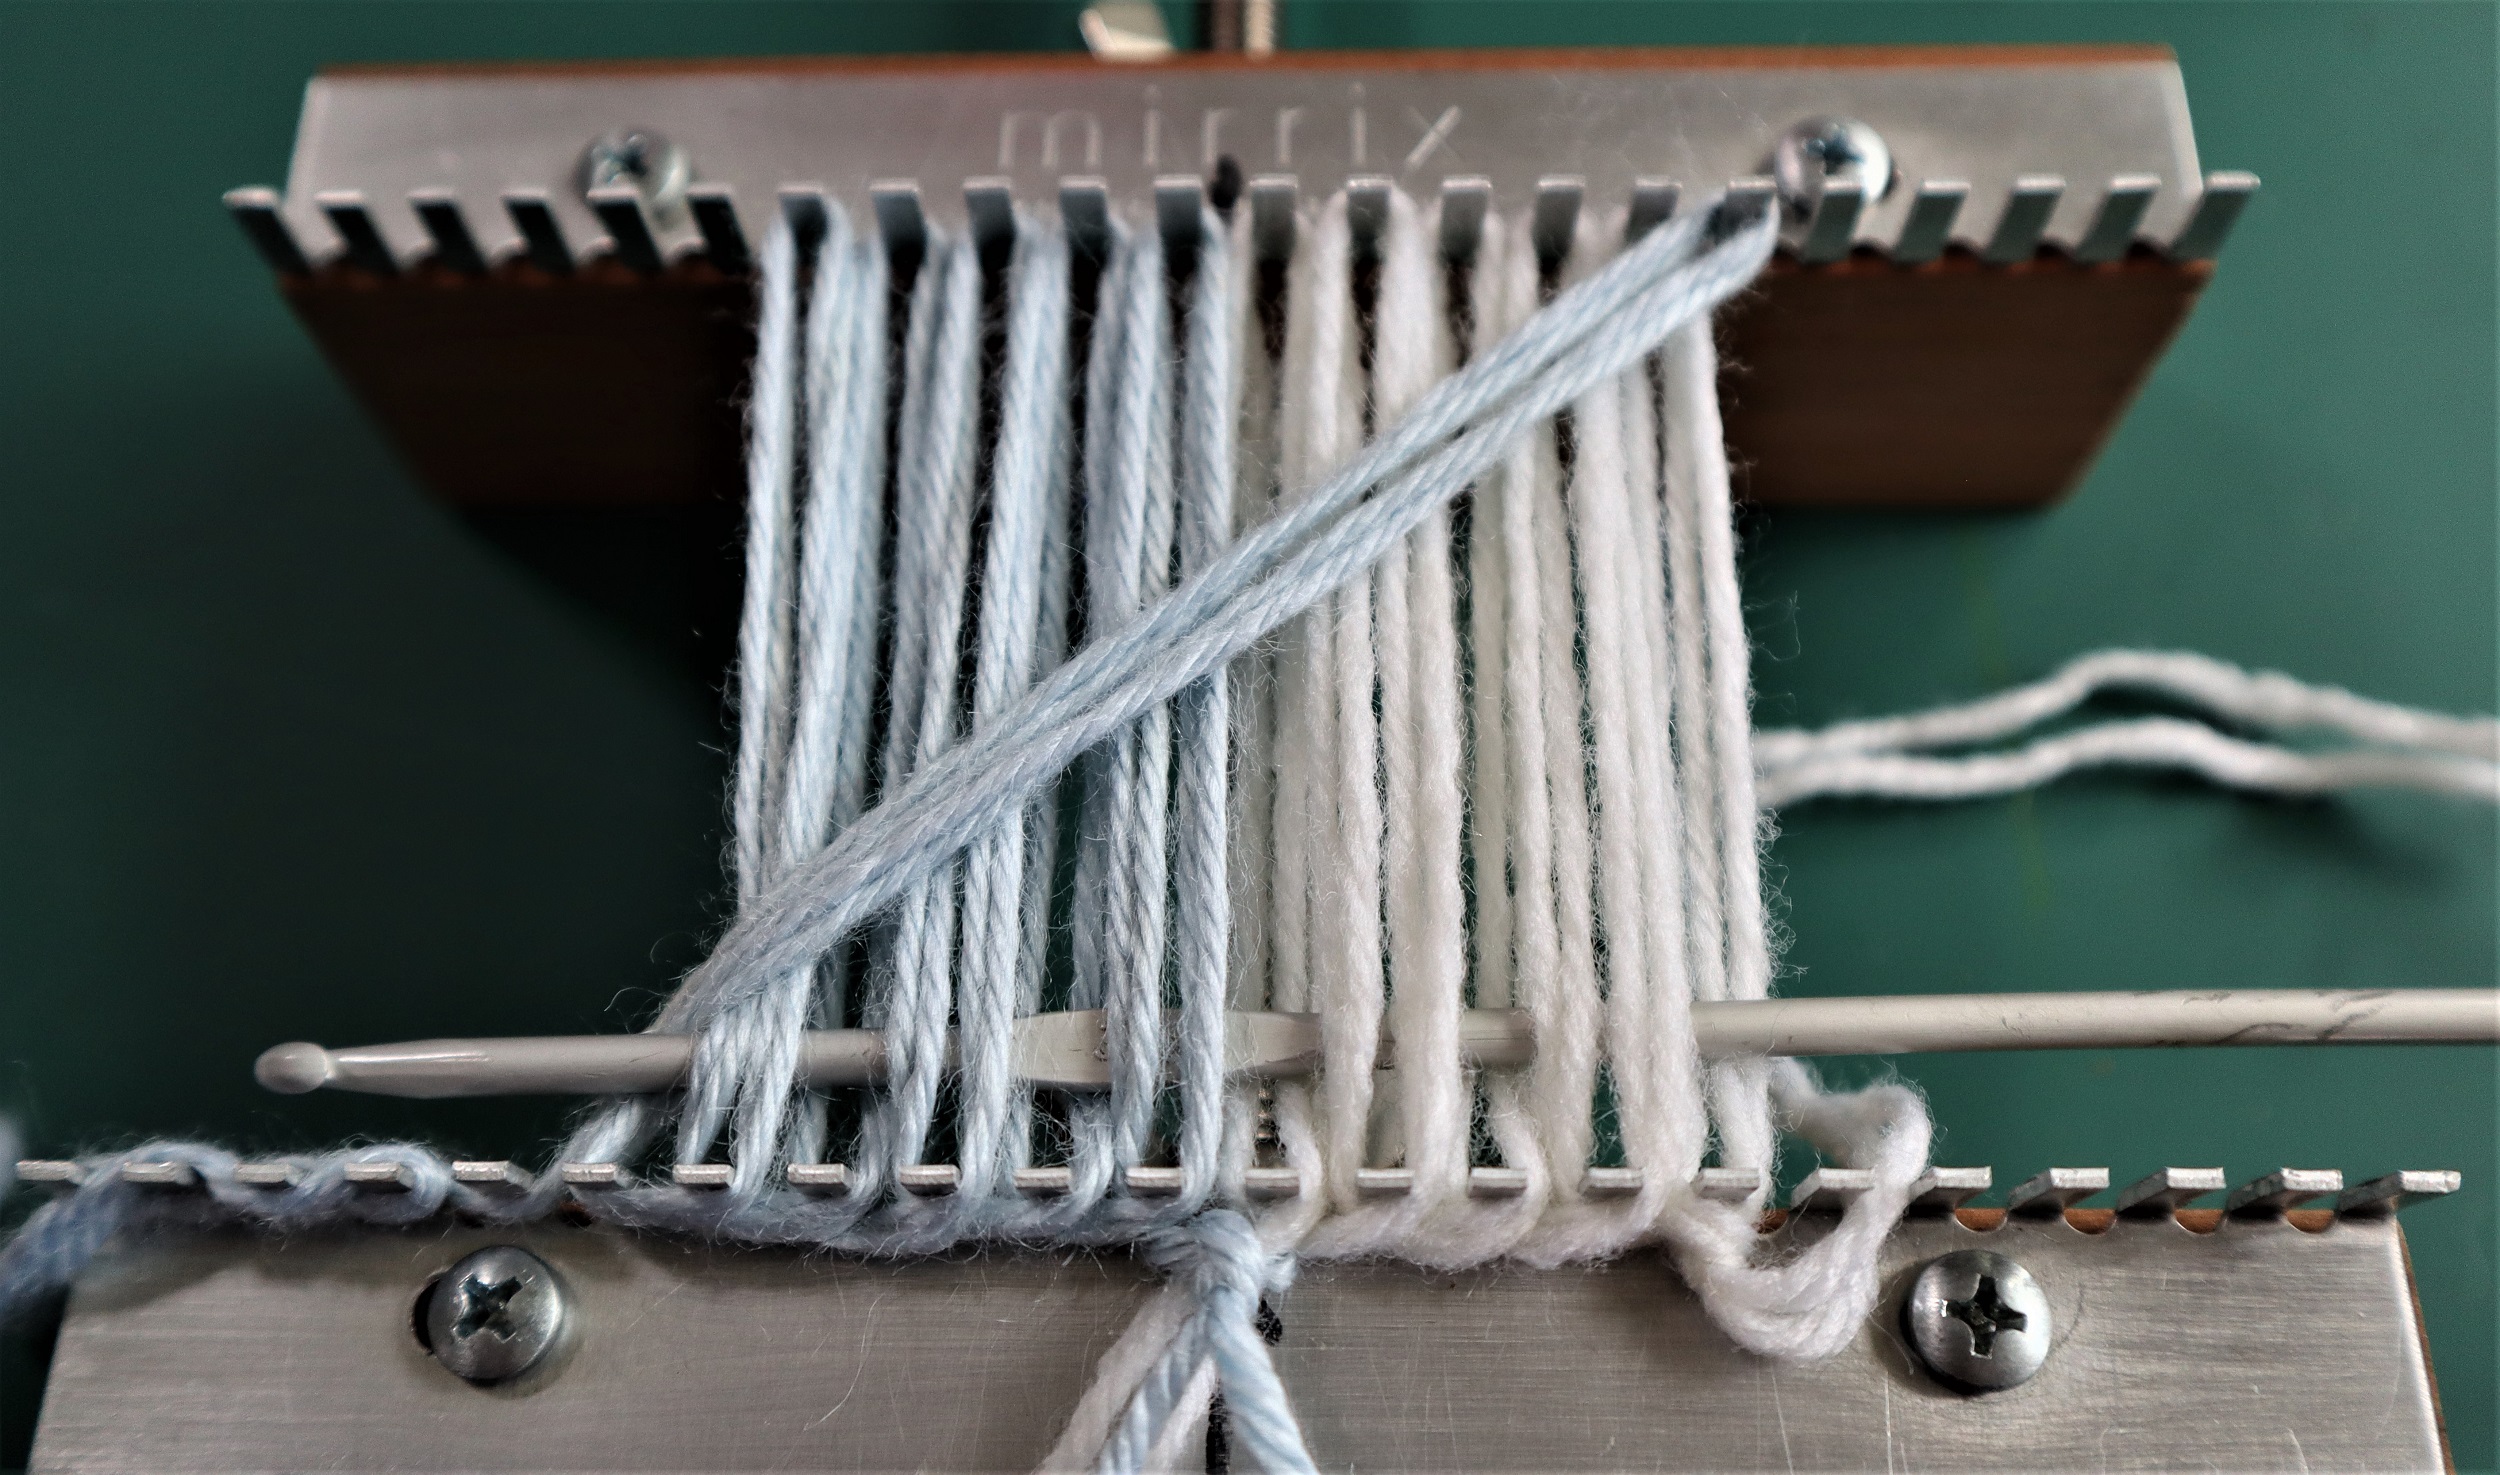
3: WEAVE:
Follow the instructions in the book to weave the triangle, using a crochet hook. Repeat for the second triangle.
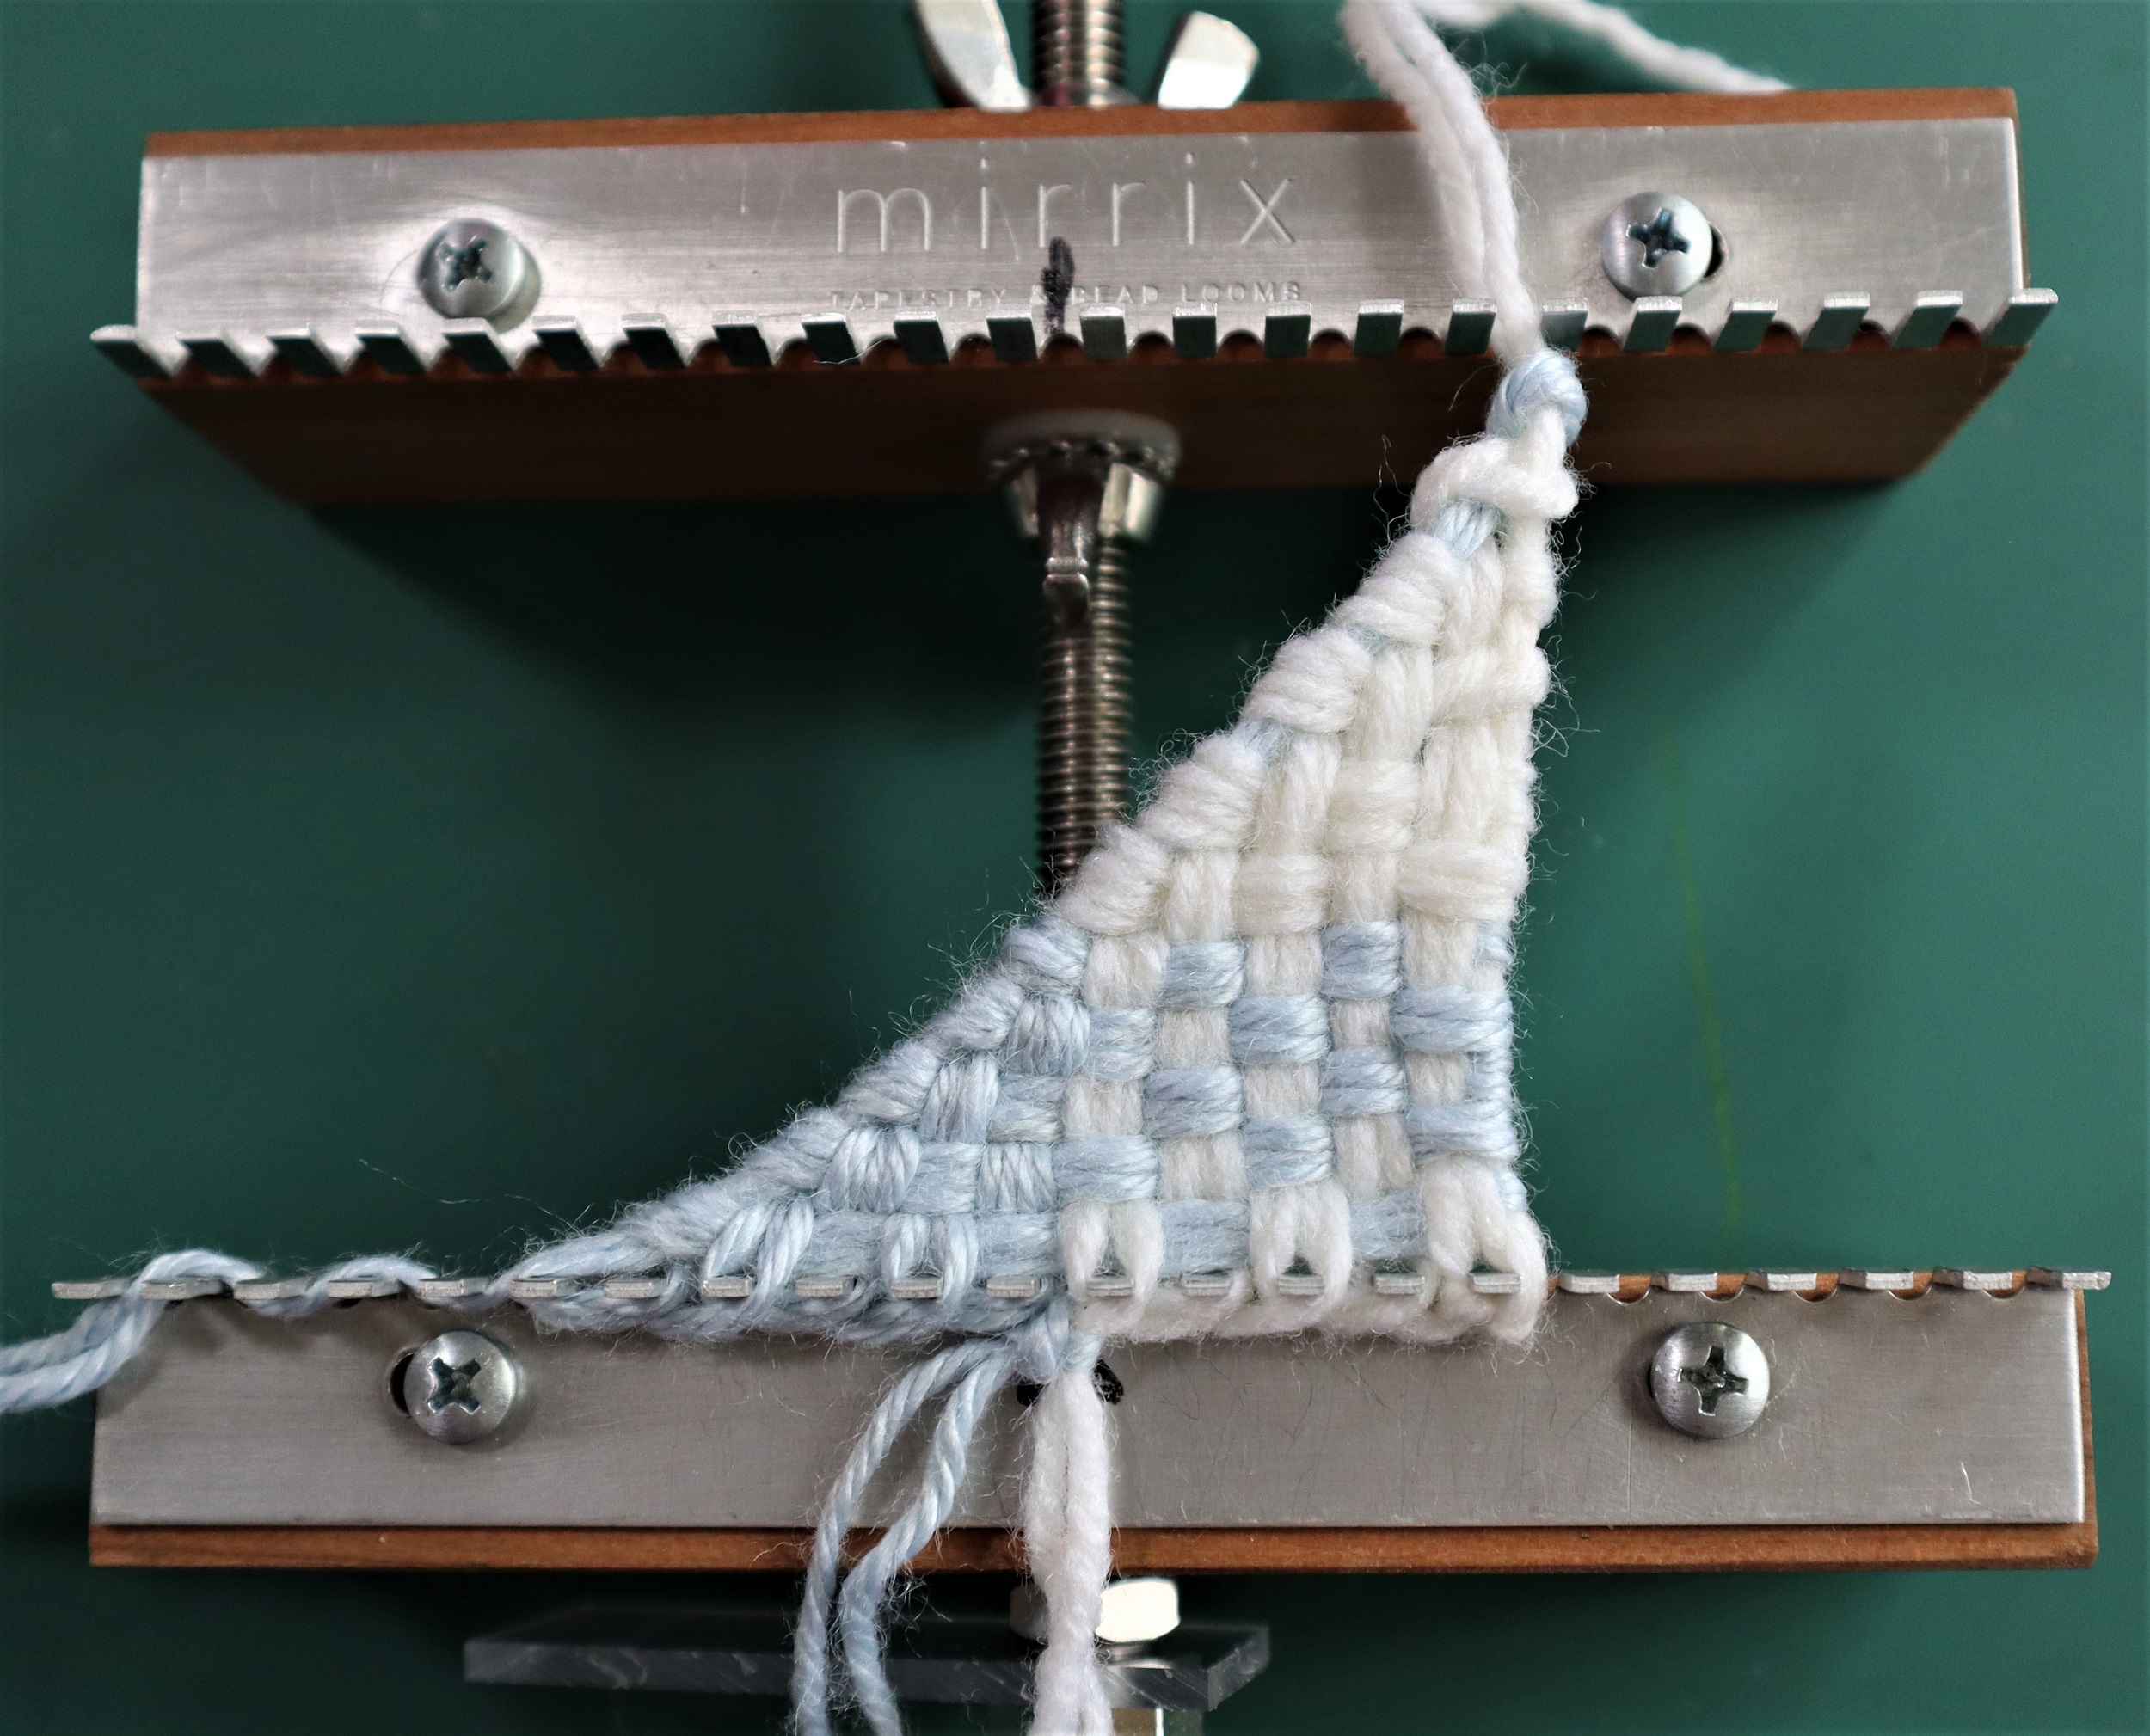
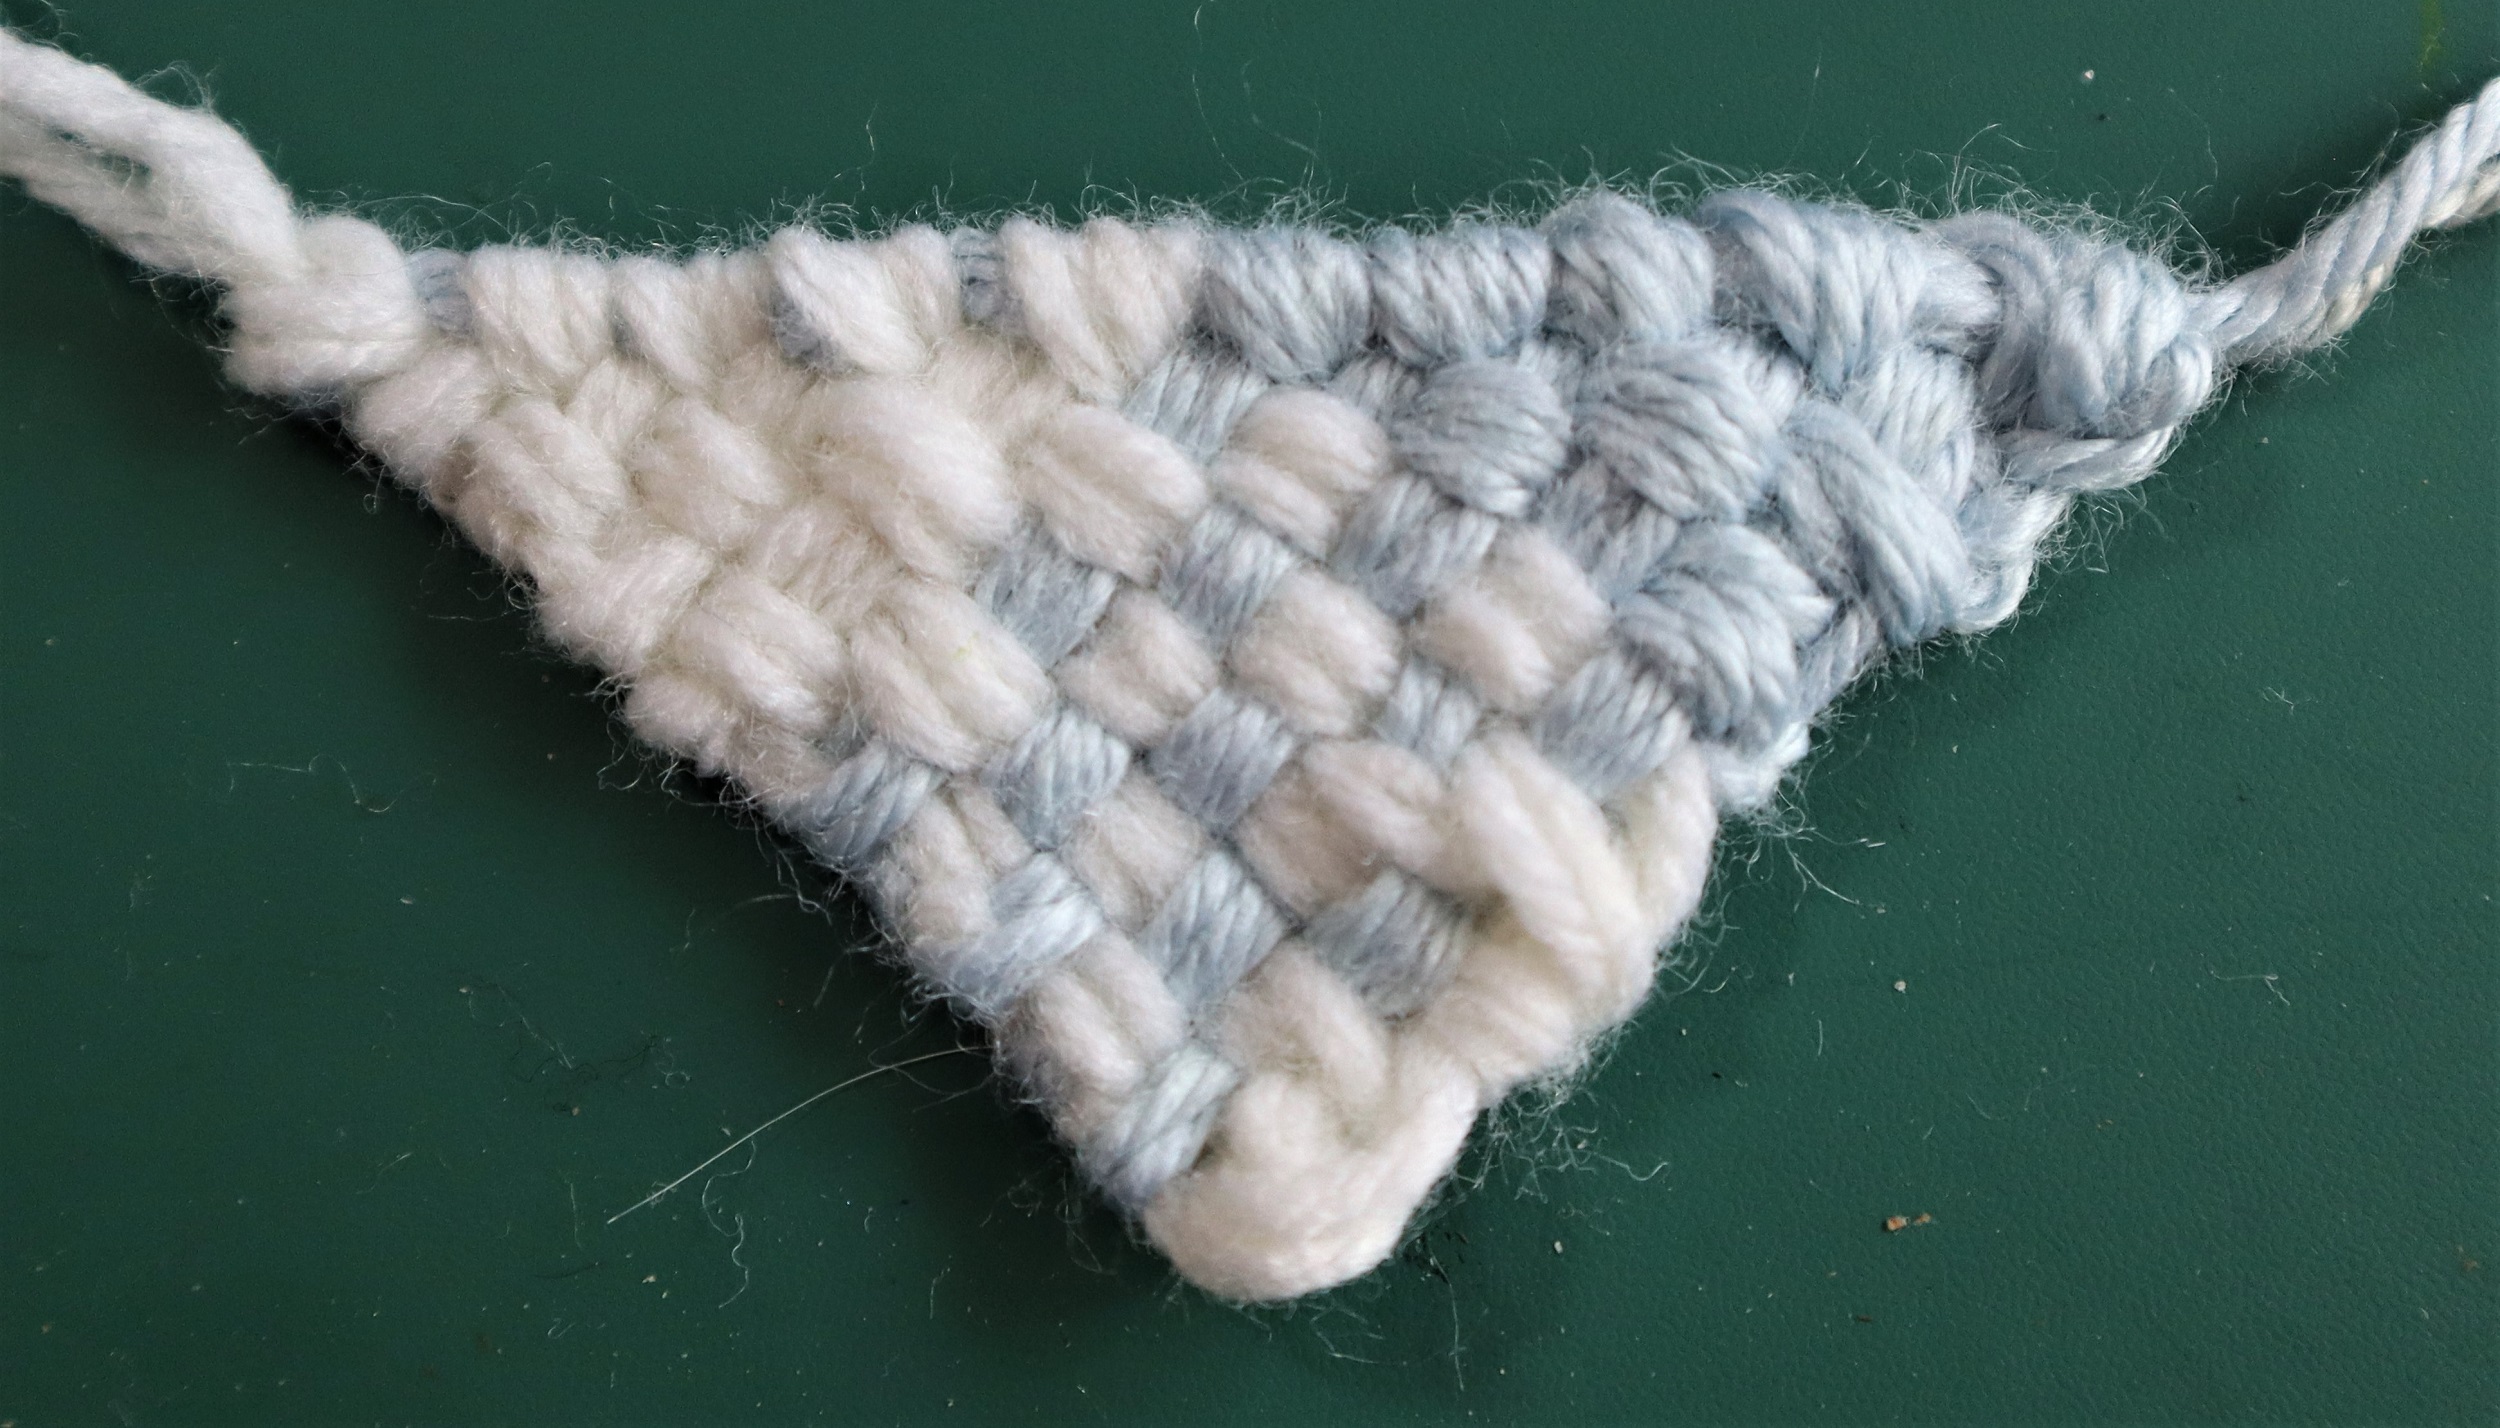
4: FINISHING THE TRIANGLES:
If necessary, pull up on the diagonal yarn end to pull the triangle into shape.
Steam the triangles on the wrong side with a steam iron, being sure to not touch the iron to the weaving.
Finger press the triangles to shape them into pleasing triangles.
Other things that are needed for the ‘Imagine’ banner:
Yarn: Less than an ounce of each of the following colors: white, grey, black, pale blue, brown, beige
Embroidery floss: 1 skein of navy or dark blue
2 small black ‘e’ beads for the eyes and needle and thread to sew them on
Scissors
cardboard
a plastic page protector
a ruler
transparent tape
felting needles,
6 rubber bands
paper
long straight pins
permanent felt tip pen
plastic or metal ring to hang the banner
1 Weaving Needle (5 1/2 inches or 6 inches long with a blunt tip)
1 Shed Stick: a second weaving needle or 6 inch Paddle style bamboo Cocktail Skewer or a short dpn knitting needle
1 craft needle (short metal tapestry needle approximately 2 3/4 inches long)
-1 crochet hook: 4.5 mm crochet hook works just fine
PART ONE:
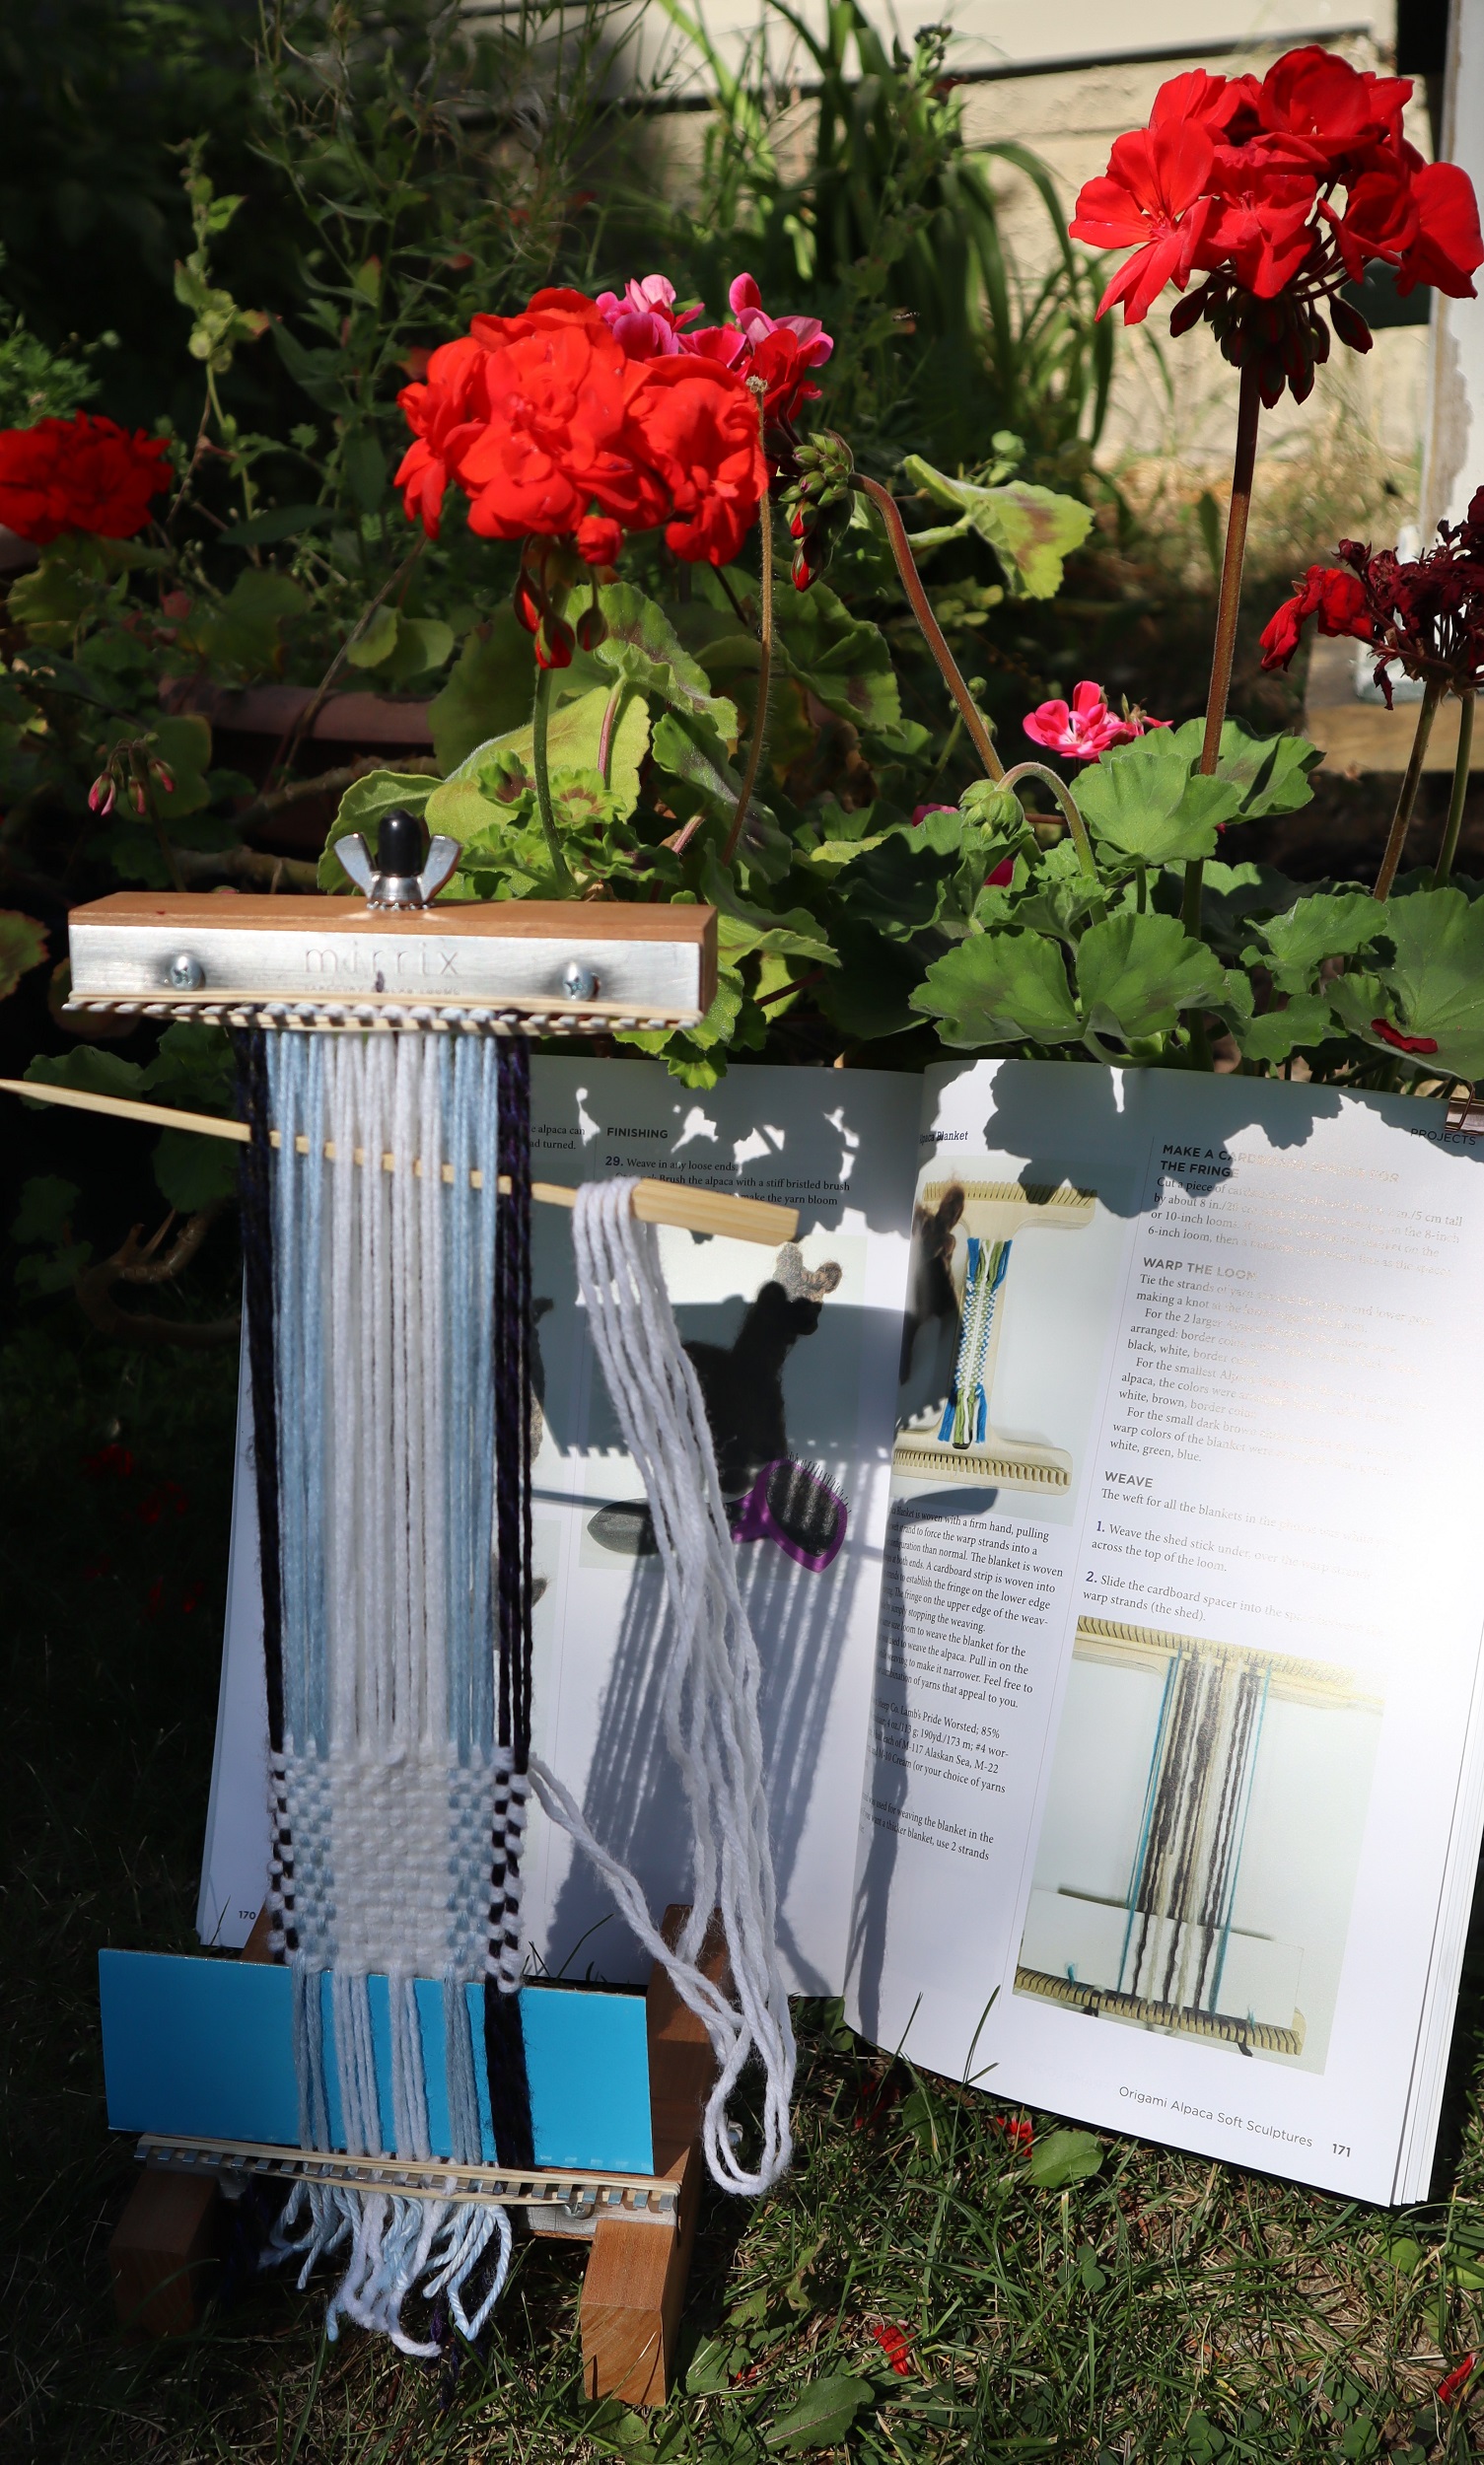
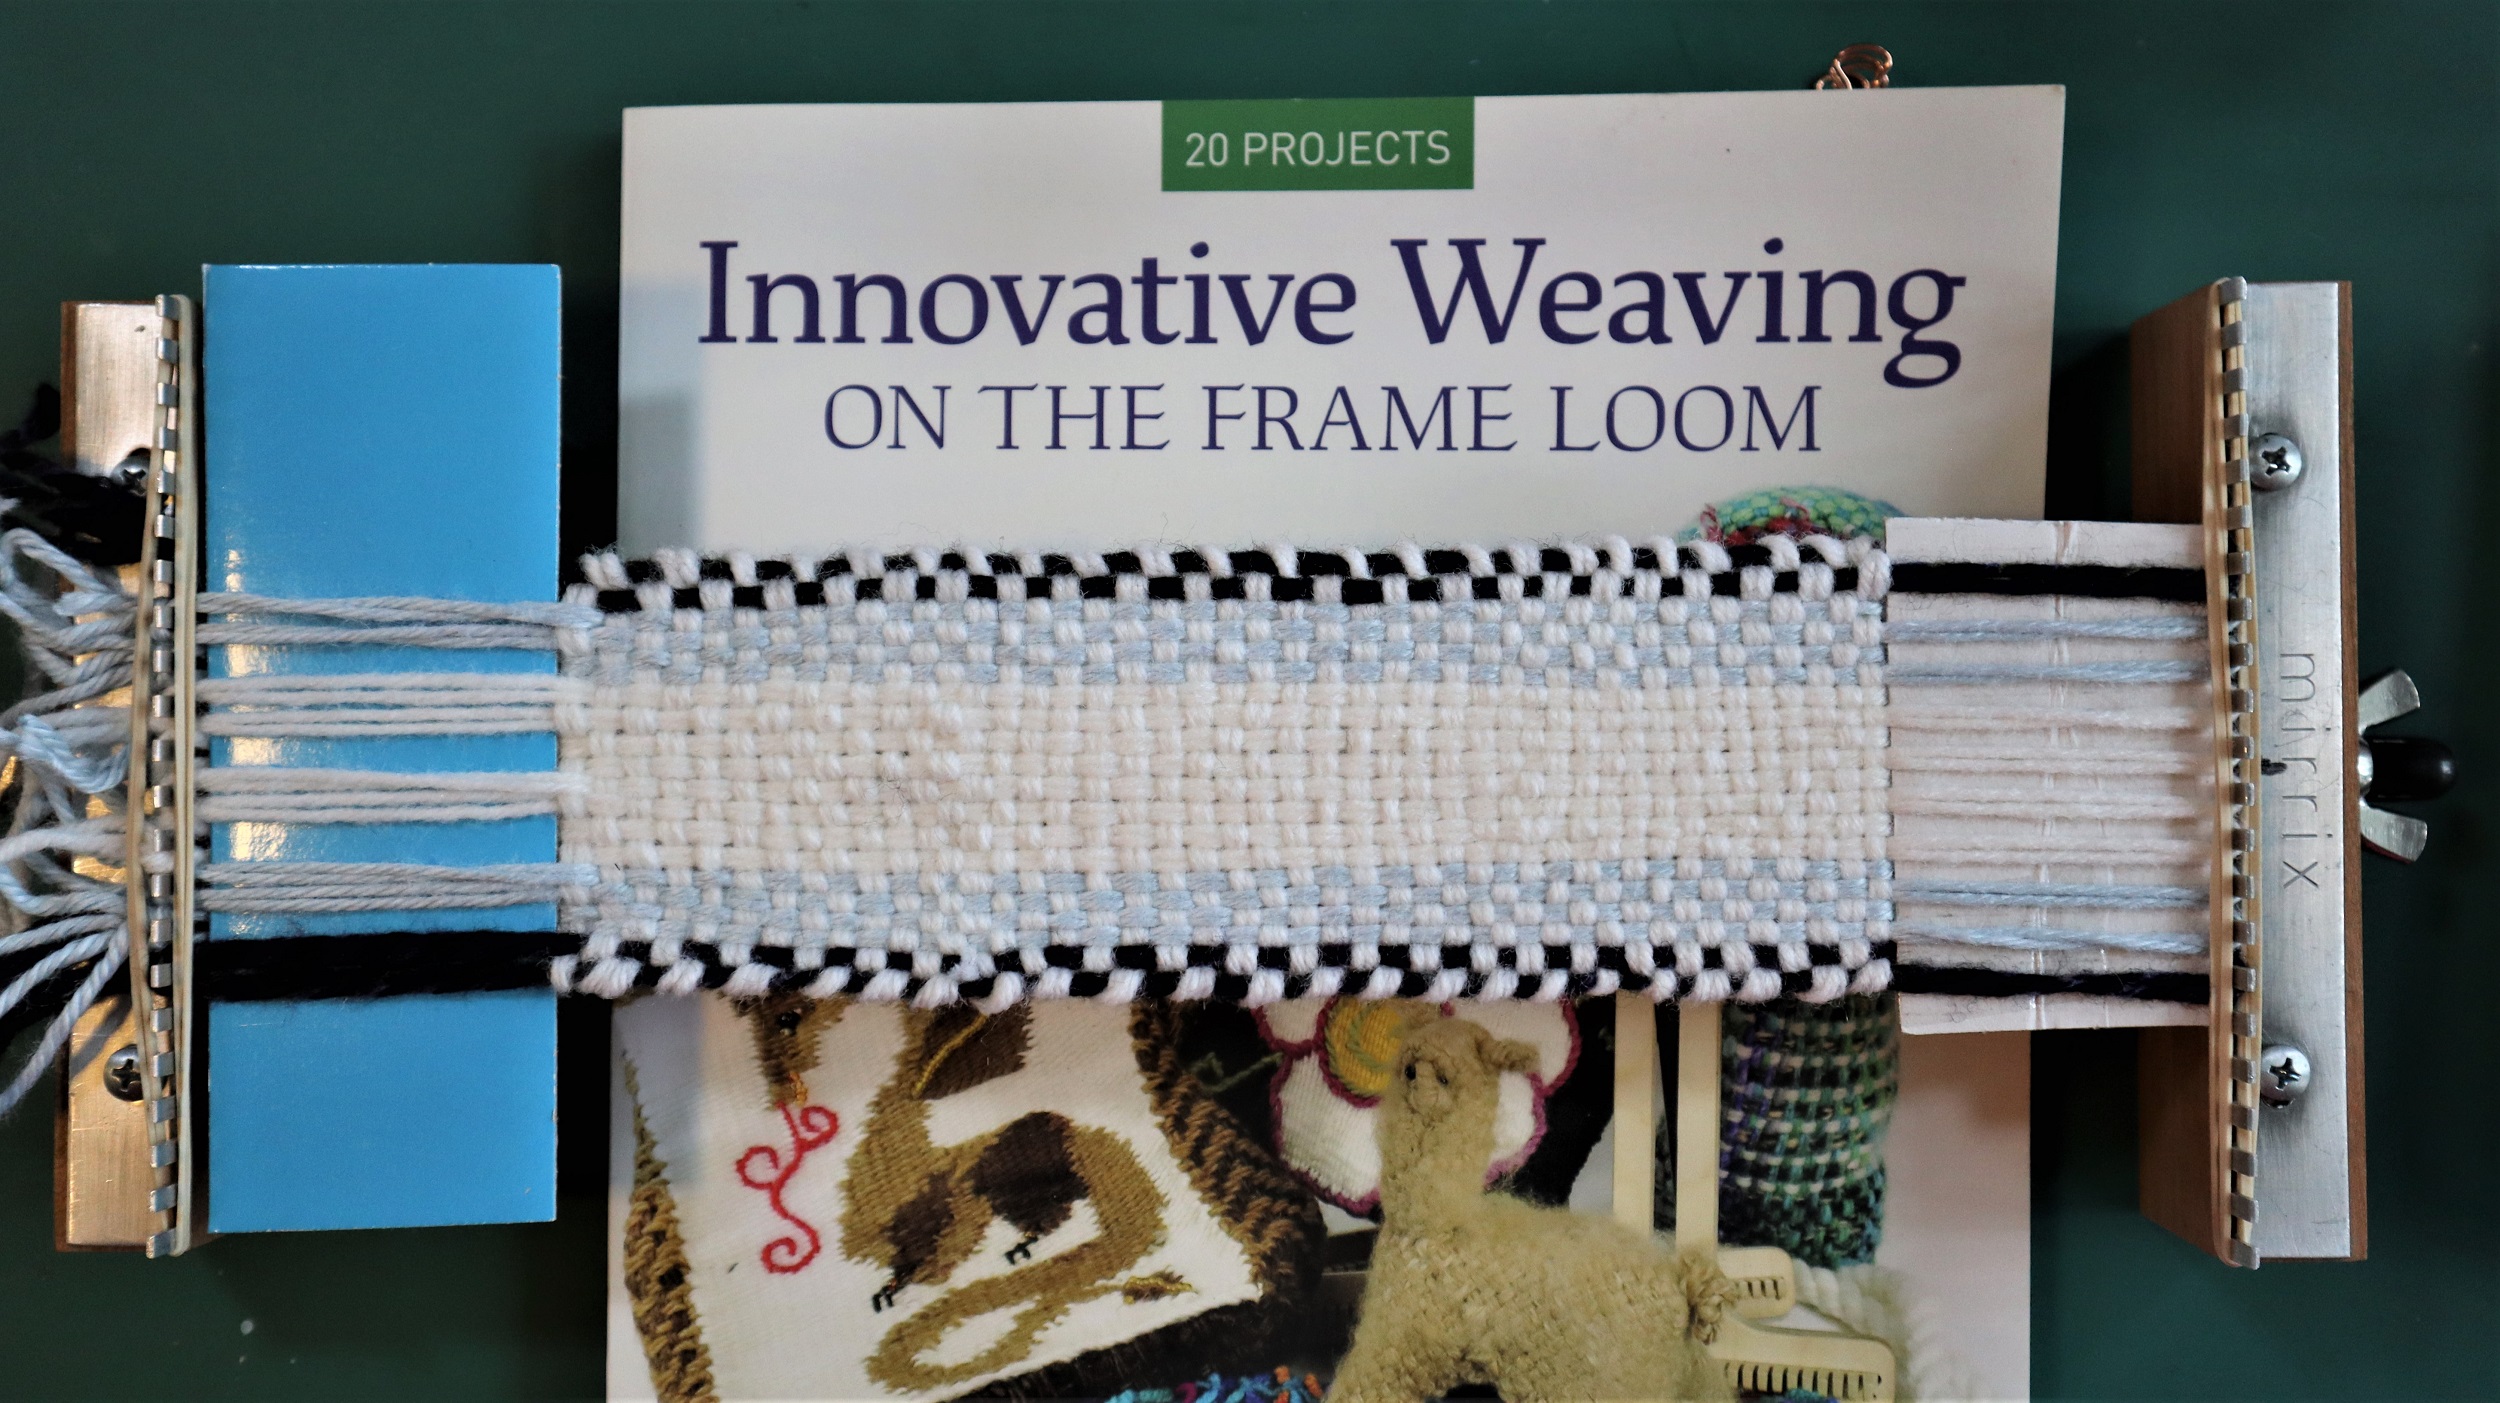
THE WOVEN AND EMBROIDERED NARROW BAND:
The narrow band in Albert Einstein’s hands is woven (with a couple of small modifications) following the instructions on page 171 of “Innovative Weaving on the Frame Loom” for the Alpaca Blanket. While it’s still on the loom, the word, ‘Imagine’, is embroidered using a simple running stitch.
INSTRUCTIONS:
1: SET UP THE LOOM so it is 11 1/2 inches / 29 cm from the lower set of pegs to the upper set. Lock it into the ‘Sandy Stand’.
2: WARP THE LOOM: Following the instructions for the Alpaca Blanket on page 171 of ‘Innovative Weaving on the Frame Loom’, put on 10 sets of warp strands.
Use 2 strands of #4 Medium weight (Worsted or Sport weight) yarn held together as if it is a single strand.
Skip 6 pegs at each side of the loom and warp the following colors, or your choice of colors:
NOTE: A ‘set’ of warp strands in this case means tying around one peg from bottom to top of loom and snipping it after tying the knot at the lower edge. The 2 strands of warp yarn are held together while warping the loom.
1 set of warp strands Black
2 sets Light Blue
4 sets White
2 sets Light Blue
1 set Black
3: Slide 3 rubber bands over the lower set of pegs and 3 rubber bands over the upper set of pegs to help keep the warp strands from jumping off.
4: Cut 2 pieces of cardboard that are 2 inches/5 cm tall. The piece that will go into the lower edge of the warp strands should be 5 1/2 or 6 inches/15 cm wide. The piece that will go into the upper edge of the weaving once it’s done can be just 3 inches/7.5 cm wide.
5: Weave the shed stick under 2/over 2 across the warp strands at the top of the loom.
6: Weave the longer piece of cardboard into the warp strands – slide it into the shed formed by the shed stick and push it down to the lower edge of the loom. This will make the warp fringe at the first end.
7: WEAVING:
NOTE: The instructions in the book say to pull in on the weft strands while weaving. When using the Saffron loom, that is not necessary.
With 2 strands of white yarn and a weaving needle, following the instructions in the book, weave until the weaving is 7 1/2 inches/ 19 cm tall.
Fold the shorter piece of cardboard in half lengthwise and weave it into the warp strands, then open it up. This will keep the weaving taut while you embroider the word, ‘imagine’.
The 2 pieces of cardboard – 1 at each end of the weaving are essential to keep the weaving in place while embroidering the letters.
Woven on the Mirrix Saffron loom, using techniques from “Innovative Weaving on the Frame Loom”
A Weave Along by Noreen Crone-Findlay
The “Imagine” banner is a reminder about the power of creativity. Noreen Crone-Findlay, author of “Innovative Weaving on the Frame Loom”, has designed this banner as a weave along, featuring the delightful Mirrix Saffron Loom.
Albert Einstein has been credited with saying that he valued imagination over knowledge.
Now is certainly the time for us all to imagine that we can make things better, so hurrah for creativity, resiliency and imagination!
The 3 components of the ‘Imagine’ banner are all based on techniques that are featured in ‘Innovative Weaving on the Frame Loom’, with little tweaks so that you can make a unique and one of a kind celebration of creativity to inspire yourself and other people, too.
You will need the Mirrix Saffron Loom and ‘Innovative Weaving on the Frame Loom’ by Noreen Crone-Findlay (that’s me, of course) to participate in the weave along.
Mirrix is offering a kit that includes both, as well as other tools that are used to create the ‘Imagine’ banner.
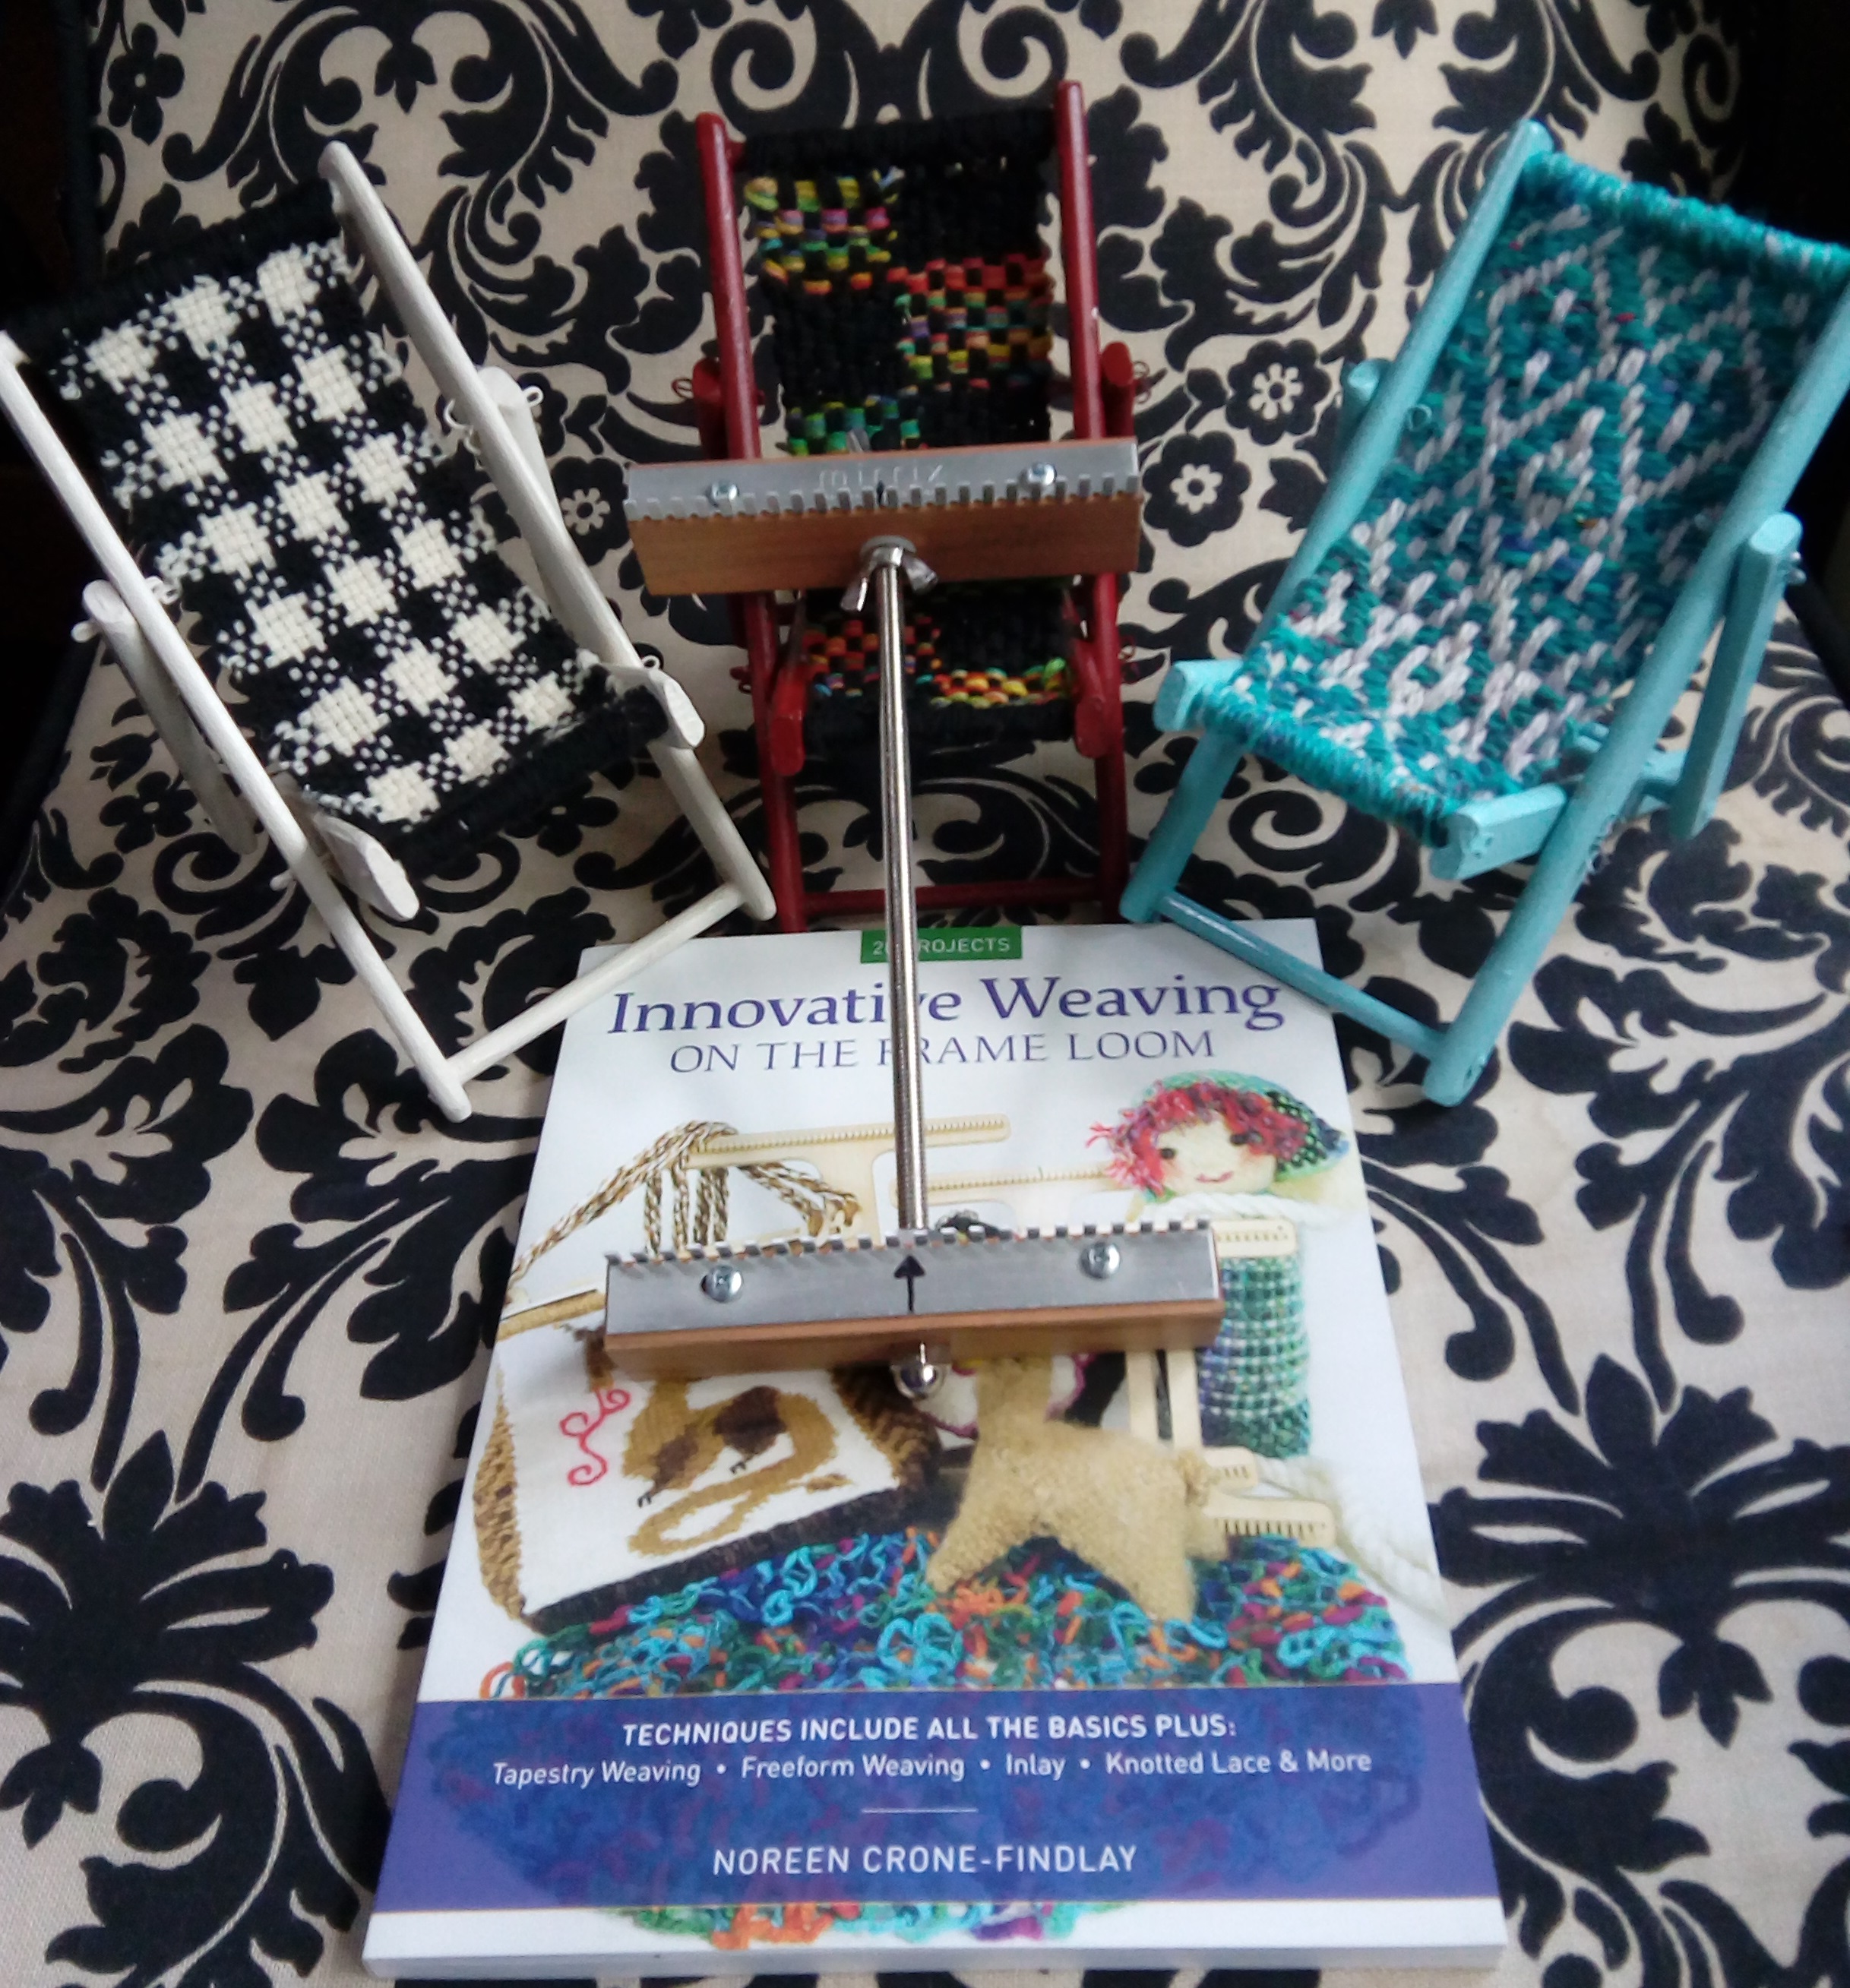
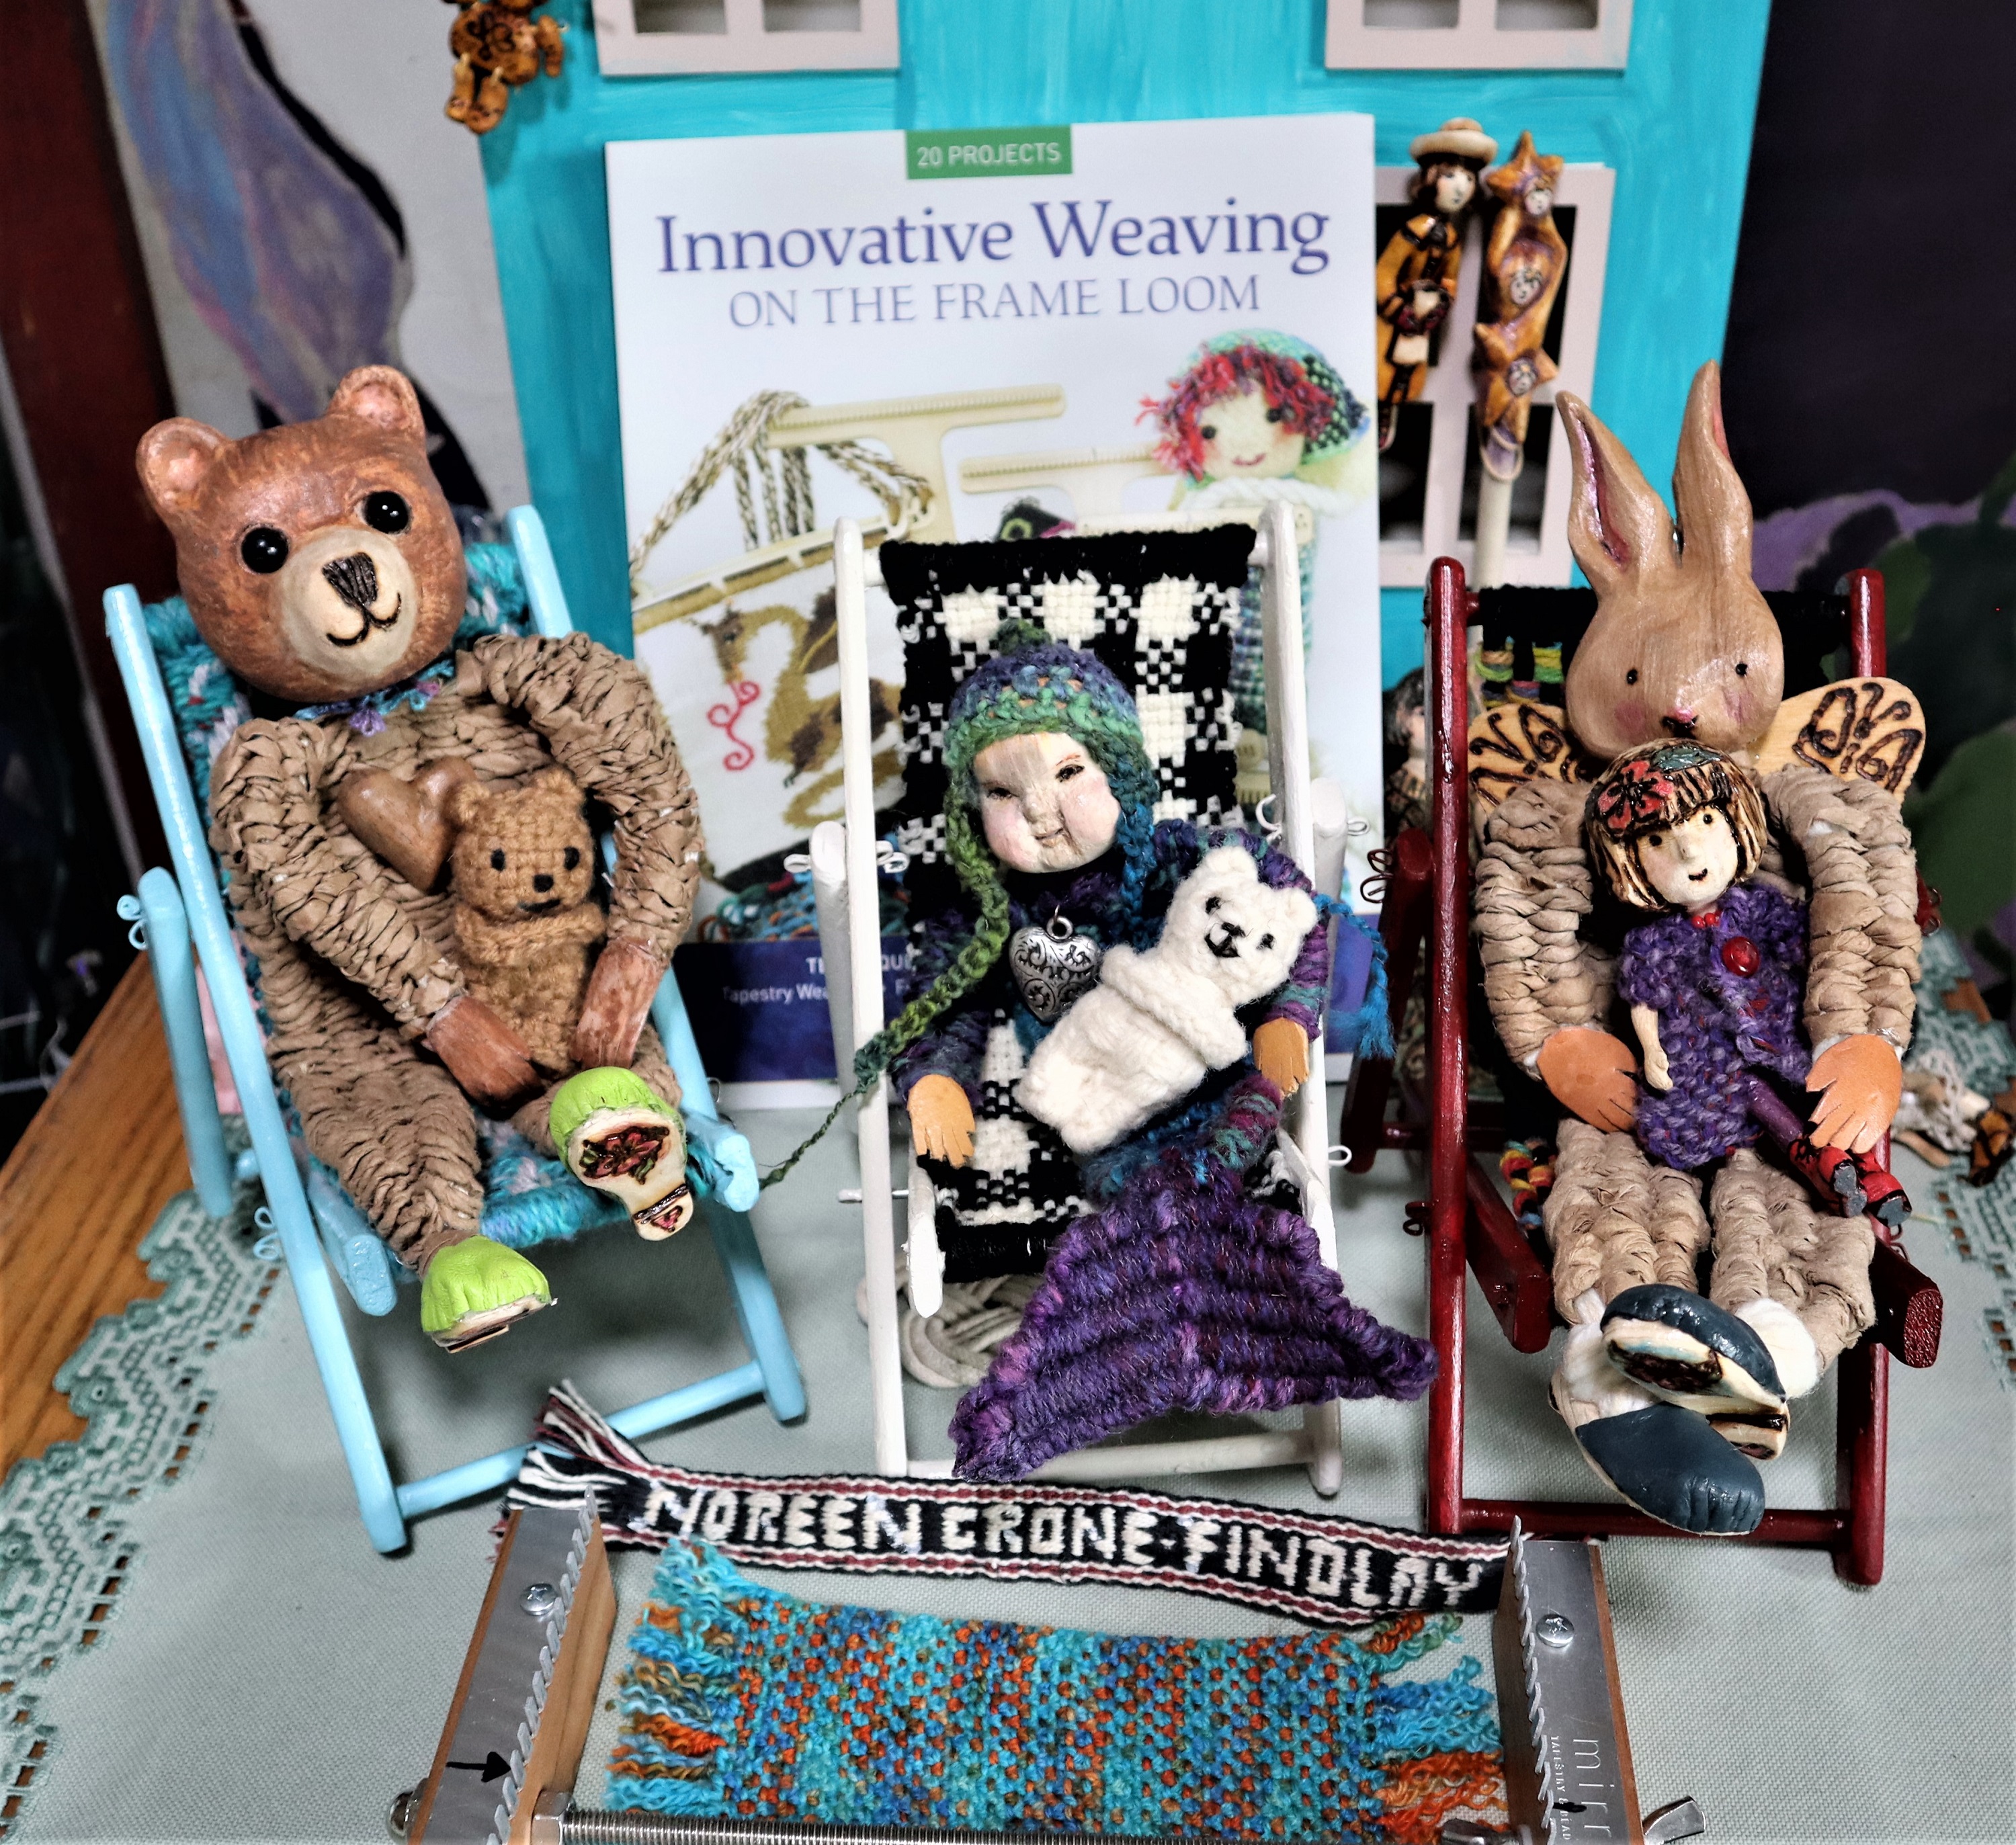
After I carved and wove 3 dolls that didn’t fit the doll furniture that I already had, (see Brown Paper Yarn Dolls) ,
I decided that I had to build them each a chair.
And so I built them each their own little chair with a seat woven on the Mirrix Saffron Loom, using instructions from my book: Innovative Weaving on the Frame Loom.
The Chairs are not in the book, but the weaving patterns are. See pages: 68, 50 and 45.
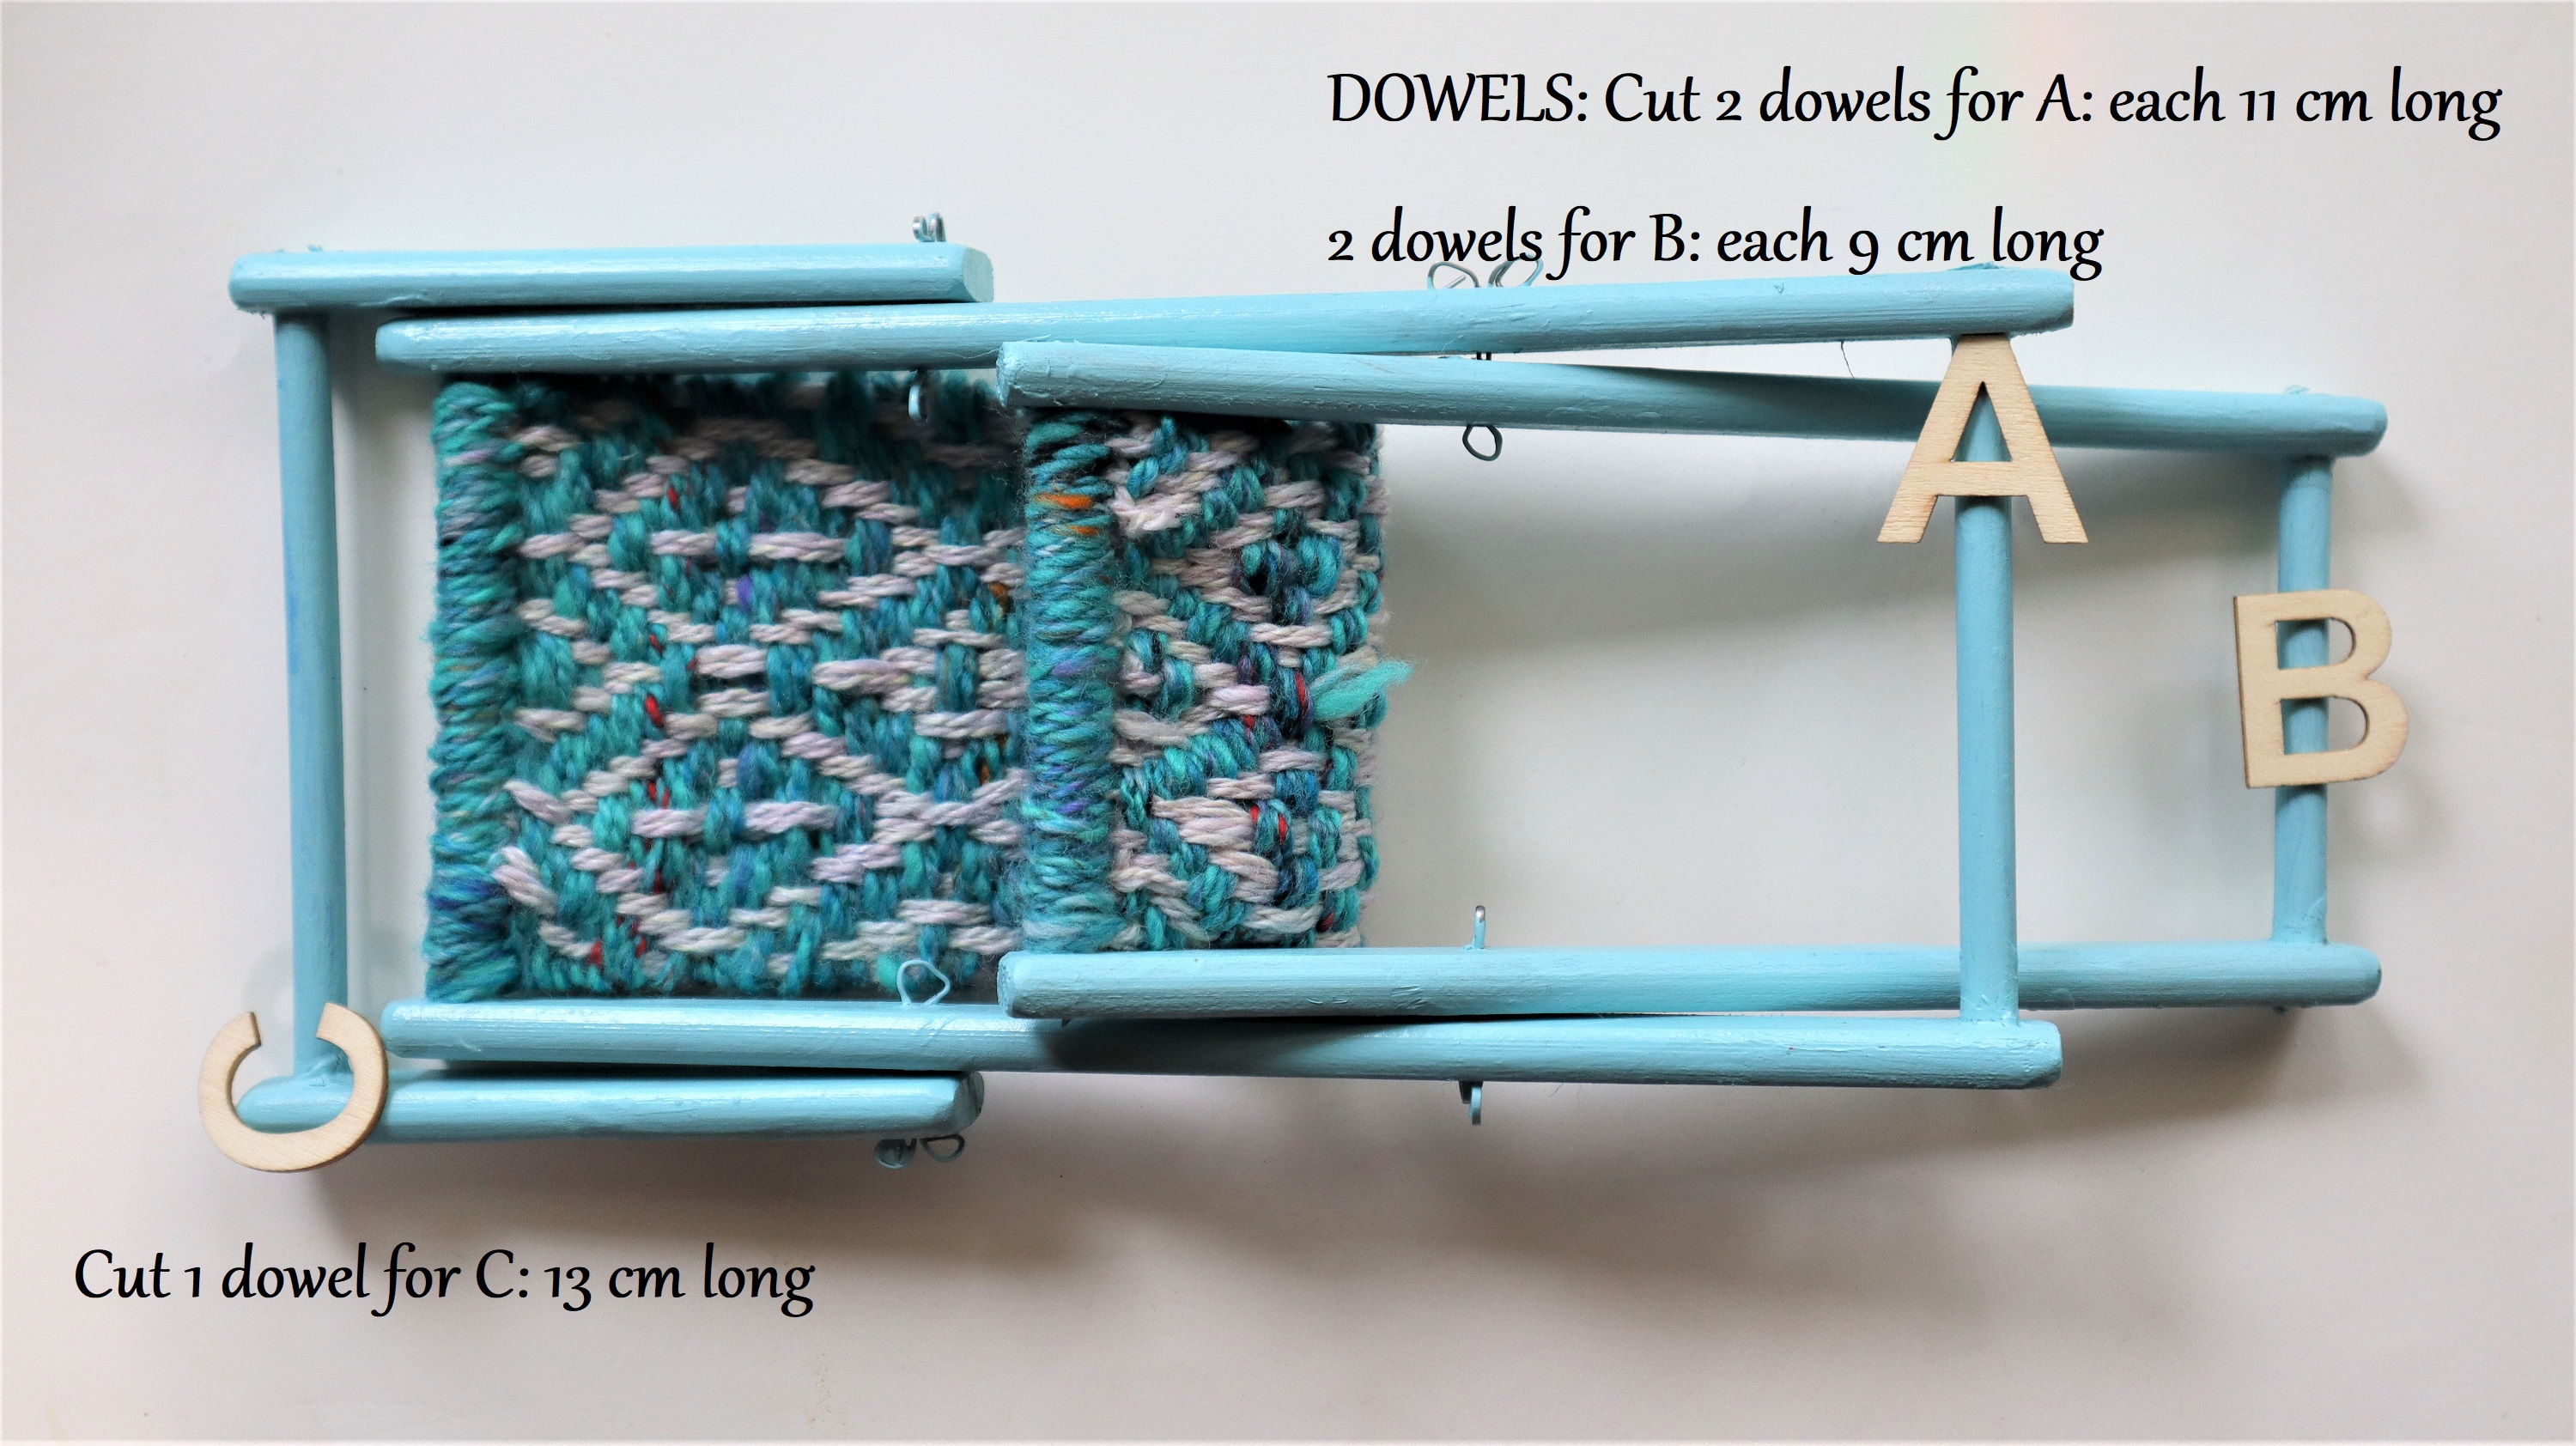
Here are the dimensions for the wooden parts of the chair:
The wooden pieces are all 1 cm thick and 2 cm wide.
Pieces A are 24 cm long (cut 2)
Pieces B are 20 cm long (cut 2)
Pieces C are 11 cm long (cut 2)
The Dowels are 1/4 inch in diameter:
A: Cut 2 that are 11 cm long
B: Cut 2 that are 9 cm long
C: Cut 1 that is 13 cm long
The Seat: Weave a piece of fabric that is 20 cm long by 7 cm wide and stitch through the end of the warp loops, over the top dowel of A and the front dowel of B.
The finished size of the chair is:
Height: 20 cm (8 inches)
From front to back: 18 cm (almost 7 inches)
Width: 13 cm at widest point (about 5 inches)
The dolls are very happy in their new chairs!
I have made a video, showing how to build the chairs- but please note that I forgot to show how I sew the weaving to the chair.
Oops.
I simply lifted the weaving off the loom and stitched through the warp loops with 2 strands of yarn, going over the dowel.
I hope that you will have fun making doll chairs for your dolls and teddy bears, too. ❤
One of my favorite eco friendly crafts is spinning yarn from brown paper….
This video shows how:
And, then, I love to weave the brown paper yarn into all kinds of fun things like this bunny and teddy bear.
I carved their heads from wood, and made their little shoes from scraps of garment leather that I glued to wooden soles that I carved. The navy shoes were made from a thrift shop coat that I cut and sewed into a ton of different things- bags and doll shoes and doll clothes.
I made their hands from scraps of heavy weight leather that I was given years ago.
Bunny’s face is lopsided because the scrap of firewood that I carved her from was wonky, but she forgives me for that!
I adapted this pattern from my etsy shop to weave their bodies on weaving sticks, using the brown paper yarn that I had spun: Here’s the link:
I love all the neat things that can be made with brown paper yarn. In our house, brown paper is NEVER thrown away!
It always gets upcycled into nifty new things 😀
This is my contribution to the monthly ‘Scrap Happy’ Blogging group- people who delight in making things from scraps and upcycled bits of this and that post on the 15th of each month.
Here’s the links to the rest of the group. I always enjoy seeing what each of them has done each month:
I don’t usually post twice in one day to my blog, but I just had a conversation with a friend on facebook that nudged me about something I wanted to talk about-
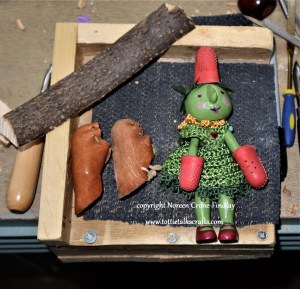
Being safe when carving wood.
Why? Because I have caused myself considerable harm a couple of times when a moment of mindlessness let my knife slip, with almost fatal consequences.
I talk about it in this little video:
Here are some specific things that I use to keep my hands safe while I carve:
The square of wood with the enhanced corner is a carving support that my husband built for me.
See how the lip hangs over the edge of the desk?
It sits on anti-slip fabric to prevent it from skidding around.
Another square of the anti- slip fabric is on the carving support to keep the piece from skidding while I am carving it.
My lovely husband made it from various scraps of wood we had around.
Make it any size that works for you.
The piece of wood with bark on it is a great way of holding down a piece of carving with my left hand while I carve with my right hand.
The knife, chisel or file can easily slip and plunge into the hand that is holding the work in place and I would rather skid into a bit of wood than my hand.
(I’ve had more than my fair share of stitches over the years!)
Tottie Tomato is modelling rubber thumb and finger thingies that are usually used for filing papers, but they work great as finger and thumb tip protectors on my left hand.
Can you see how the nubbinses are almost all gone? That’s from interacting with knives, chisels, sandpaper and files.
Better to nip the finger protector than my finger.
The 2 leather things are thumb protectors that I made from leather by trial and error to get the fit and shaping right.
I cut an oval of thick leather that I had in a drawer in the studio and punched holes around the top to gather it and also 2 holes in the tabs to tie them into a comfortable fit.
You can see that the lighter color one is almost done… it’s really notched up – and none of those cuts made it to my precious thumbs! Yay!
It started out looking identical to the darker colored one (same leather), but the hard use and lots of slices have taken the finish completely off it.
I sometimes wear the second one on my left hand, but not often.
I NEVER carve without wearing the protector on my right hand thumb.
You can see why, as it’s so beaten up by just a few hundred hours of carving.
Power Tools:
ALWAYSwear a face shield when working with electric tools, and a dust mask and ear protectors and anything else that is going to keep you safe, smart and out of the emergency room!
This is only friendly advice from a person who has done damage to herself when NOT wearing safety equipment and I really don’t want you to hurt yourself.
BUT I also have to make the usual disclaimer… I don’t know your situation and I mean well, but I am NOT an authority on safety issues, just a concerned and loving person.
So, my friend, USE YOUR THINKY BRAIN AND DON’T DO DUMB STUFF, okay?
One of my most favorite things to do at Christmas time is to make ‘the ornament of the year’ to give to family and friends. I usually end up making a LOT of them and it’s totally delightful.
This year, I have been weaving up a ton of tiny Snowmen- I designed them last year and made a video so other people can make them too.