I have been folding little Origami boxes to help me organize the Comfort Bears as I weave them.
People have asked me for instructions on how to make the Origami boxes, so here’s a video tutorial on how to fold them:
Happy Folding!
I have been folding little Origami boxes to help me organize the Comfort Bears as I weave them.
People have asked me for instructions on how to make the Origami boxes, so here’s a video tutorial on how to fold them:
Happy Folding!
I have been making Comfort Bears for a community in Northern Saskatchewan.
One of our close relatives has been working with people in the town because of his job.
When he heard that there is a high stress level there, he mentioned to a front line care person there that I make Comfort Bears, and so they asked if I would be willing to make some Comfort Bears for them.
I couldn’t get to them right away because at that point in time I was working 24/7 to deadline on the 2 new books that I have coming out this year as well as a solo show that was here in Edmonton before Christmas.
Once those deadlines were met, I set in on making Comfort Bears for them.
I sent a box of 30 Comfort Bears off to them:

The timing of sending them seemed to be powerfully right… as a teenager had died of suicide and that the box of 30 bears had arrived soon after and had been given to his grieving classmates.
I was deeply saddened, and was grateful that the little bears had been there at the right time to do their job.
When my contact person told me that there were other people waiting for Comfort Bears, and that their need is great (I don’t want to say why, as that would be a violation of their privacy) I cried.
I was galvanized to get more Comfort Bears to them as quickly as possible. I had been working on more bears for other groups, but I chose to re-direct them to my contact person.
I set myself a goal to weave 100 Comfort Bears before the end of January.
This meant that I had to put aside everything else that I was working on, but that’s okay.
I DID IT! Hurrah!
I have sent another 50 bears off to my contact person and I hope that they will bring all kinds of happiness with them.
Sometimes people just need to know that someone that doesn’t know them still cares about them.

There are 50 Comfort Bears in this box.
With love in every stitch.
It helps me to sleep at night to know that I am doing this small thing, when otherwise, I would be worrying about people who are going through ghastly things.
A few things that I have discovered as I have ‘marathoned’ on the Comfort Bears-
1- Wow, have I ever gotten fast at weaving them! The more I weave the more streamlined the process has become!
2- No 2 bears are alike. Even the ones who were born out of the same ball of yarn have totally different faces.
3- The faces on the little bears seem to be ‘destined’ – a couple of the bears look distinctly grumpy. I was not pleased about that as I was aiming for them to be comforting after all. But, as much as I tried to cheer their faces up, they solemnly refused my efforts. Okay. Maybe some people need a Comfort Bear that isn’t going to be grinning at them.
4- I usually have a hard time with January. Yes, the days are getting longer, thank goodness, but for crying out loud, when an Arctic cold front lands on us for record breaking days and days and days, it’s truly brutal.
And, the political situation…. sigh…. and worries about the planet…… sigh/sob….. and awful things that people are dealing with…. oh my word…..
BUT… I have found great joy in the making of these 100 little bears, and respite from the worries and woes about the state of the world.
Yes, it’s such a small thing that I am doing, but it has helped me to feel better. And, that matters.
5- People are so kind!
I have talked about this on facebook and youtube, and people have offered to make some Comfort Bears and send them to me, but I am asking them to please make Comfort Bears for the people who come into their lives, wherever they live- whether it’s a classroom full of special needs kids, or a neighbor who is having a tough time or a stranger that is obviously in need of a little kindness, or someone is sick or scared or lonely or working really hard or studying for exams…….
The pattern for the woven Comfort Bears is in my book: Potholder Loom Weaving.
Free patterns for crocheted and knitted Comfort Bears are on this link: LINK
Please won’t you join me in making Comfort Bears?
Thanks ❤
If your weaving hook is too short to reach across your potholder loom, using a shed stick will solve that problem.

Also, you can use a shed stick when you are weaving twills, too.
Here’s the video:
The Potholder Loom Weaving book is available at all online book vendors and you can also order it from your local bookstore.
Happy Weaving!
An astute weaver caught an error in the Potholder Loom Weaving book:

I made a little video that shows exactly where to look on page 52 of the Potholder Loom Weaving book to correct the error in the chart. I apologize for the error. 😦
I am often asked how to care for woven wall hangings and tapestries.
The answer is quite simple.
I wrote and designed and wrote and designed sooooooooooooo many patterns and projects for the Potholder Loom Weaving book that the book became too big, and my editor and I had to make some hard decisions. Even so, the book is a lot thicker than the publisher had originally intended, so many thanks to Stackpole Books and especially to my wonderful editor, Candi Derr, for going to bat for the book and letting it grow bigger than it was originally intended.
We pulled this design from the book and now I am offering it to you as a gift.
If you want to make the blanket larger, use a 27 peg (Pro size) 9 inch loom instead of the Traditional 18 peg size potholder loom.
![]()
POTHOLDER LOOM GEOMETRIC BLANKET by Noreen Crone-Findlay (copyright)
The Geometric blanket is a cozy wrap to keep you warm no matter what season. The teddy bears and their friends are having a lovely picnic on the Geometric blanket. Won’t you join them?
NOTES: Feel free to change colors and yarns. The blanket in the photos was woven with a single strand of bulky yarn. If you choose to work with thinner yarns, you will need to purchase (or spin) twice as much yarn and use 2 or more strands held together as if they are a single strand.
The twill pattern is on page 59 of Potholder Loom Weaving. The brown and green butterflies in the original blanket didn’t work well, so use the twill pattern or you choice of alternates instead.
FINISHED MEASUREMENTS: 60 inches/150 cm square.
If you would like a larger blanket, then use the large size (27 pegs or nails per side) potholder loom, following the chart and weaving the same number of squares and rectangles. You will need to purchase at least 50% more yarn.
WPI of yarn: 6 wraps per inch
EQUIPMENT AND TOOLS: Potholder loom- 6 inch size (18 pegs or nails per side), Optional: Small size (9 pegs or nails per side) potholder loom; weaving hook; chopstick or knitting needle for shed stick; crochet hook; scissors; tapestry or craft needle.
YARN: Lion Brand Wool-Ease Tonal; Bulky #5 weight yarn; 80% acrylic/ 20% wool; 124 yd/ 113 m; 4 oz/113 gm; 1 strand of yarn is used as warp and weft. 3 balls of each of the following colors: #112 Raspberry; #153 Night Sky; #123 Sand; #126 Coffee; 4 balls of #194 Lime.
INSTRUCTIONS:
WEAVE:
20 squares in #194 Lime Here’s a link that will show you how to weave with yarn on the potholder loom: LINK
16 squares warped with #194 Lime and woven with #126 Coffee
16 squares in #112 Raspberry
1 square in #153 Night Sky
12 squares in #126 Coffee
36 rectangles, warped vertically over 9 pegs or nails, and woven horizontally over 18 pegs or nails in #153 Night Sky, woven using Rectangle technique on https://youtu.be/K2X4nLRBBNs
16 squares in #123 Sand
4 small squares in #194 Lime, woven using instructions for how to weave small squares (9 pegs or nails by 9 pegs or nails) on p.10 of the Potholder Loom Weaving book or instructions that came with the small size potholder loom.
PUTTING IT ALL TOGETHER:
Stitch all the squares and rectangles together, following the chart .
Start at the middle and work out.
![]()
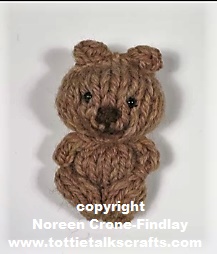
Knitting, crocheting and weaving Comfort/Compassion/Kindness/Pocket/Prayer Bears is really important to me.
I have crocheted, knitted and woven thousands of them over the last 20 or so years, and have given them all away.
I designed my first Comfort Bear in response to 9/11 in the hopes of soothing frightened, grieving hearts.
The first version was a crocheted Comfort bear, and was the front page of the Craft Yarn Council of America website for a couple of years. The link is still there: LINK
And, here’s the link to the Crocheted Comfort Bear that I tweaked slightly for my blog: LINK
A few years ago, I designed a knitted Comfort/Blessing Bear that has a ‘hugging’ single loop for the arms so it can hug you back: LINK
I’ve also designed a very simple little knitted Pocket Bear with Stitched Arms: Here’s the Link to the video:
https://tottietalkscrafts.com/2018/12/25/easy-to-knit-comfort-or-pocket-teddy-bears/
In memory of my beloved son in law, Clancy, who died of a Covid caused heart catastrophe, I designed this bear: LINK
The most recent Crocheted member of the Comfort/Kindness/Compassion/Blessing/Prayer bear family is a crocheted Panda:
Note that you don’t have to make it as a Panda…. crochet it in blue yarn to make a Blue Bear of Happiness, or in more traditional brown yarn…..

Another kind of Blessing Bear or Compassion bear is to make them for people who are grieving the death of someone they loved.
Use garments that the person used to wear and either cut the garment into fabric strips and knit, crochet or weave a Memory Bear, or unravel one of the person’s sweaters and knit, crochet or weave a Blessing/Memory Bear with that.
Here are some links for Memory Bears: LINK and LINK
I did mention that I have woven Comfort/Blessing bears didn’t I?
One of my favorite projects in my new Potholder Loom Weaving book is a Blessing Bear woven on the potholder loom:
Here it is, peeking out of a little pocket on one of the baskets that is in the book:

Here’s a link to order it online, but you can also order it from your local bookstore worldwide: LINK

For the last almost 20 years or so, I have been crocheting, knitting and weaving little bears and giving them away as my way of spreading kindness, comfort, solace and delight.
I have made thousands of them, and I have never had anyone say no when I offer them one.
And, the lovely stories that people tell me about their experiences with them are so special.
(LINK to the Craft Yarn Council of America Website for the explanation about how I was inspired by the events of 9/11 to design the first Comfort Bears and the pattern for the very first one.)
So, anyhow… back to Panda Pocket/Comfort/Blessing Bears……
Last week, I had an ‘Aha’ moment… I thought….. I should design a Blessing Bear that is a Panda!
After all…. who doesn’t love a Panda?
I set to work on it and came up with this little darling:

I’ve seen that people love the ‘hugging arms’ that allow the bear to hug them back, so I designed the arms to be all one piece. Perfect for giving hugs.

Although, the little huggetty arms can also cleverly hang onto things….
A dear friend came for tea today and fell madly in love with the Panda, and she was thrilled when I gave the prototype to her. It immediately jumped onto the clasp on her bag:

I thought that that was very clever of her!

Even though I designed the pattern to be a Panda, it doesn’t have to just be a Panda….
Crochet it in blue yarn, and it’s a Blue Bear of Happiness.
Crochet it in brown yarn, and it’s a dear little ‘Regular Sort of a Bear’.

No matter how you crochet it, please put love into every stitch.
Please DO NOT SELL THEM.
Please make tons of them and carry them in your pockets, because you’ll be amazed at how much joy you can spread by giving them away. You will bring kindness and happiness and goodness knows, we all need that.
I make Blessing Bears as often and as much as I can and give them to the ministers at our church, and they give them away as part of pastoral care. Please feel free to do the same.
I love that these bears bring a ray of sunshine. I hope that you’ll enjoy making and sharing them, too!
HERE’S THE PATTERN- IT IS MY ORIGINAL DESIGN, SO PLEASE RESPECT COPYRIGHT AND SEND PEOPLE TO MY BLOG (AND YOUTUBE FOR THE VIDEO)- PLEASE DO NOT COPY OR SHARE THE PATTERN.
Scroll down the page for the video of how to crochet the Pandas.
CROCHETED PANDA BLESSING BEAR
Designed by Noreen Crone-Findlay (c) 2019
The size of your hook and weight of your yarn will determine the gauge of the crocheting, and the finished size of your bear. When made with worsted-weight yarn, the Panda Blessing Bear is approximately 3 inches tall. When made with thicker yarn and a larger hook it will be bigger. When made with thinner yarn and a smaller hook it will be smaller. To make this bear, you will need to know how to make a chain, slip stitch and single crochet.
MATERIALS:
The bears in the photos were made with less than half an ounce of worsted-weight yarn or bulky weight yarn. Hand spun is wonderful.
Black embroidery floss for embroidering the features. 2 tiny beads for eyes- but embroider the eyes if you are going to give it to a child who is younger than 3 years old.
Crochet Hook in a size slightly smaller than you would usually use for the size of yarn to give a denser fabric
A tiny amount of stuffing
Darning needle for sewing seams
Embroidery needle for embroidering features
ABBREVIATIONS:
Ch= chain
Sc= single crochet Turn= turn the work over and start the next row in the last st of the last row
* to *= you will repeat the instructions that appear between the two”*” signs however many times stated in the pattern.
DIRECTIONS
BEGIN WITH THE FIRST LEG: With Black Yarn:
Ch 5, leaving about 4 inches of yarn at beginning of ch. This tail will be used to sew the legs up later.
Row 1: Sc in 2nd ch from hook and in each ch to end. (4 sc). Ch 1 and turn.
Row 2: 4 sc, ch l, turn. Cut yarn, and draw end through last ch l.
SECOND LEG: Repeat Rows 1 & 2 for the second leg. Tie white yarn to black yarn end, leaving a 4 inch/10 cm tail.
NOTE: If you are doing a bear in just one color, don’t cut the yarn at the end of the 2nd leg. Just continue working with it.
BODY: With White Yarn:
Row 3: Work l sc in each of the 4 sc of one leg, then work l sc in each of the 4 sc of the other leg. (8 sc). Ch l and turn.
Rows 4 & 5 & 6: 8 sc, ch l, turn.
HEAD:
Row 7: 2 sc in each sc, (16 sc ) ch l, turn.
Row 8: 16 sc, ch l, turn.
Row 9: (l sc , sk next sc) 8 times, 1 sc in last sc. (9 sc) ch l turn. Row 10: *1 sc, skip next sc* Repeat from * to * 5 times. (5 sc).
Cut yarn, leaving a tail of about 10 inches, pull yarn end through last ch l.
ARMS: Make 1: Note: The arm piece should be about 2 1/2 inches/6 cm long, so depending on your choice of yarn and hook, you may have to change the number of stitches you use to make it.
Row 1: Ch 10, slip stitch in 2nd ch from hook, and in each remaining ch. (9 slip stitches). Cut yarn, leaving a tail of about 4 inches, pull yarn end through last ch l.
FINISHING:
HEAD: Take the yarn end into the needle and then go through each of the 4 sc at the top of the head to gather the upper edge of head, then pull up tightly. Stitch to anchor.
-Sew center back seam of head.
-Stuff head.
NECK: Wrap yarn end around neck of bear 3 or 4 times, and pull up tightly.
– Stitch over the neck wraps 2 or 3 times to lock in place.
BODY: Stuff body and sew shut.
LEGS: Fold the leg edges together. With the starting yarn end, sew the leg seams. Tie the yarn ends in a tight knot and take all ends inside body.
ARMS: Take one yarn end of the arm through the shoulders of the bear. Pull up to lock the arm piece to the bear. Use the end to stitch the other end to the bear’s shoulder. Take the ends inside the bear.
Stitch the other end of the arm piece to the bear and then take the ends inside the body.
EARS: With Black yarn: Push crochet hook into a stitch in the top of the head, yo, pull up a loop onto hook. Ch 4.
-Cut yarn, pull end through last loop on hook.
-Tie a knot with first yarn end, then thread yarn end into darning needle, and hide yarn ends inside
head.
-Repeat for other ear.
FEATURES: With Black yarn:
EYE PATCHES: At the midpoint of the head, take 2 or 3 stitches that cover 2 sc for the first eye, then 2 or 3 stitches that cover 2 sc for the second eye. Note, if you are making a bear that isn’t a Panda, skip the eye patches.
NOSE: take one stitch slightly below and between the eye patches.
MOUTH: Take 2 stitches slightly below the mouth. Take the yarn end inside the Panda’s head.
EYE BEADS: Stitch one small black bead at the center of each eye patch. Start at the back of the neck- take the needle in through the body and out at the neck, then make a securing stitch then take the needle to the front of the face, stitch one bead on for the first eye, then go to the second eye and stitch another bead on. Take the needle back through the head and out at the back of the neck. Make a tiny securing stitch and then take the needle into the body and out, pull up and snip the end close to the body.
Here is a link to a bunch of posts for patterns that I have designed. Sometimes, I call them ‘Comfie Bears’, sometimes, ‘Blessing Bears’, sometimes, ‘Pocket Bears’, sometimes, ‘Prayer Bears’ or ‘Compassion Bears’. LINK
I love knitting and crocheting comfort/compassion/pocket bears.

Here’s Tottie Tomato with a batch of bears that I just knitted.
By the way, in the video, I explained a little about where ‘Tottie Tomato’ came from.
Back to Comfort or Pocket Bears…….
Over the years, I’ve made thousands of them and given them away.
Here’s my newest version… knitted, and then folded and stitched, and oh so sweet!
The pattern is: Knit 20 stitches for 22 rounds and then follow the instructions in this video:
Happy knitting! And, may the little bears bring you delight in the making, and joy in the giving!
For more patterns for Comfort bears, please click:

My friend, Teresa gave me a bag of gorgeous Alpaca fiber – bliss!
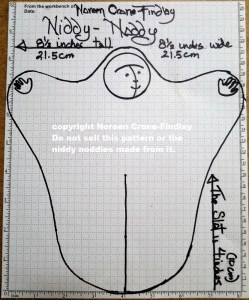
I started spinning it up, but realized that I had misplaced my Niddy Noddy.
So, I thought… I can make one from cardboard.
One thing lead to another, and I soon ended up with 2 charming little characters who do acrobatics to help me wind a skein of yarn.
They are sturdy, work perfectly and are easy to store.
A totally successful upcycle of re-using cardboard. Yay!
Here’s the pattern that I finally settled on… after a LOT of tweaking and twiddling:
Print it full page: I couldn’t get the thumbnail to open to a larger version, so I have added a larger version at the end of the post that I hope will work for you!
And here’s a video that shows how to use it, as well as the inspiration for Niddy and Noddy’s faces:
Happy Spinning, Happy Weaving, Happy Upcycling!

Noreen Crone-Findlay, designer and author