I hate wasting yarn… so I really don’t like loom waste – who wants to toss their yarn in the trash? Really 🙂
That’s why I love Claudia Chase’s ‘No Warp Ends’ technique for the Mirrix looms.
copyright Noreen Crone-Findlay
The one thing that I wasn’t keen on was using paper clips to be the holders for the yarn ends, so I thought about it and mulled it over.
Hmmmm…. I use ‘S’ hooks all the time to hang things and connect them, but I have never used them on a loom.
This called for some experimenting.
I don’t know about you…. but, I have a tendency to start with a really complicated plan, and have to do a lot of trial and errors to get to the elegant and simple final version.
I was thinking about all kinds of ways of making harnesses to hold the bars for the ‘s’ hooks…. oh my!
I also figured that I wanted to use both sides of the loom while setting up for this technique.
I had woven two affinity bracelets at the same time- one on the front of the loom, and one on the back, so this seemed to stick in my mind as ‘the way to go’.
Well… I twiddled and fiddled, and threw away the whole overly elaborate harness idea, and ended up using 4 loops of double sided velcro to hold the bars to the upper and lower edges of the loom.
That was a big breakthrough- talk about a simple way to do this! Yay!~
And, I am really pleased with the final method that I came up with- it really works for me!
copyright Noreen Crone-Findlay
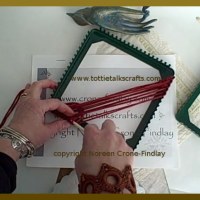
Here is the video, showing how I warp the Mirrix Lani using the ‘No Warp Ends’ technique, with ‘S’ hooks:
If you have a loom that doesn’t have a shedding device, picking up the warp strands for every row you weave can be a tedious process.
I like to use a stick, a pin and a loop of string to open the sheds. It’s a huge time saver!
I’ve made a video tutorial on how to do this for narrow bands, but this technique also works on wider pieces, too.
copyright Noreen Crone-Findlay
Pick up every other warp strand with a weaving stick (even a popsicle/craft stick or a paint stick will work).
Push that stick up to the top of the loom.
copyright Noreen Crone-Findlay
Now, use a knitting needle to pick up the ~remaining~ warp strands, to open the second shed.
You’ll be going over the strands that you went under in the first shed, and under the ‘overs’.
copyright Noreen Crone-Findlay
Take a loop of string (in this case, I used 2 string heddles from one of my inkle looms held together for more strength, and to make it easier to see in the video) through the open shed.
copyright Noreen Crone-Findlay
Pick up the end of the loop with a kilt pin, and then lift the loop strings between each warp strand onto the pin.
copyright Noreen Crone-Findlay
Take the second end of the loop up onto the pin, and close it.
Adjust the length of each section of the loop.
And, Voila! you now have a handy, dandy way of opening both sheds!
copyright Noreen Crone-Findlay
copyright Noreen Crone-Findlay
Here’s a pic of the shuttles that I make by upcycling old rulers and bits of decorative trim:
copyright Noreen Crone-Findlay
HOT TIPthat I mentioned in the video: If you use a file folder as the separator/background thingie between the front and back of your loom, you can use the pocket of the file folder to park your shuttle and beading needle when you’re not weaving.
I have just finished designing the newest crocheted healing doll- The Angel of Compassion:
copyright Noreen Crone-Findlay
Like the Angel of Healing doll, you can make them any size you want, using any combination of threads, yarns, cords, fabric strips, string, cord or whatever strands appeal to you.
copyright Noreen Crone-Findlay
The Angel of Compassion is meant to be a reminder of being kind to each other, and to ourselves- as compassion is one of life’s greatest gifts!
You can order the pattern for the Angel of Compassion from my website:
Recently, friends of ours experienced a tragic loss. At the same time, some close friends and family members have been facing some health issues.
I wanted to show my concern, my love, my empathy and my wishes for healing, so I reached for my crochet hook.
I designed a new Angel of Healing doll, and have been crocheting them up for the dear ones that I am wishing healing and wholeness.
copyright Noreen Crone-Findlay
You can order a copy of the pdf pattern from my website if you would like to make some Angels of Healing for those that you love, and also, while you are at it, do make one for yourself!
And, that is what this Crocheted Angel of Healing doll is all about. The Angel of Healing is meant to be made in a contemplative, meditative, prayerful way, so that it is filled with wishes for healing, wholeness, peace, harmony and happiness.
The crocheted Healing Angel doll can be made small enough to fit in your pocket (or the pocket of someone that you care about) to remind you (and them) that you (and they) are loved and cherished. Or, you can make it larger.
When you crochet your Healing Angel, you can express your creativity in endless ways with your choice of yarns or threads. (It’s a great stash buster, as it takes only tiny amounts of yarn, and it’s also a great way of upcycling by using tarn and other ‘alternative’ yarns).
The Healing Angels are meant to have treasures included in them, so the pattern tells you how to do that.
The wings are shaped into a sideways ‘8’, which is the symbol of infinity, because this Healing Angel is a reminder of love, which is “to infinity, and beyond….. “
Make Angels of Healing for yourself, or for the ones you love. They are a beautiful way to express the wish for healing and wholeness!
At the beginning of May, a ‘new-to-me’ loom , a large Mirrix tapestry loom, arrived in my studio. (Courtesy of my son and daughter in law who picked her up in the city 4 hours away, that used to be her home- the previous owner didn’t want to ship her).
copyright Noreen Crone-Findlay
I immediately sat down and made a whole lot of heddles for her, as she didn’t come with them.
And then, I warped her up- ooooooooohhhhhhhhhh, I love how easily she warps! Bliss!
As I was warping her up and starting to weave, I thought…. ‘Hmmmm…. there must be a group for Mirrix weavers on Ravelry’
(Ravelry= the facebook of the yarn world)
I looked, and sure enough! There is a Mirrix group…. which I joined, pronto.
And the first thing I saw was that Claudia (the inventor of the magical Mirrix looms) and Elena, her talented daughter, had posted that they were accepting applications for their annual ‘Social Networking for a Mirrix Loom’ campaign. Link
Well… I had decided within hours of starting to weave on my ‘Joni’ loom that I wanted to fill my studio with Mirrix looms.
So, I sent off an application….
Um… I wanted to fill the studio with ~Smaller~ Mirrix looms!
MEANWHILE>>>> The Joni is one big Mamma, and even though I am tall, my arms are short, so I found that I was having shoulder pain.
My clever daughter in law subtly sneaked the information out of me that I was longing for the treadle kit for the Mirrix loom. Then, she orchestrated the family buying me the treadle kit for Mother’s Day! What a sweetheart!
To say that I was thrilled was an understatement!
THEN! on the 18th of May, was just tickled pink to hear from Elena that they had picked me as one of their team for the 4 months of the ‘Social Networking’ campaign. Whee! What a couple of thrilling days!
And, now… I am starting to keep my part of the bargain, which is to chronicle my experiences with the Mirrix loom(s).
So, since I began my Mirrix adventures with making string heddles, I am going to show you my quick and easy way of making the string heddles for the Mirrix looms (or inkle or frame looms, too).
Last week, a friend asked me what I was working on these days.
In response, I rattled off a list of projects and tasks that is the length of my arm.
The next day, as I was leaving the dentist, he drove up to the stop sign, he said: ‘Oh yah, you say you’re working on all these things, but here you are, just walking down the street!’ 😀
Um… if I could master the transporter, I would! Zap! into the dentist chair! Zap! Home again! Sparkle sparkle zing. 🙂
I would like that…. 🙂
Anyhow, here are some of the things that are happening in my studio right now….
(Not ~ all ~ the things that are happening, as I can’t show projects that I am designing for magazines etc- the editors would be smacking me on the side of the head if I did….)
(and I am working on some stuff that I need to not talk about until it ripens. You know how it is.)
Okay… first things first…
We have adopted an adorable little rescue…. he’s 4 1/2 years old and is just wonderful.
(except for being a cat botherer… that is NOT good 😦 ) This is him (in his fetching blue harness) with his adopted big brother. (Our dear old chihuahua/daschund cross).
copyright Noreen Crone-Findlay
Ah, well, other than being oh so barkie about the cats, he is completely adorable. As you can see, he has settled in beautifully.
Although, every adoption takes time and patience and attention….
Alright…. a brief zip around the studio:
Okay, in the southeast corner, there’s a big project happening on my tri loom (configured to the 3 foot size).
I’ll be posting more about this as the project moves closer to the finish line:
Hearts are one of my most favorite design motifs ever.
I decided that I should design a tiny little woven heart motif as a project for the ‘Stitch Red’ heart health campaign, and also work as an embellishment on a special ‘I love you’ scarf for my daughter.
Here’s the link to the previous post about using tambour crochet to embellish the scarf: Link
The yarn used in the heart motif is from Koigu, made specially for the Stitch Red campaign. Link
Here is the pattern to make the pin board loom to weave the heart:(Note: Print it out so the pattern is 2 inches by 2 inches)
copyright Noreen Crone-Findlay
Materials and equipment: a square of foam (I upcycled some packing material) that’s about 4 inches square by an inch or so thick.
34 pins or 1 inch fine finishing nails. (You may need a nail file to file rough edges off the tops)
A 3 or 4 inch square of clear plastic from a clamshell package or other recycled thingie.
Knife to cut the foam, scissors.
2.5 mm crochet hook
small tapestry needle
Instructions
1: Copy the pattern, and trim to fit the size of piece of foam.
2: Place the piece of clear plastic over the pattern. Push the pins into the dots.
Warping: The right hand arch of the heart is held vertical and the left hand arch is horizontal.
3: Tie 2 strands of yarn together (Note, you need to be working with fine yarn, like a sock weight) and place over the pin at the point of the heart.
4: Skip 8 pins, go around the next pin and down to the lower edge, and around the pin to the left of the pin at the point.
5: Go up and down across the 5 pins at the top and their mathcing pins on the lower edge.
6: Take the yarn up to th emifpoint pin (there are 3 empty pins above it) and down.
7: Go up and down across the next 5 sets of pins. There will be 3 vertical pins/nails left empty. Make an ‘8’ around the last set of nails to bring the yarn back down to the lower set of nails.
copyright Noreen Crone-Findlay
8: Weaving
Row 1: Weave hook from right to left: Over 4/Under 4 between the 1st and 2nd pins.
Make a loop of yarn and place it on the hook, then draw it through the warp strands. Place the loop on the 2nd nail on the right hand side.
Adjust yarn.
Rows 2 & 4: Weave Under 4/Over 4 across, pick up the loop of yarn, ease through, place loop on nail/pin.
copyright Noreen Crone-Findlay
Row 3: WEave Over 4/Under 4 across, pick up loop, ease through, place on nail on right hand side of loom.
Rows 5 & 7: Weave )ver 4/Under 4/Over 4/Under 4/Over 4… make loop, ease through, place on pin on right hand side.
Note: on Row 7, the yarn passes by 5 pins before it’s woven in.
Rows 6 & 8: U4/O4/U4/O4/U4 make loop, ease through, place on pin on right hand side.
Row 9: Working with top 3 pins only: U4/O4/U 4 make loop, ease through, place on pin on right hand side. (It already has loops on it, but not to worry).
copyright Noreen Crone-Findlay
Finishing:
Wrap the yarn around the circumference of the heart 2 1/2 ties and snip.
Working in a counter clockwise direction: Thread the yarn ends into a darning needle and lift the stitches off, one by one, stitching through them.
copyright Noreen Crone-Findlay
Some nails have 2 sets of threads on them, so lift the sets of yarn off one at a time.
Stitch over the long floating threads to capture them.
Stitch twice at the tip of the heart.
Untie the beginning knot and weave in the ends.
Adjust the circumference stitching to shape the heart, and stitch through the outside edge again if desired.
Weave in ends and trim.
copyright Noreen Crone-Findlay
The hearts can be used to embellish or trim scarves, hats, mittens, gloves, cowls, hair ornaments, bags, stuffies, dolls, toys, blankets, shawls, stoles, vests, coats, wall hangings, cellphone and tablet covers. The sky’s the limit!
Here’s the video tutorial on how to weave the heart motif:
I think that people might like to have a heart loom in wood, so I asked Donna and Gary McFarland of Dewberry Ridge looms Link if they would make them, and they said yes, so if you want one, drop them a note.
PLEASE NOTE: All content of this blog, including video, audio, written and photographed is the sole work and property of Noreen Crone-Findlay, and MAY NOT be used without my permission. Thanks so much!
The bond was formed in childhood, when my beloved teddy was a panda (a pink and white one at that- you can see the very tiny homage I made to her on my website at About Us )
Panda designed by Noreen Crone-Findlay for Lion Brand yarns/Martha Stewart Loom
I hope that I will contribute to other people’s Panda love with this design for a Panda bear knitted on the Martha Stewart loom.

")
 2")
")
")
")
")
")
")
")
")
")
")
")
")
")
")
")
")
")
")
")
")
")
")
")
")
")
")
")
")
")
")
")
")
")
")
")
")
")
")
")
")
")
")
")


")