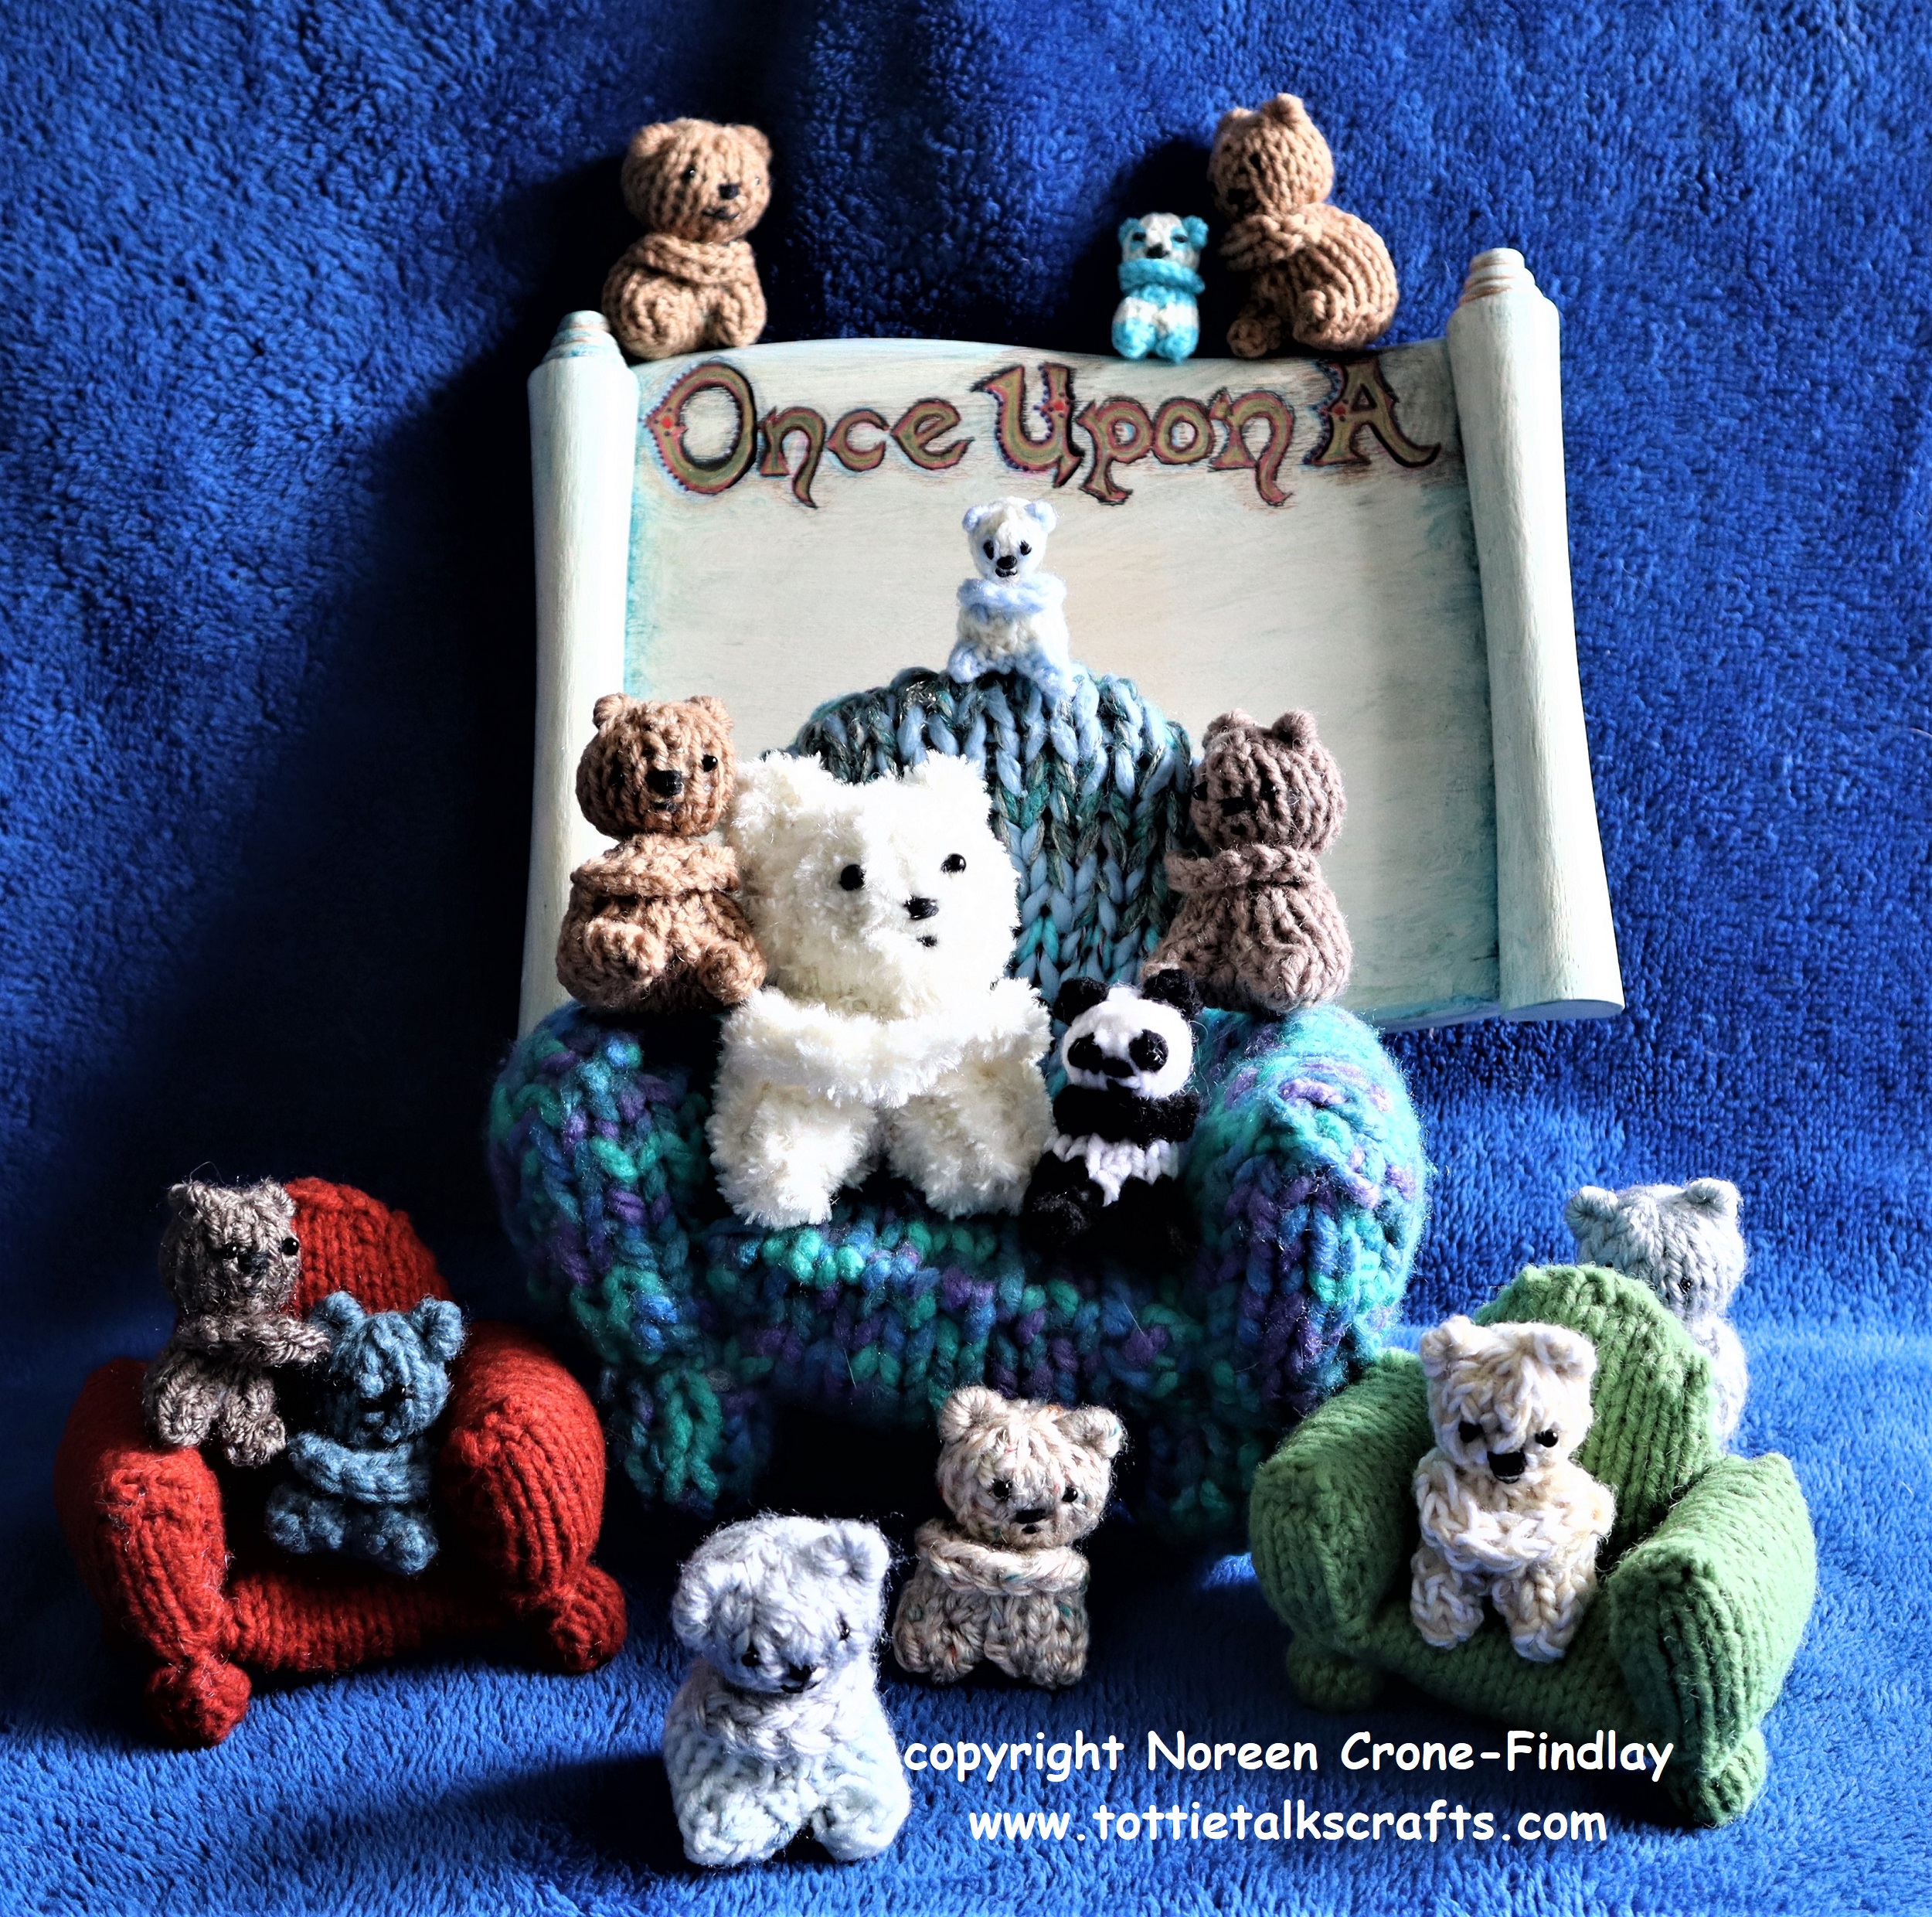
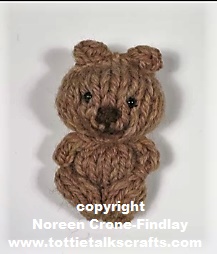
The knitted Clancy Comfort Bear is my latest design for comfort bears.
I designed it in honor of my beloved son in law who died last year.
Clancy was kindness incarnate and always kept several Comfort Bears in his pocket to offer to people who were having a difficult time. So, the Clancy Bear is a living legacy to keep his kindness unfolding in the world. With love in every stitch……
THE ‘HOW TO’ VIDEO FOR THE CLANCY COMFORT BEAR IS AT:
NOTE: The finished size of the Clancy Bear is determined by the thickness of yarn and size of knitting needles that you use.
WHAT YOU NEED:
Knitting Needles in a size that is appropriate for the thickness of your yarn,
Yarn: Less than an ounce for each Clancy Comfort Bear
A crochet hook that is appropriate for the thickness of your yarn.
Black 6/0 glass beads for eyes, Stuffing,
Black sewing thread and a needle that is small enough to sew on the beads, Tapestry or darning needle
Sewing machine thread in a color that matches your yarn (optional)
Felting needle, Tape measure, Row Counter, 4 small safety pins, Scissors or thread snip
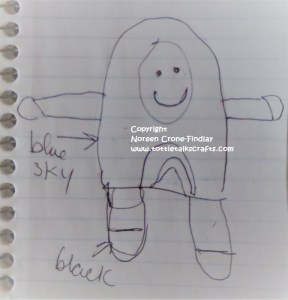
INSTRUCTIONS: Beginning at the feet:
Cast on 11 stitches.
Rows 1- 16: Work in st st (knit one row, purl the next)
Place one of the little safety pins at each end of Row 6 and then 1 more pin at each end of Row 10.
At the end of Row 16, cut the yarn, leaving a 42 inch/105 cm long tail
Thread the tail end into a darning or tapestry needle and lift all the stitches off the needle.
Pull up to gather the top of the head.
Take the needle through the stitches one more time to secure them.
HEAD:
Sew the centre front seam using the Baseball stitch to the first set of safety pins. (see video for how to).
Take a couple stitches to secure the head. Remove the 2 safety pins.
Stuff the head.
Wrap the yarn tightly around the neck 2 times then stitch over the wraps to secure them.
EARS:
Take the yarn up to the side of the head at the top of the head and stitch over the knitting needle or crochet hook twice.
Stitch over these loops several times to make the first ear.
Repeat for the 2nd ear.
Take the needle back down and out at the ‘shoulder’ to be used to make the arms.
TUMMY SEAM:
Thread another strand of yarn or the sewing machine thread into a needle and stitch the center front down to the next set of safety pins.
Stuff the body.
LEGS:
Fold the cast on edge in half to find the midpoint.
Take the needle through it and stitch it to the end of the tummy seam.
Stitch in place a couple of times to secure it.
Squeeze and fold the edges of the front to meet the cast on edge, forming the leg with the corner point becoming the toe. It’s a bit like origami.
Stitch the leg inseam together, pulling up tightly.
Stitch the second leg inseam.
Secure at the middle.
Take the needle through the body to the back, and snip.
ARMS:
Take the crochet hook through the stitch at the shoulder where the yarn came out.
Yarn over, pull up a loop through the stitch on the body.
Chain by taking the yarn over the hook and pulling it through the loop on the hook.
Do this 7 to 9 times, depending on the thickness of your yarn.
Take the crochet hook through the shoulder on the other side of the body and pull up a loop.
Thread the yarn end into the tapestry needle and stitch the loop to the body.
Take the hook through the first chain stitch at the shoulder, and make a slip stitch in it by pulling up a loop through the chain stitch.
Repeat this for all the chain stitches, ending at the first shoulder.
Stitch the end into the body and use the felting needle to secure the arms to the shoulders and to bury the yarn end.
NOSE:
Take the black thread through the head, coming out at the center of the face.
Secure it with a couple of tiny stitches.
Make several horizontal stitches for the nose.
MOUTH:
Move down and take a couple of shorter horizontal stitches for the mouth.
EYES:
Take the needle up slightly above and to one side of the nose and sew on the bead for one eye,
then the other.
Secure the stitches by going back down to the nose and taking a couple of tiny stitches at the corner of the nose, then taking the needle back through the head. Snip the ends.
PANDA:
INSTRUCTIONS: Beginning at the feet:
Cast on 11 stitches with black yarn.
Rows 1- 6: Work in st st (knit one row, purl the next)
Place one of the little safety pins at each end of Row 6
Rows 7 & 8: Join white yarn and work in st st
Rows 9 & 10: Drop white yarn and work in black yarn.
Place 1 more pin at each end of Row 10.
Cut the black yarn, leaving a tail of 42 inches/105 cm.
Rows 11- 16: Work in white yarn.
At the end of Row 16, cut the yarn, leaving a 20 inch/50 cm long tail
Thread the white yarn end into a darning or tapestry needle and lift all the stitches off the needle.
Pull up to gather the top of the head.
Take the needle through the stitches one more time to secure them.
Stitch the center front seam of the head with the white yarn.
Stuff the head and wrap and secure the neck.
Take the black tail end out through to the shoulder and leave it there for now.
Work the rest of the Panda body, legs and arms the same way as the Basic Clancy Bear.
EARS:
After working the Arms, take the black yarn up to the top of the head and make the ears.
EYE PATCHES:
Take 3 small vertical stitches for each eye patch.
NOSE:
Take 2 horizontal stitches for the nose.
MOUTH:
Take 1 smaller horizontal stitch for the mouth. Secure the yarn by stitching through to the back of the neck and stitching in place the burying the yarn in the body.
EYES:
Sew the eye beads to the center of the patches. Secure the thread ends in the eye patches.
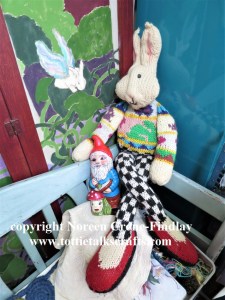
Many years ago, I bought a vintage gnome at a garage sale.
Rather liked that he had weathered off all his paint, and yet was still steadfastly all in one piece.
Last month, when I was weaving hearts for the window, I decided to add gnomes to the window, and the old fellow didn’t look cheerful enough to add to the gaity.
So I painted him:
It struck me as being odd that he didn’t have a mustache, so I added one, using my much loved old ‘Gnomes’ book as a guide.
I tried to add the Bunny to the window, but he’s too big and floppy, so he’s sitting in a corner of the studio instead.
I designed him many years ago for Canadian Living magazine.
Here’s a link to the pattern for him and his sweetheart: KNITTED BUNNIES
And, then, I took pics of some of the other things in that corner of the studio.
Including a little video:
And then I totally forgot to blog about Gnomes and Bunnies and looms.
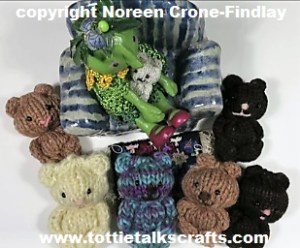
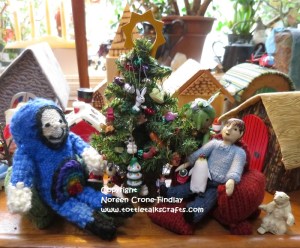
Knitting, crocheting and weaving Comfort/Compassion/Kindness/Pocket/Prayer Bears is really important to me.
I have crocheted, knitted and woven thousands of them over the last 20 or so years, and have given them all away.
I designed my first Comfort Bear in response to 9/11 in the hopes of soothing frightened, grieving hearts.
The first version was a crocheted Comfort bear, and was the front page of the Craft Yarn Council of America website for a couple of years. The link is still there: LINK
And, here’s the link to the Crocheted Comfort Bear that I tweaked slightly for my blog: LINK
A few years ago, I designed a knitted Comfort/Blessing Bear that has a ‘hugging’ single loop for the arms so it can hug you back: LINK
I’ve also designed a very simple little knitted Pocket Bear with Stitched Arms: Here’s the Link to the video:
Note that you don’t have to make it as a Panda…. crochet it in blue yarn to make a Blue Bear of Happiness, or in more traditional brown yarn…..
Another kind of Blessing Bear or Compassion bear is to make them for people who are grieving the death of someone they loved.
Use garments that the person used to wear and either cut the garment into fabric strips and knit, crochet or weave a Memory Bear, or unravel one of the person’s sweaters and knit, crochet or weave a Blessing/Memory Bear with that.
Here are some links for Memory Bears: LINK and LINK
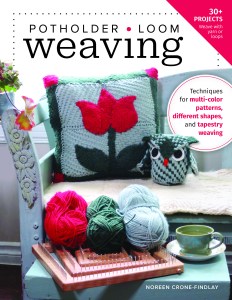
I did mention that I have woven Comfort/Blessing bears didn’t I?
One of my favorite projects in my new Potholder Loom Weaving book is a Blessing Bear woven on the potholder loom:
Here it is, peeking out of a little pocket on one of the baskets that is in the book:
Here’s a link to order it online, but you can also order it from your local bookstore worldwide: LINK
I am thrilled to bits…. a lady on Ravelry found a link to Knitting Today archives.
This means that people who are looking for patterns for Edward and Anastasia teddy bears (that I designed for Knitting Today) can now get the patterns online.
Yay!
I can’t send them out because the publisher owns the copyright.
I did a LOT of designing for Knitting Today, so there are lotsa other patterns in there from me, too.
Recently, I made a video about cutting up garments to upcycle them by weaving or knitting with the fabric strips.
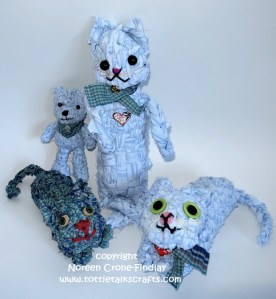
In early October of 2017, my son in law’s step-dad passed away.
This was, of course, very hard on our grandson.
I talked with him about what it meant to him to have his ‘other’ grampa (not my husband) pass away.
I asked him if he needed something of his grampa’s to hold onto, and he said yes.
So, I asked for a couple of Bill’s shirts so I could make comfort critters with them.
I cut them up and wove them into kittys, as that was what my grandson asked for, so he has one, and other family members have them too. (I didn’t photograph all of them).
I also knitted a teddy bear for one of our relatives, as he is definitely a teddy bear guy 🙂
The bear and kittys have been well received and they do carry the love that went into every stitch of making them.
I’ve done this before, and have found that ‘compassion critters’ made from upcycled clothing of a dear one is very comforting for people in grief.
Every little thing helps….
Here’s the video:
The woven kitties and knitted bear are made from the following patterns:
For many months, I have been working really hard on new mixed media fiber art sculptures.
The 6th Sense is intuition/inspiration/imagination.
These one of a kind art dolls are based on dreams, memories, meditations and contemplations and are an invitation to embrace creativity, healing and wholeness.
They are a combination of tapestry weaving, narrow band weaving, lucet cords, tatting, knitting, wood work wire work and leather work.
Here’s a slide show video of my 6th Sense One of a Kind Art dolls.
Most of the 6th Sense One of a Kind Art Dolls in the video are for sale, but some of them have already sold and gone to live in their new homes.
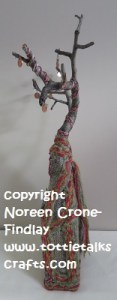
Last month, when there was a spectacular Super Moon, we stepped outside to admire it.
The gigantic moon looked like it was suspended in the huge trees that line our street.
The image of the Great Tree Mother, rocking the Moon in her arms, rose up in my mind….
and I knew that I had to build one of my 6th Sense one of a kind art dolls.
Here she is:
Great Tree Mother Rocked The Moon in Her Arms:
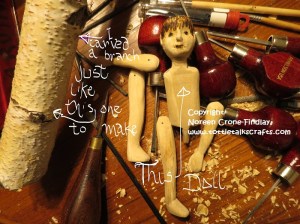
While I was contemplating how to build the Great Tree Mother piece, my husband and our daughter took the dogs for a walk one morning.
Chloe came home with a wonderfully gnarly branch that had been pruned from someone’s tree and tossed into the alley.
She just knew I needed it…. even though, at that point, I hadn’t told her what I was mulling about 🙂
We have a very deep connection!
It is perfect.
So’s our daughter….
Anyhow…
The faces….
Years ago, my dear friend found a moose antler that had been shed and she asked me if I could use it.
I cut 3 faces from it, and carved them and painted them.
Two of them became part of this piece:
Tree Mother’s face.
She also has a ‘Hidden Face’ that is hidden inside the piece and will never be revealed.
Too bad I didn’t photograph it! Oops…
Here is Moon’s face:
I carved the hand from wood.
I wove the bands on 2 different looms and knitted the grey hand spun cloth of her robe.
All of the 6th Sense Woven Women have 6 pennies incorporated into them, as a metaphor for coming to our senses, and embracing intuition, intelligence and inspiration.
She is 29 inches/72.5 cm tall and the branch spreads out to 15 inches/37.5 cm wide.
She is not for sale.
By the way, she is also a celebration of creative adaptive re-use and upcycling. I love that.